Wednesday, 21 January 2015

Waffle Dropje vest

After making this vest, this company is my new current favourite.  I spent a lot of time thinking about the Dropje.  Carrie's double-sided version seemed very shapeless, and I suspected I wanted something more fitted.  I had some (highly unrealistic) ideas about skiing around in this vest on well-groomed ski slopes, but we have had almost no snow this year, *and* I never "ski around," I whimper and cry and then do everything possible to avoid actually facing downward on a ski slope, so I'm not completely sure what I'll wear it for. 

I asked my friend R if she would volunteer as a muslin-recipient.  The fabric is a scrap from my Georgia dress last year, and I searched high and low for bright pink fleece, but didn't find any.  The lining is the fuzzy inside of sweatshirting that I got in Chur.  I made a size 34, as R is small.  I didn't make any changes to the pattern.  After what felt like a lot of thinking about the pattern, construction was amazing.  The instructions are fun and straightforward and they made a beautiful finish possible.  I enjoyed the construction a lot, and it made me want to try other Waffle patterns (I have the Caramel but am daunted by the long instructions and by making more welt pockets.)

In order to make the lining, I copied all body pieces and only the armhole facings.  I attached the hoods right sides together, after sewing both jacket and lining according to the directions (no pockets in the lining!) Then I sandwiched the zipper between the layers to get a clean zip finish.  I suspect that I could have then sewn the armholes together...but instead I basted them and used the armhole facing.  Finally I folded the hem over the lining and sewed (mostly) in the ditch for a clean finish.  I got excited near the end (cause I wanted to mail it to R!) and my sewing in the ditch was all over the place. 


Interestingly enough, it fits me ok.  I would have made a size 38 going by the chart.  I will shorten it by 1" for me, but I'm debating whether to make the same size, or a 36 for some extra room.  I tried it on with a sweatshirt underneath and it was still fine.  However, I want to make a quilted version.  The fabric I'm planning to use is flannel and wool tweed, which don't have the stretch of the cotton.  I have read that quilting shrinks fabric, so to avoid that I thought I would quilt before cutting out the pattern pieces.  Originally I was going to quilt the lining and the exterior together, but the lining on R's jacket is sooo nice as it is, and that clean finish is great.  It makes me consider just quilting one layer - but the outside, or the inside? 

Republique du Chiffon Lucie

One day last week I suddenly got tired of waiting to make this dress.  I put together the pdf, traced, cut and finished it in about 2 days while also being on hospital call.

I bought it last summer when it came out, which means I have the pattern in French.  Also, no seam allowances.  I was so very excited to make it!!  But ugh, so many things to make me pause - the pdf cutting and pasting, the french, the seam allowances.  So although I really wanted to make one exactly like the model in the black Atelier Brunette fabric, it didn't happen.

Now that I'm on the other side of the Black Hole of Moving, the fabric choice is a very rough rayon from Anna ka Bazaar - disappointing, as I wanted to use it for some Tania Culottes and it has a terrible drape and a rough weave.  It feels like linen.  That's why the fabric was set aside until a different project came along.  The lining is cotton on the top and silk on the bottom, just because I had a piece of white silk in exactly the right dimensions.


My hesitations about this dress were all about the gathered waist.  I generally avoid gathering.  I find it irritating and frumpy looking in sleeve heads and I have a psychological block about it everywhere else.  With exception when it's in very small amounts, like in the Anouk (which is even borderline.)  Also, it seems like a gathered waist is difficult to finish nicely.

I cut a size 34 after measuring the pattern pieces and myself a few times.  I would be a 38 according to the measurements but the final dress measurements of a 34 still gave me some room in the bust, and I wanted it to be a bit less loose and hanging than on the model.  I am 165 cm so I didn't lengthen or shorten it at all.

The technique for putting the top together is the same as the Datura blouse - namely that you sew the neck and armholes of the lining and the fabric together for the front and for the back, and then you place the back inside the front with one of them right side out, and you sew together the little tube of the shoulder.  I find this method completely absurd and crappy.  There's no way I can sew a perfect 2" tube.  I end up with lumpy and uneven shoulder seams and that made me think this dress was a mess early on.  Because of that I didn't do the extra work of sewing the lining and the dress skirts separately.  I think the pattern has you sew them together, but if you sew them separately then you have a clean finish on the inside.  Because I was suspicious about this Lucie, I didn't want to do the extra work of gathering twice.  I basted the bodice and bodice lining together, and then I gathered the front and the back of the skirt separately and sewed them to the bodice one half at a time.

I thought the dress looked totally stupid when I tried it on, but after a solid pressing of all those gathers and finishing the hem it seems to look better.  I'm still on the fence.  I can't see the shoulder seams anymore so they don't bug me like they originally did, but I would LOVE another method for sewing a clean finish on a lined tank top.  (BTW I think this would make a nice tank top too...with a french dart for some shape.) When I wear it I like the feel of it.  Nothing like some silk lining to make anything have a nice swish.  But I still feel like it's very unflattering. 

Monday, 19 January 2015

Papercut Saiph, take 2

When this pattern came out I snapped it up.  It was right when I was getting confident with modifying patterns and identifying my own taste.  I made it in silk charmeuse with the fluttery skirt, using an XXS based on other reviewers size assessment.  I skipped all the facings, and learnt that it's not wise to try just folding silk armholes to finish them.  That was one of my first truly successful patterns - I wore it a lot for the last two summers.

So, back to this pattern.  I felt like it deserved a try as written.  However, let's review why I had made all those changes above...
-I hate facings.
-The waist seam is exactly on the widest part of my hips, aka very unflattering
-I own NO woven dresses with long sleeves, because they don't fit my shoulders or upper arms at all.


I'm staring here at the problem I always have with woven sleeves- this tightness right at the front bottom of the armhole.  It pulls a lot.


What could one expect, then?  No surprises here, this dress is a fail.  My camera decided to wash out my pictures and make me gain some long legs, but that's only because the skirt is about 4 inches long.  It doesn't look good in reality.  And I think I was supposed to move those darts somewhere. Also, I found the instructions for the pockets to be confusing.  You sew the pockets on to the skirt front, then fold them but how much are you supposed to fold up?  Are you supposed to sew the pocket top into the seam allowance? Something was off, and the result is that they gape open and have messy corners.

Friday, 16 January 2015

Stylearc Sharon Sweat Top

This was a freebie pattern that came when I ordered my Lorie jacket.  It was well timed, because I had been eyeing Stylearc zip-front knit jackets for awhile.

The fabric is merino sweatshirt fabric - I haven't seen anything like it very often.  It's like cotton sweatshirting with the fleecy inside and flat outside, except it's merino!  I got it at The Fabric Store, which I visited in LA.  It was a labor of love because I was in the States to deal with the Black Hole of my luggage and this was bulky stuff to lug back to Europe.  So I was totally fantasising all the way home about this jacket.

It came together slowly partly because I really wanted to do a good job, but also because I was dogged by lack of equipment.  It took awhile to get the main zip and bindings, and I hadn't brought a fabric swatch with me.  Then I had to get the pocket zips...then I ran out of thread...the instructions were crap, as expected, but unexpected too: the instructions refer you to an "in-seam zipper tutorial" which I could not find on the Stylearc website.  I browsed various other sites but couldn't get a straightforward demonstration of putting an inseam zipper into a knit pocket.  I figured it out but I didn't put any interfacing in, which I later regretted.


My friend Joana did the photoshoot in Bern (Urban chic?)  It gives a better sense of the colour, I think, as my camera was doing funny things at home that day.


I got a size 8 as before in Stylearc.  I measured the back length and the shoulder breadth (it's about 14.5") and shortened the sweatshirt by about 2", trying to do it at the same height on the princess seamed side pieces.  The breadth seemed the same as a sweatshirt I have, so I didn't widen it.  Because I hadn't brought a swatch with me, I got heather grey bindings.  I was working on the blue Undercover Sweatshirt at the same time and suddenly decided this would look nicer with self bindings, so I used the Undercover Hood sleeve binding (but the Stylearc pattern's bindings for the bottom and neck.)  I have only recently realised how much stretchier ribbing is, and that might have been nice to have, but I do like everything being the same colour.

Final thoughts:
-zips in the pockets are not beneficial and just weigh the jacket down.  This is partly because I have all riri zips (it's hard to find anything else!) and they are heavy metal.  Plastic zips might be less bothersome. 
-topstitching makes everything look much more professional and it holds the seams down on the inside.
-why is there a facing?  I didn't use it.
-...but if you don't use a facing, how do you finish the inside zipper edge neatly?  (I used two layers of topstitching and zigzagged.)

Despite shortening this sweatshirt, and it does fit fine, and I love it about 92% as much as I hoped, it is still very shapeless.  I know two projects is early to make global judgments, but so far Stylearc seems to be Queen of Shapeless.  I am about to order three more Stylearc patterns...we shall see how they go. 

Tuesday, 6 January 2015

Papercut Undercover not-a-Hoody

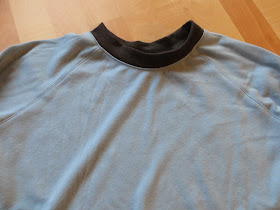
This is another basic project.  I learned some neat things though - this was a hoodless version of the Papercut Undercover Hood. It's an XS with no modifications.  I forgot to pinch 1" out of the center front as I had done on the hood versions, and that makes it more baggy and a bit more batwing.  Luckily it's a lounging sweatshirt for a friend and she is curvier than I am so I think it will still work just fine.


My main experiment was with bindings.  I didn't realise until I made this sweatshirt how much stretchier and softer ribbing is compared to using self bindings.  Because I have made this sweatshirt a lot and always done self cuffs, I never had an equal comparison.  The ribbing is honestly so much softer and stretchier, and will make me reconsider using self binding on future projects.  However, I wasn't prepared for that and so I think I could have cut the neck binding a lot shorter.  I cut it about 3" shorter than the neck hole.  I used the pattern piece for the bottom binding and just cut it a bit shorter as well, and I used the pattern piece from the Style Arc Sharon sweatshirt because I was planning to use these cuffs on that sweatshirt and had already cut them out, so this is a shorter arm cuff than the pattern usually has.

I noticed while doing the Style Arc Sharon (blog post soon but it deserves nicer photos so I'm waiting for a camera operator...) how much topstitching added to the appearance of a sweatshirt, so I did lots of topstitching here to make it look nicer.  Added benefit - it holds the seam allowance down on the inside.  I'm still sewing everything with my cheap Singer, which means I straight stitch and then zig zag the seam allowance.  

I wouldn't consider this the perfect raglan sweatshirt quite yet but I will likely tweak a few more versions when tempting knits fall into my hands.  (Ginger has made a nice one.)

Monday, 5 January 2015

Simplicity 7715 Rainjacket (and a bonus Grainline Scout!)


This is one of those creative projects that was so wrong in loads of educational ways...I had the idea of a little hooded rainjacket.  I found this pattern based on my idea (there is this one review of it.)  I knew I would shorten the hem and raise the pockets, but I planned to basically follow the pattern other than that.  However because it's quite loose, I figured I should muslin it, and I did, using a bedsheet.  That wasn't helpful at all.  The real question was whether to line it, and how it would look in coated fabric, and a bedsheet couldn't approximate that. 

I got the idea to make it for a friend as a muslin.  She's smaller than me by about one size, and said she could find a use for a baggy rainjacket.  I got pink Gore-tex-like fabric and wasn't sure what to use as the lining (it ended up being part of another bedsheet.)  When I was browsing blogs ages ago, I came across a post discussing the different types of Gore-tex-like fabric.  I can't find the original post, but the gist was that there is 2-layer and 3-layer.  Two-layer is a layer of nylon on the outside, and a Teflon inner side, which is white and gummy.  Three layer does not have that gummy feel, because the inside has also been treated (or there is a membrane sandwiched between two layers of nylon.)  The 2-layeris what I had, and was reported as being notoriously difficult to work with, because the Teflon sticks to everything and since it is rubber, it also stretches and will lose its shape.  Therefore I can admit I was warned.  


The things that were bad:

1. 70% fail: the fabric.  Sewing coated nylon when it was the pink side (not the Teflon side) up, and when it was against the lining, was not terrible.  Sewing two layers of coated nylon together was terrible.  I made no attempt to avoid all that shirring, because I didn't have the equipment for it, I had no teflon or walking foot.  I found that masking tape didn't help. I occasionally put pins in the seam allowance, which is also a pain because the fabric is rubbery and doesn't accept pins very willingly.

2. 30% fail: the pattern.  It's not a bad pattern, but it's a very oversized, kind of shapeless hooded jacket.  I probably needed to actually shrink the pattern about 6 sizes before it would have matched my hopes.  The finishing touches, which are always the most difficult for me, were done freehand and are particularly bad -- how do you attach the bottom of a separating zip, when the little lower panel of the zip is hard plastic?  My sewing machine needle won't go through it.

The only reason I continued:
I thought despite everything, my friend might still find it hilarious enough to wear.  For a little while, anyway.  The finishing is not very good, especially along the zipper bottom, and so I'm not sure whether the zip will pull loose.  

I lined the body but not the sleeves of the jacket, and folded elastic into the cuffs and hem - I just folded it over and sewed it down.  It's not a very neat job.  The pockets are lined with geometric rayon geometric scraps, which made them easier to sew down to the front of the jacket.  I was considering putting a string into the hood, but I left it out because the hood doesn't seem that deep (I am not sure it's very functional) and my string was too short...

Here, also for my friend, is a bonus Scout.  It's such a relief to make a really simple, easy project!  This is a size 0, and I used store-bought bias binding and french seams.  The only seam I left open is the sleeve attachment, although there is a Grainline tutorial that says you can french seam the armhole the same as the body.  The quilting cotton was easy to work with so I practiced my iron skills by actually using the steam - generally it scares me and I avoid it.