Friday, 31 March 2017

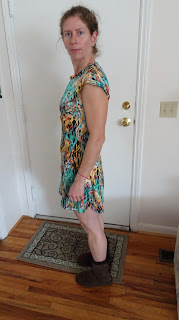
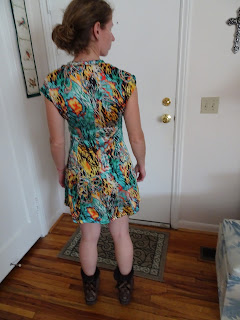
stretch silk Sewaholic Davie

I planned, long ago, to make Davie out of a different fabric.
Plus I swear I had already written this blog post.  Or not?  I'm having deja vu as I write it, feels like again. 

I decided at some point that the initial fabric, which was a beautiful lilac merino, was too heavy and didn't have enough stretch so I changed my mind about using it.  I think also I didn't quite have enough fabric for the flare of the skirt.  This fabric is stretch silk from Ukraine.  I bathed it in gelatin thinking that would be a good idea.  And I decided I would make this for my cousin as the bright colours (as much as I love them) would suit her better than me.  Plus she lost a silk dress recently so it seemed apropos.  Luckily she is the same size as I am.

I cut a size 4 at the top tapering down to a 0 around the hips.  I just softened the hip line, and I did so only on the curved pieces, not on the straight ones.  I found as I was pulling the princess seams together that there was so little stretch and I blamed it on the silk, so I washed it to get the gelatin out but it didn't help.  So some seams were quite challenging.  I did keep the keyhole, although I debated leaving it out.

I made a standard jersey binding for the neck, but I folded over the arms to hem them.  This turned out pretty messy.  The hem is also my standard job and is a total mess, but the high low hem is in so I'm not too fussy.

End thoughts: stretch silk is too floppy for this pattern.  Because of the skirt flare, it needs a knit with some body.  As many have said it's quite large for its size too, and the top half is almost a bit too big.  It's not a very neat effort but it is wearable and the pattern distracts from a lot.

I'm not sure how much I referred to the instructions but I think they were ok.  This dress kind of represents the end of Sewaholic to me - right before Tasia left, when the amazingness of the early projects - the Lonsdale, Minoru, Cambie - just couldn't be reproduced. 

Sadly my father, who took these photos in the midst of packing hell, and who has been totally competent at taking vacation holiday photos good enough to frame and put on the wall, can't take focused pictures of me in a dress.  Sorry.  Maybe my cousin will provide.


Wednesday, 22 March 2017

Megan Nielsen minimalist aboriginal Karri

So this is basically as minimalist as a dress can get but despite that it was a huge struggle to get it even close to done while moving.  It's really hard to focus on sewing when life is crazy.  Not to mention packing.  I'm so over packing. 

This Karri is again an XS and again has stretchy side panels. This time I went to the Goodwill on a hunt for three big tshirts in mostly the same colour family. I really wanted marled seafoam green but I couldn't match the color very well (can't imagine why not), so blue it is.


This Karri, being minimalist has:
-no sleeves
-no lining
-no back zip
-no pockets

In order to bind the neckline, I french seamed the bodice front and back and then bound the neckline with bias tape.  Because of that I did not cut the back bodice on the fold.  I did first consolidate the front pieces so I could cut the front on the fold though.  Any seams with all wovens were done with french seams and anything else was zigzagged to finish.

Not adding the zip was a tactical decision, based on the presumed stretchiness of tshirts when there are no sleeves.

I really was going to add the pockets but they added some additional stress because I need to actually follow instructions to get pockets on, so at the last minute I prioritised actually getting the entire dress put together, and skipped them.

The final order - which has something to do with the direction of max stretch - is to sew the front bodice and the front skirt together, ditto back bodice and back skirt, making the final seam be the vertical seam down the sides.  I think if the waist seam is the final seam, it is tight (when you are using a sewing machine), and so this method leaves the waistband stretchier.


I finished it (mostly) a few hours before leaving for the airport.  My luggage is a catastrophe and I unpacked in New Zealand to discover I have no pants but some luggage is being shipped so I guess I'll survive for now.  It means this dress didn't come with me, but I grabbed a few snaps before packing it away.  The sleeveholes are not bound and it's not hemmed.  I think I'll hem it quite a bit shorter - maybe 10 cm.  I'm planning to use some strips of tshirts to bind the sleeveholes, either leaving it as a binding or folding it inside.

Update: used bias tape on sleeves and hemmed the bottom:


Overall I am actually surprised because I thought I would love this version absolutely the most of anything ever.  I like it and I can get into it easily without the zip, but I miss the lining.  Without a lining it clings a bit too much and I think it's less flattering.  A part of this is that the tshirts are pretty thin and so they don't have much body and they show details - a thicker stretchy fabric would definitely be more flattering.  However, I wear sleeveless dresses a lot because I like to layer, so once I'm reunited with it and finish up those details I won't hesitate to wear it lots.


Friday, 17 March 2017

Not so boring grey Watson bra

This grey stuff is from a Merckwaerdigh kit, which I bought on Etsy.  It came with lace which I used on the Madalynne bralette.  I thought I should give the Watson another try since my first try was pretty good (see here) but I didn't like the long line bra at all.

This time I learnt from my recent Marlborough experience and cut out the B cup instead of C.  Still with a 32 band.

I double layered everything, therefore avoiding any elastic on the center of the cups, but I used powermesh on the band, and so I didn't figure out how to get a clean finish when attaching the cups to the band.


It was pretty easy and I didn't do anything else surprising.  It fits pretty well although the band looks like it's wrinkled, it seems to sit just fine. However, the support that the center elastic usually gives would be nice to have.  Next time I will probably go ahead and use elastic there but make sure it's a very low profile elastic - I hated all the frilly bits sticking out on my first Watson attempt.  Of course it's not the kind of bra that lifts and centers, but it's good for very low impact sports.  The band is actually a bit loose and I'll eventually get around to fixing that.

Thursday, 16 March 2017

Colette Rooibos dress in aboriginal kangaroos

Colette patterns and I almost never get along at first sight.  I look at the twee pattern envelopes and I just see too many ruffles, too many ridiculous details, and I don't look further.  Only later after I see the versions people have made do I realise that something streamlined can be achieved with a bit of tinkering.

This pattern went like that.  I was buying something else online anyway and I suddenly realised that ridiculous fold over collar could be just hacked off.  Plus what nice design lines!  And pockets!  I dove in.

First the good: This is an easy make.  I went from a size 2 at the top to 4 at the waist (unnecessary actually, as it seems to have a lot of ease. I could have made a 2 all the way.)  The pockets are cute and although I think the grey waist panel kind of interrupts the dress, there are lots of nice options for mixing and matching.

The bad: Ridiculous facings. WTF?  It would be totally JUST AS EASY to fully line the bodice, including the waist panel.  The insides are terrible.  The instructions don't even suggest ways to finish the dress, which, well, I can figure it out if I want to but when I was a beginner, I couldn't.  That makes me think this is not really a beginner friendly pattern despite being quite simple.  I'm contrasting this to the True Bias Sutton which I've just made, where the instructions force you to make a beautiful finish.


Also I see Colette has a weird fondness for these humped waist panels that cup the breasts.  See the Chantilly pattern...
I think it's kind of stupid looking at the intersection of the bodice and the waist panel, or at least badly aligned.  The upper bodice seems too short, and the waist panel is quite loose AND is not really below my breasts.  The result is to both make my chest look smaller and my waist look bigger.  It would be better suited to someone with bigger boobs so that the actual difference between the chest and the empire waist is more obvious.  Colette does draft for a C cup and I've noticed on other patterns that the boobs are usually too big on me.

I am happy enough with this as a muslin but I would make some changes if I seriously planned to repeat it: straight size 2.  Lined bodice and lined waist, or even a full lining.  I do quite like the neckline without the foldover collar, but I would have to lower that front waist piece somehow.  I don't see myself repeating this any time soon.


Wednesday, 15 March 2017

Atelier Vicolo no. 6 All Together pattern

This exciting pattern popped up on my radar sometime early this year.  I thought it might be just the right amount of gathering.  Plus a free dress pattern! Plus by an Italian sewist!  How exciting.

The pattern is here. 
There is a video tutorial but no instructions.
There are seam allowances included, thank god.  Things never go well for me when there are not seam allowances already included.

I cut an Italian size 40, which is about usual for me.
My exciting quilting cotton is an aboriginal print! I got it at the quilting shop in Sedona after seeing online that they stock it.  I have a few more which you will be seeing soon.  The ladies were a bit befuddled by an excited garment sewist in their quilting shop but they were very gracious as I pulled out every single bolt and strew them across the floor of the shop to help make my decision.

The only mess I made was that I decided not to add sleeves, since cap sleeves have a 2% chance of not looking ridiculous on me and I didn't want to mess this one up.  But I didn't really plan ahead with that and I sewed the neck and the sides of the straps with the lining before thinking about how I needed to burrito in order to get a good clean finish.  So I had to use the terrible Vogue method of sticking one strap back through it's front and sewing that tiny tube together.  This method is bad because it's hard to get a good finish on it, but I guess overall it's as effective as the burrito method.  I did some understitching on the neck but not on the sleeves (laziness, and so awkward).

My zip went in ok more or less.  I'm using a borrowed Janome now (hence no more complaints about the borrowed Singer) and I noticed something: the invizible zip foot on the Janome doesn't have a centered needle.  So on the right side of the zip, it eats the invisible zip into the stitches, and on the left side, it's not actually invisible.  In fact, my Janome in New Zealand did the same thing.  Food for thought.


The lining is just for the bodice, and I thought about how to tack it down.  The only place it can be attached at the waist is at the gathered patches, so I pinned it down to figure out whether I could stitch in the ditch, but I haven't done it yet.  It would be tricky to make an entire lining for this dress without copying a bunch of pattern pieces to get rid of the gathers, although certainly possible.

Anyway I like my dress!  It's sort of a muslin as I didn't finish the seams of the skirt, but I'm moving really soon so it's part of my crazy rush to get things done.  I think the aboriginal design is a bit too busy on this - I would use a solid color on the side panels next time and leave the center to be the wild part.

Friday, 3 March 2017

True Bias Sutton tee in Versace

I have been looking for something to do with this fabric, a white rayon (?) with silver strands woven in, by Versace, for a long time. It's a lot shinier than I usually go for...it's from Casa dei Tessuti in Firenze and after browsing everything they had, it was one of the few things that seemed both fun and wasn't too expensive.

Initially I thought it had some stretch and wanted to make a Mission tank, but it really doesn't.  So finally I realised it's light and drapey enough to match the Sutton pattern - another thing I've had kicking around for about 2 years!

I cut a size 2, sizing down as my measurements would put me at a 4. This type of top is not something I like too baggy.


The Sutton pattern was a joy - with instructions that surprised me but produced an excellent result. I am really pleased with the clean finish.  The french seams sometimes seemed silly on this fabric, which looked very unlikely to unravel, but you can't go wrong with french seams so I carried on.  The pattern has you first finish the side seams and then sew them together as a prep for the side vent, and this is yet another spot where I wished for a serger.  That's basically my mantra lately.  I want a serger!!

I like the result more than I expected (I find the fabric kind of too outrageous.  I think.) It's quite scratchy but I like the fit, although I might shorten the body of a next version by just one inch.  This fabric had a little too much body and so it sticks out over the shoulders, but not too dramatically.   There will be more versions of this top!