Tuesday, 30 October 2018

Patterns for Pirates linen loungers in silk wool houndstooth

I made a bunch of major changes from version 1 (here) to this version.


I went from S to XXS.  I lengthened the legs by 2 inches, and I used the yoga waistband.  I also switched up the pocket options.


This pattern went pretty smoothly the second time around. The fabric is a silk-wool blend which tends to be slippery and shreds.  I went for as many french seams as possible though I did not enclose the waistband.  I realised my mistake and went back over it with FOE (not sure this was the best option.)  It looks a bit ridiculous inside but holds everything in.


I still used the shaped hem, I had to cut the straight edges off it since my lengthened leg pieces continued to narrow, but they still matched up at the important curved bits.  

I could definitely have gone with the XS instead of exaggerating!  These are a snug fit.  The pockets are useless because my thighs need that space.  And this drapey light fabric also creates really a different kind of fit.  Once I made these the weather changed and I didn't get a chance to wear them.  They were sitting around waiting for me to take photos and decide what to do next, when my housemate saw them and fell in love.  She is slimmer than I am and they look great on her - the slightly shiny fabric suits her aesthetic perfectly so I donated them right away and I think she has been wearing them for 2 days straight : )  I'm pretty happy with that result.  If I can get her to take pictures I'll add them!

Next time I will go with the XS.  I could imagine playing with the yoga waistband again, but I would wait until I could serge it (no overlocker was available when I made these.)  For now as the weather cools I have no intention of making more shorts. 

Friday, 26 October 2018

Halfmoon Atelier Anegada

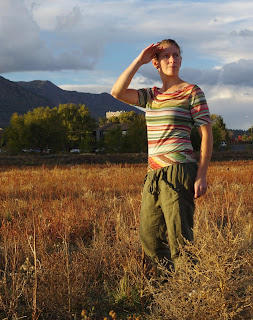
I've had this pattern for awhile -it's one that I didn't get to test because I was living in Nepal at the time - once I got it I had to wait for just the right fabric.  Which came while I was in Switzerland recently!  I picked up this very stretchy, sparkly rainbow from the sale bin, and definitely didn't have enough to make the cardigan I was envisioning.  As I was tetris-ing pattern pieces I realised the drape would make this a perfect Anegada, and the stripes meant I could get some fantastic diagonal bindings.

I do recommend, no matter how much you think you know everything about making tshirts...to not only read the instructions but to understand them.  Oops.  I read through what to do on the front neckline tucks, but didn't understand at all.  I made some halfhearted pintucks, the sewing machine gobbled up all the fabric, and in the end I ripped everything out except two tucks on the sides that I couldn't undo without damaging my light fabric.  The binding is long enough that the excess didn't even gather and I would just skip doing those tucks in the future.

It felt weird to be cutting huge bindings on the bias!  But so worth it.  The rest of this top went together without a hitch on my amazing new overlocker and I wore it the next day (and many since.)


Size: 3, consistent with everything for me by Halfmoon Atelier.
Sleeves: I removed 1" before adding the binding, because they were too long otherwise
Length: I removed just under 2" at the lengthen lines: the amount from the line itself to the edge of that piece of paper on the pdf pattern.  If I wanted this to hang at my waist without pooling I could remove another 2 inches!  

I recommend drapey fabrics to get the best out of this pattern.  Because I didn't tuck, my front probably drapes a bit more than it's supposed to.  I really like using stripes on the bias!  I think it gives the pattern something really unique.  Also I was pleased to see it goes well with these shapeless green pants of mine - I don't really like tucking things in and was struggling to find good matches with them.


I rushed out of my house to get sunset photos on the mesa with huge thunderclouds in the background!  It was a weird spot to take pictures and I'm really looking forward to owning my first tripod instead of making rock structures to put my camera on.


Thursday, 25 October 2018

Grainline Portside Dopp kit and toiletry bag: Review

I didn't make the actual Portside bag.  That is for another time. It gets really good reviews.
I know that Carolyn made a huge number of these dopp kits, but mostly that side of the pattern goes under the radar - and the small bag is apparently just an afterthought.  I mean, you wouldn't buy the pattern for it.

More on that: this small bag is literally three pieces of fabric, a zip and two instructions.  After you have gone to the trouble to line the duffel and the kit bag, you are just making a little fabric sack?  It seems like the level of attention in this pattern was focused on the big target item - the duffel.  And each step down from there had a decrease in quality pattern instructions, and in results.

I was extremely disappointed by the Dopp kit pattern.  I was hoping to make something I could take with me travelling as my toiletry bag has basically disintegrated.  I had this ridiculous pineapple fabric and a shower curtain to use as lining.  The pieces make sense, but the instructions basically have you finish all the seams on the inside of the bag, despite the fact that it's in two layers.  So I rethought it and with my recent Ida Clutch experience, attached the zipper first, made each layer, and then painstakingly sewed the sides up to the zipper through a hole in the lining.  Then I turned it right side out and closed the hole.


Also - there's no lining for that outside pocket, which I also really didn't like.  

I used a zipper that is a little bit too weak.  But mainly I thought this bag was huge, way too big for my needs, and I was too busy being pissed off at it to want to use it.  I gave it to my sewing friend's daughter who is apparently really pleased.  (She's 6).

So I decided to salvage things with the small bag.  I cut out everything in my original plus lining fabric and basically followed the same method, of attaching everything to the zip, then I created tubes of each fabric and sewed up the sides one quadrant at a time through a little hole that I left.  I paid attention not to leave any gaps in the lining so no piece of jewelry (etc) could slip through.  I added a little grab strap on one end.  I also used an invisible zip here and that's the weak point in my system.   This fit all my toiletries, though it's not really a great shape, it worked for the trip to Nepal and I can store stuff in it til it falls apart.  


Saturday, 20 October 2018

Grainline Uniform tunic in double gauze

This double gauze travelled a long way with me!  It's from Nancy's in Seattle, before it closed.  I was going to use it for an Archer...and then a dress...and then...stashbusting time!

I cut this tunic in a size 4.  Grainline is usually consistent (a recent experience with the Farrow is the exception, more on that later.)  I was worried that it would pool in my back and not fit over my hips in the pockets version, so I did v. 2 with the overlapping sides.  I'm 33-27-37.

I french seamed, and unfortunately got a hairy seam at the waist from making my seam too small.  No one else can see it.

It has facings than can be sewn down.  I mean, I suppose you don't have to sew them down.  But I did.

The fit is good.  The pattern is straightforward.  I had no moments of irritation or panic.  I don't think gauze suits this pattern very well.  Linen would be good and drapey fabrics would be good.  The gauze just sort of sits there.  I wore this to work and realised I Need Pockets (if only to have somewhere to hang my ID badge) so I might do up the other version in a different fabric and just preventatively widen the back or grade out to a 6 to ensure it doesn't hang up on my swayback and hips. 


I'm not sure it's very flattering, but I think that is more a feature of the fabric.  I don't think I had realised the absolute drapelessness of double gauze!


Sunday, 14 October 2018

Ready to sew Jimmy sweatshirt in scuba

This pattern is for yet another variation on a knit tshirt, by French company Ready to Sew.  The exciting features include raglan, 2 part sleeves, detail pintucks on the front sleeves, and two hem options both including godets.

The instructions are in English and are pretty decent as far as translation goes.   For some reason their theme for patterns is to use men's names starting with the letter J.  Though I see now they've expanded to a few female names too.

I made this in red merino last year, in version 2 with the hem band.  I made the size 36.  That seemed like a small size to me but it was way too big.  I gave it to a friend.   In a heavier weight material the size might have been ok but in the merino it was just very long and drapey. Seems like the sleeves were pretty long too.  I didn't take very good notes before I gave it away!

So I had few notes, no photos to inspect, and decided to take the leap and go for a size 34.
The pattern pieces are interesting.  You have the option to not cut off edges, but to abut them.  This is great.  I don't much like the cutting.  However the result is that there are wide margins without any lines on them - you have to extrapolate the lines there.

The first time I printed the 36 with all the layers, it was impossible to tell which were the pintuck lines and the marks for my size because they are only differentiated by colour not by the shape of the line.  For the 34 I only printed the layer for my size and although the pattern looked a bit naked, it seemed to have all the marks...except 1 of the 4 pintuck lines, which was lost in between pages!!  So these pdfs are not as straightforward as average and make me hesitate to consider this company for more complex patterns (I was in love with the Joseph coat when I discovered this company, but I've hesitated to make it.)

I was also really jumping in the deep end - I cut straight into this gorgeous scuba that I bought sometime last year.  It was a ridiculous purchase; I think I bought it while I was in Nepal because I saw it on somebody on Instagram.  It shipped to my parents and then I just petted it for awhile and thought of all the things I could make.  So now it's here, and soon I won't be sewing much, so now seemed like a good time!

I barely followed the instructions because anyway, it's like a tshirt.  My borrowed sewing machine seems to be generally miserable.  One entire bobbin was catching and not stitching well even after changing needles - magically fixed with the next bobbin of thread, but means that I flipped it over and redid every seam.  And I made this right before dinner and was both desperate to make a work of art, and desperate to hurry on to dinner!


So:
sleeves are a tiny bit short.  But ok
and otherwise I love it!!!
I top stitched the sleeves and the raglans.  I left the hem for now as I thought anything I did would mess it up - I was thinking of leaving it raw but after wearing it I think it would be better to have the weight of a hem.  I might still shorten it an additional inch or two.

The light weight fabric means that the godets kind of flow.  It would have a lot of volume in a heavier weight fabric and I can see why sweater knits are recommended.  I can actually see this being nice in a pretty heavy sweater knit.  I didn't like it in merino, though I think now that I have the correct size it would work better.  I think in sweatshirting or other fabric with a lot of body, I would find annoying how much it would stick out and create a bell shape. 

Of note, it has a high low hem, and if you want to shorten it, because of the godets, you have to use the lengthen-shorten lines (which are provided).  Version A is fine the way it is but I recall the version with the hem band was really really long - because you have the full length plus a band.  I would probably shorten it 3 inches.  I'd be tempted to do that above the godets.  I don't remember where the shorten lines are in the pattern, seems like they might be through the godets, which seems like too much work.

While I was obsessively trying it on I thought another very cool variation would be to not use the godets at all, but to add about 2" to the front and back at the sides and overlap them.  It would be a tunic with high cut sides - almost like a sari top....