Wednesday, 30 March 2022

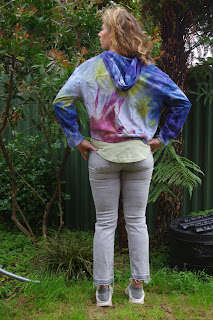
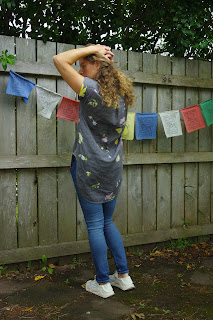
Mile End hoody in both views, by Closet Core patterns

When this came out I wanted it right away but I was in the middle of a winter hoody binge and it really seemed like I should keep using the patterns I already had.  Eye roll.  I should have bought this right away. The papercut patterns undercover hood will always live in my heart but I think I've hacked it to its limit now and need to move on.

This is an amazing pattern.  The back seam wraps around to the front.  The sleeves are in two pieces and have an elbow dart.  The hem is also pieced.  

So add to that story: beautiful rainbow striped terry cloth from Blended Thread, and me post night shift.  

What could possibly go wrong?  ...with pattern matching across 6 pieces on no sleep?  OOPS

I made size 4 and I ran a commentary to my best friend as I tried to pattern match and that kept me awake and in good spirits through the drama.  It was pretty dramatic!  Because as much as you want it all to line up overthinking in my case always wins and everything is always off by 1 mm.  Just that little bit.  And then it all goes to hell with those elbow darts.  BUT at the top of the sleeves my matching is perfect, and it ends up that's the only spot that matters. 


I love this. It is a classic oversized, cropped hoody.  It's not super long.  I do however feel the draft up the sides, and in this fabric it's not warm at all.

The blended threads terry cloth is a bit stiff and not very stretchy, making it hard to get the bands on.  There's some white that shows through when it's stretched.  I love some of their designs but I have so far not been impressed with the fabrics and I don't think I would pay the shipping again. 


I obtained white terry cloth fabric from The Fabric Box to make the next one in the other view and ice dye it.  I have determined it's best to make an item and then ice dye it rather than the other way round, however the distressing problem is if the dye job comes out ugly you have wasted some time.  Making the hoody was slow because I was deep in moving, but it was fun as projects go and forced me to get friendly with my coverstitch machine, which is not a bad thing.  The ice dyeing was literally one of the last sunny days I was in Gisborne and was a bit stressful (ie late to work) but I love the result (and the other things I dyed are also amazing.)  In this case as well I had band problems - I absolutely could NOT use self fabric bands the length of the pattern piece.  I had to remove one half sewn on.  I think I added 3-4 cm and that was still barely enough.  So if you are not using rib, considering extra length on the sleeve bands.  The hem doesn't require as much stretching so it's not relevant there. 


Sadly I have to say - these are both beautiful, nicely made, based on good inspiration, I have no complaints...and I can't really find any place to wear them.  They are roomy so they aren't warm.  They are quite short so anything under them hangs out and looks sloppy - and I'm short.  The sleeves are really spacious.  The hood on the hoody version is gratuitous, it's the kind of hood you never wear up. 

I have been inspired by the many hacks on Insta - it's definitely roomy enough you can make it in a woven then just add stretchy bands.  It's tempting to try something like that.  Also I get now that the front tie pulls it in, and though I didn't like the look of that in the pictures, it's possible I would love it in real life and that it would make the hoody feel more cozy. 

So now that I have made both of them (sorry my new photo spot is not getting me very crisp pictures and my hair really needs more attention...) I think I'm done with this pattern for now while I mull over whether I have any use for it.  Unlike a lot of my projects I love both of these and I'm keeping them despite not knowing how I'll wear them.

Sunday, 13 March 2022

Closet case Kalle top, a review

I did have a make 12 list in 2021. It wasn't something I needed to make too public, but was rather a way of keeping myself to task on projects that had been queued up for a long time that I was avoiding because they felt hard. And it was the cusp of the new year and I had one remaining thing on the list: Kalle.  For the something like 6th year or whatever since it came out, and despite how I wanted to make it the minute I saw it.  Also despite the fact that I bought fabric for the dress version something like 3 years ago.  I actually bought enough, which means I have an unusual 3m stashed piece of fabric that has not been harnessed for another last minute project (so so rare!)

And so despite the time limitations and the fingers of desperation curling around my psyche because of my upcoming move, I knuckled down to make a practice version using the long popover view...in Nani Iro double gauze.  ("Practice version".  Indeed.)  The double gauze was well behaved but I treated it like gold to make sure it didn't fray.  I worried many times that this was a bad fabric/pattern combo, because double gauze really has no drape and so I thought it might hang up on my backside.  I also really don't like shirts with collars, and so I wasn't sure this style would suit me.  That was kind of why I made it first, I was cutting out the paper pattern pieces and wanted to test the size and fit of the view I liked the least.  I did some regretting that I was going ahead with this piece of beautiful fabric...

I was between a 4 and 6 (or even 8) on the size chart as I'm 33-27-37. I know that I'm either a 4 or a 6 in most Closet Core patterns despite not being a great match on the chart, and I did waffle about what to do here.  I ended up going with a straight size 4.  It meant I was committing to a size 4 on all the versions so I was a bit nervous, but I'm happy with the fit.


The instructions were fine.  I went relatively slowly - took a few days to make this, avoiding the hottest part of the day.  I had never done a front button band before and I didn't understand what I needed to sew down, exactly, but it came together neatly and the bits I didn't sew right away were easy enough to topstitch later.  I skipped the buttons for my first instagram photoshoot while thinking about whether I needed buttons - decided I needed one so I wouldn't flash people a boob.  Then while looking at my button stash a friend grabbed out these green buttons (I was scheming over grey vs pink) and two it was.  That way it looks more purposeful - I'll never shut the top one and I'll never open the bottom one, but I like the balance they provide.  

A few labels made their way onto this top. 

Lo and behold I LOVE it.  Thank god too, wouldn't want to waste this fabric.  I was definitely not sure how to style it at first since in the middle of summer I was too hot to wear much at all, but it ends up I have a reasonable number (= way too many) fitted pants I can wear it with and that seems to be the best thing to balance the extreme length at the back hem. 

I think the back of the armhole bunches up a bit, could be my wide or slopey shoulders causing a bad fit there, but it doesn't bother me and I think it just looks like wearing ease.  Yay for an end of the year win (it did take me into the new year to finish this top but I'm glad I didn't rush!)  


Friday, 4 March 2022

Taylor Tailor Desmond Backpack, a masterpiece after much planning!

 After years planning this backpack it was December and my make 12 for the year was down to 2 things: a backpack and a Kalle top.  Add to that selling my house and an upcoming move...I knew I needed to buckle down for a last few important makes before my head scattered and my stuff was packed away (and turned into a total catastrophic mess, but that was later...)

I had accrued a total of 8 types of webbing.  8! types of webbing!  Because I needed the Just Right match, webbing, you will agree, makes this backpack.  Nothing was ever just right, until finally the vision had coalesced and the right option was there.  I had bought green and cream cotton webbing, cotton magenta webbing with silver in it, grey nylon webbing, I forget the others now...and then at David's one day when visiting Hamilton I saw this webbing, a dark maroon nylon webbing with a subtle pattern in it. YES!

The silver bits are from MacPherson's in Seattle which is always a fun little bike ride.  However it's proof of how long ago I bought them...I don't have a bicycle in Seattle anymore (parents complained about it taking up space) so it must have been when I was visiting circa 2017.  That means these bits which are quite heavy have travelled a lot ways with me!  I've moved about 6 times since 2017...

The fabric is maroon cotton oilskin, I think it's Merchant and Mills, and I bought it from Miss Maude.  Only about 2 years ago!  

Then I was totally stumped regarding linings.  I was stumped about linings basically all year this year.  It was only as the year came to a close that I felt a certain pressure to just Do the Thing!  I went to Spotlight and bought a fabric to match.  It is, yet again, perfect, showing that sometimes waiting for a project to come together is worth it. 

During my many years of thinking, plus the actual reflecting on the pattern over the two weeks before I made it, I focused on 2 major changes.  Front pocket needed to be bigger, and the side pockets for the waterbottles needed to be bigger.  I had this very complicated vision for the side pockets including accordioning the bottom with a pleat, adding a front grommet and a pull so that you could snug the top of the pocket shut...

Then I watched this video.  

I figured out that I could increase the size of the main pocket by only increasing the outsides along the dart edges - so the pocket pieces were unchanged on top in terms of how the pocket would sit on the pack, but all the edges would be longer.  

And finally I had some waterproof oilskin liner left over after using it for my Merchant and Mills Field belt.  This was just randomly lying around but when I realised I had enough, it was genius! 

I sallied forth and underlined the entire pack in the oilskin liner, and used the lining separately which I block fused.  The front pocket and waterbottle pockets also are underlined.  It means the inside of the pack and the inside of the pocket are impervious to rain (which has been the case.)  This did make it harder to sew.  Oh, and it was like 28 degrees in the sewing room, which means actually the oilskin itself was melting.  

In order to make this project happen I proclaimed to some of my work colleagues that I would be making it the next day so they would hold me to task.  I cut it out that night and sewed for an intense chunk of time the following day, getting the backpack to the point of starting the lining, then I went to a work party and was able to show evidence that I had made some pretty good inroads into the thing.

Everything including the lining and finishing was the following day.  So basically this was about 2 days of pretty intense sewing.  


I used the youtube tutorial for my side pockets, realising it was a WAY better idea that messing around with grommets or extra bits.  My pockets were wide enough and high enough to fit a Swell bottle, which I used for measuring.  I pleated the bottoms of the pockets to fit in the allocated space.  My elastic is a super heavy stuff, was a bit tricky when folding over on the edges, but I managed.  When my sewing machine just couldn't deal I switched over to the Bernina and that was really amazing.  Most of the project was managed by the little Pfaff, but it just hates anything heavy duty so it was perfect to have a back up machine that didn't baulk at those parts.  I did also wield the hammer to flatten my seams since I wasn't ironing the oilskin.

Extra details on the main pocket are for bicycle safety - a hook for a light and a reflective strip.  I wanted to add some details but not too many.  The patch is from Klum House and it was random luck how well it matched!  

I ditched all the inner pockets, just putting one zipper inner pocket and not against the back, where its contents are very irritating, but on the other side.  YAY win for DIY.  The only thing I knew I would miss (and I do) is a panel against the back to add structure.  You could simply add a full height pocket then put a piece of foam or a notebook in there and voila, it would be much less crumply.  I'm tolerating it ok but that would have been the one thing I added if I made this again.  I just couldn't quite figure out how, and it was one thing too many to think about.  This pack really did take my full bandwidth of figuring out and thinking how I would use the pack to make it a genuine replacement for my previous, totally waterproof pack. 

Out in rain: doesn't soak through.  If you don't towel it off it does soak through over time, but the contents don't get wet, the bag exterior just feels damp.  I have worn it in heavy rain with this effect.  I do have a backpack cover that I will most likely use in heavy rain because I don't see any reason to challenge the oilskin, but it's great to feel secure when rain is not heavy or changes suddenly that I don't need to stop and put the cover on my pack halfway to work. 

This pack is pretty spacious in a way I don't always like.  I'm a structured bag kind of girl.  However, it is working fine for going to work where I take a notebook, various bottles of water and tea, a lunchbox, maybe my climbing clothes, and have space to buy a few groceries on my way home.  If it is not full at all, the straps fail to hold down the roll top, because you can't cinch them tightly enough, so it's a bag better at medium capacity.  It has certainly given me the confidence to make a few other little bags in my queue (once my sewing stuff is up and running) and to try out the Klum House backpack pattern which I have also now acquired in a kit with all sorts of backpack making goodies!  Sewing feels far away right now as I am just dealing with moving in, but I'm sure eventually I'll be back.