Tuesday, 29 August 2023

Hove, cardboard but shiny, throwing the sewing machine out the window?

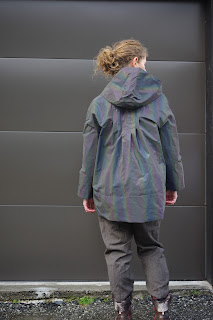
 It is a real pleasure that I've made time to get into the sewing room in the past month.  I am bombing through projects I've wanted to sew for over a year.  Including the endless queue of jackets!  Hove has been top of the list, and this fabric from Mood has been earmarked for it.  Because the inside is white, I bought black jacket nylon to line the body with.  I assumed one of my zipper collection would fit, which was not entirely accurate.  The zip I chose was too long (pity I shortened the jacket...) and so I decided cleverly to just let it go further up the front of the hood than it's supposed to.  This worked out fine but when wearing the jacket it's really hard to zip up those extra 3 cm.  I obviously just don't.  If you had a too-short zip it would be better, because you can just start it higher up the hem, but I don't really recommend letting the zip go higher than it's meant to on the front. 

At some point in the planning stages, I got serious and bought bias tape and matching thread specifically to use for this pattern - a rare event which pretty much catapulted this to the top of the list.

I have not used a pattern by In the Folds before, except for the free ones by Peppermint Magazine. I made size C going by the size chart, that matches my measurements pretty well and this fabric is quite heavy so I thought it is good for it to stand away from my body a bit (could have chosen B).  I did pay attention to the comments in the pattern about drape and I do think you should go with a fabric that will drape better than mine does unless you also want a bell over your bottom (but I'm resigned to this situation.) 

I also took note of the height this pattern is drafted for: 5'7" and I read through all the blogs and noticed the jacket looks fine on tall people and very disproportionate on short people.  It really needs to maintain its proportion to be cute.  So I accepted the challenge to crop it 3" at the shorten lines since I am 5'4" and short waisted.  The actual shortening was fine, there is a line.  However, that line is along the front curve and changes the front curve dramatically - there is a huge misalignment to reset.  If you don't plan ahead and reset that curve then the pockets won't fit.  In fact, I have some advice here.  Do shorten the jacket.  Do use a French Curve to fix the curve, and then sew the lining to the lining pockets *BEFORE* doing the outside, because if those don't line up you will know in time to fix the problem.  It's a lot easier to cut four more pockets than to cut 4 big monster S curve shapes that take a metre of fabric each. 

I didn't do that, I just eased it all together and then did some hidden sewing inside the pockets to fix weird gaps that formed.  You can see whiskers along the front of the jacket where it attaches to the facing and that is all from me easing the front together like a boss to make it work despite a very dubious cutting of my new shortened curved front.  That was when things started to get dramatic.  Prior to that I did the back pleats which were a pleasure, because this holographic fabric actually presses very well and I was able to chalk all the pleats and iron them to position them.  Of course, the fabric does not take pins, so I was holding everything together with clips and some double sided tape.  I underlined the back of the jacket before I pleated, and then I lined the sleeves instead of underlining, so the sleeve seam is hidden.  

The pattern instructions are very nice.  They are well drawn, clear, and not excessive.  I generally followed them exactly.  

My dramas were not regarding the pattern, for once.  My fabric was fine when I was sewing a single piece.  Once I had a larger item in front of me, it was heavier and burlier than my sewing machine, and so I got in big fights with the feed dogs that basically were not moving fabric along at all.  I went through many needles, which is fine, because they were all pretty old needles.  I got in fights with every single other thing on my sewing table because this jacket basically required a free space of 1m around the sewing machine in every direction.  Sewing the sleeves on was the final move and that's good because it was almost my final move.  I definitely did not bias bind that seam (but I ran out of bias tape before then.  Buy extra, I had 5m and didn't use it on the sleeves.)

The jacket is very trippy.  It is stiff and I can wear any number of layers under it.  The pockets are roomy and satisfying.  Others have commented the sleeves are short - this is true - I like the length for this type of rain jacket because I think if they were longer the shape would be compromised, and water will run off them out of the way.  I will most likely wear this walking around and biking because it's too much like trying to maneuver a tent to get into the car wearing it, it's very firm.  But perfect for biking, and isn't that when you want to be extra reflective? 


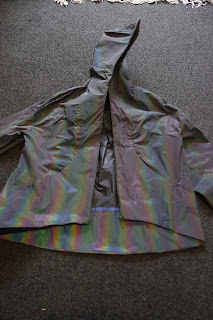
With the camera flash!  Apparently more extreme than when light shines on it irl


I wore this around Auckland and got heaps of compliments from people who sew.  People who don't sew were possibly just too bedazzled to comment.  In the photos the colour looks quite drab but apparently with movement it randomly catches the light here and there and is pretty exciting to look at.  I had been on the fence about this jacket prior to the Auckland trip, likely due to the suffering of making it, but now I quite like it.  I would even sew this pattern again in a very different fabric if I for some reason didn't want to make the other 12 jackets in my queue first. 

Monday, 28 August 2023

Persephone, dear, it's been awhile

 Gosh how has it been this long? I last made some Persephone pants in 2019!  

I made three separate versions of these, somehow struggling to commit to an actual heavyweight fabric, and playing around with the rise and the size.  I started with size 4, then I removed the pockets and some of the rise, and then I finally tried out a size 0 (which was a bit of a leap).  The first pair were fun for awhile, the second pair shredded, and the third pair were way too tight.  

So I pulled out these pattern pieces and this heavyweight brick twill (finally!)  All the work has been done fitting and I have made these a few times there are no surprises to the process.  They are a size 4.  There is 1" removed from the rise plus I cut off the top at the size 0 line. I lengthened the darts since previously they were a bit fat after all that cropping.  I cut the waistband much longer than the pattern piece so I wouldn't have to worry about easing it (some flashbacks to terrible Philippa pant experience here, I don't think the Persephones needed to be eased.)  I also narrowed them to size 0 at the hem to see if that would keep my bike from chewing on the cuffs.  I used Pomona patch pockets on them. 

These came together relatively quickly, without any harm to the maker, and with minimal screaming at my sewing machine.  I did the fly buttonholes easily on my normal machine, and after a single attempt at the main button I switched to the Bernina right away because I have learned it is not worth expecting my Pfaff to do a serious buttonhole.  


Hooray new pants!  They are too airy for winter and I got cold the first day I wore them. The patch pockets still don't really solve the problem that I can't get things into them.  One solution would be pockets with darts at the bottom and kind of bellows shape so they stick out and are ready for me to put things in, but as I wore these I realised the other solution would be to put the pockets much lower down where there is space for me to get my hands into them - I'm not sure how this would look.  But none of that belies how great they are!  I think they are safe for my bicycle too which is excellent.  Overall it took me years, but I finally have a perfect pair of Persephones in my closet. 


Sunday, 27 August 2023

The Friday Pattern Co Ilford Jacket, a review

This is one of those patterns I wasn't interested in initially.  There are a number of similar patterns out there, like the Paola workwear jacket, which is free. (Get it instead!)  The Ilford has a kind of lazy look to it (more opinions on this later.)  But then I have a small yardage of plaid fabric and I want a cozy jacket and I am stuck auditioning patterns for this precious piece, arg.  So I decided to make this and compare it to the Modern Sewing Co Potter, which I do love the look of, and which has been on my list for ages. 

I had a look at the size chart and went with XS, which matches my measurements.  The jacket is described as "oversized" so that was also pretty reassuring that it would fit.  I cropped it by 2" and this was partly because I thought I could, and partly because I really only had a small piece of fabric, and now I was determined to make this jacket with this particular piece, because it has some stretch to it and I thought that would make the fit forgiving.  It is from Draper's Fabrics in Auckland and I bought it initially to make stretch leggings which now I think would have been a great idea. Oh well.

First a wee rant to get it off my shoulders: We all get that the Friday Pattern Co have really good influencers on instagram (and wherever else, I suppose.)  They advertise themselves well and constantly.  It makes it really hard to see through that hype and understand with their patterns what you are actually getting.  This pattern is advertised as having so many pocket options!  So many things you can do to the blank canvas!  Yeah, that's all true, but you know, we buy patterns so that someone tells us what to do in order to make a good result.  Just having access to potential cool options is not invariably helpful.  Every pattern has the potential to inspire you and I have been inspired by some really random patterns (always unforeseeably) to hack to my heart's content.  I don't think it's valid marketing to use that as a feature of a pattern.  

So, what you actually get here.  

A few nice things: mainly the front placket is really fun to sew with a neat cutout that leads to a fantastic finish.  

The bad: oh, everything else.  No, not really, mostly it's just meh.  It's a shirty thing.  I am not known for wearing shirty things much. 

What I don't like: the dropped shoulders are Lazy Drafting.  They are a bit gathered, they hang off the shoulder so they don't need to fit, and will thus look just a bit sloppy on everyone.  Similarly there's nothing to make the collar actually roll, because the collar pieces are identical. 

This jacket is small feeling, and yet it does fit me.  I added elastic into the cuffs to make it borderline wearable because I find it super weird to have cuffless sleeves.  I had very little surface area upon which to put pockets, after cropping the jacket, but I did my best.  For someone who really is into shirty things I think it might be cute but I feel very disengaged from this project and the weird way in which it doesn't feel quite like it fits. 


I have lots more Friday Pattern Co patterns to make because I too have been sucked in by the hype.  I love the Adrienne blouse that I made but that's with the caveats that it isn't free of lazy drafting - I mean the front and back are the same!!  That fit works for me but I did remove a massive amount out of the sleeves to make it not ridiculous.  It will be interesting to see if I notice a difference in fit when comparing the unisex patterns with the ones drafted for women.


Friday, 11 August 2023

Sew House Seven Toaster 2, a review and pleasant surprise

The toaster sweaters went through a revamp a few years ago, and somehow I have lost the instructions for this version.  I looked everywhere. No instructions.  I used the size chart and SA from Toaster Sweater 1, and made size 2.  I was aided by 2 blogs, one of which showed the hem, and a tutorial by Sew House 7 with advice on keeping the neck down using wonder tape or hem tape.

The fabric is a very not stretchy italian nubbly stuff.  This pattern took very little of it which was too bad, because I was trying to use it up and give the top to a friend.  I came at this in a true spirit of entertained curiosity, and I was blown away by how fun it was to make, and how cool the results are.  I used iron on hem tape for the neck - I sandwiched it between the layers, positioned everything, and ironed it down, and now the neck is stuck in place!  Nothing flappy!  I have no idea if I did the hem properly but I am happy enough with the way things look.  I think I overlocked everything, sewed the corner mitres, then flipped it and topstitched with the coverstitch machine (which was a bit crazy at the corners).  I tried different clever things at the top of the split, but ended up just stitching across to strengthen that spot.  The fabric doesn't show stitch lines so that was an advantage.  


The fit of this is great on me. I'm short, it is pretty short, the arms are tight, but my friend is smaller than me.  I will decrease the SA on the arms for myself and use some more stretchy fabric, but I'm definitely making myself one of these. 

Since the pattern pieces were on the floor, I did that sooner rather than later. Unfortunately I had to use my last piece of the nice cashmere Mind the Maker fabric for my boyfriend's snowboarding midlayer, and I absolutely could not tetris two tops onto the fabric I had.  So spots it is: 


This is normal weight sweatshirting.  It's not quite as cozy as I thought, I went down to about 3/8 or sometimes 1/4" SA since I was overlocking anyway, and so it drapes straight down the front and lets a draft up.  Also, I used the double iron tape again, but I didn't get it at the absolute bottom of the neck band bit, and so my neck band is still trying to flip a bit.

Thus I could comment - this pattern is really great for not-very-stretchy knits.  I think the neck is suited to that type of fabric.  For a stretchy knit it's still ok but I do really hate any kind of facing that flips around and I'm worried this one might irritate me from the small bit of flipping it's doing.  Other people have commented on how the pull from the shoulders across the front of the neck creates a kind of wrinkle, which looks good in drapey fabric, but looks a bit funny in more structured ones.  I have noticed that more here than in the blue top.  The blue fabric had more body so it might have been less obvious.  This is cute but I do struggle with sweatshirts so it might end up going to a friend, we shall see! It will be kind of funny if I cave in and use the rest of the blue fabric to make myself another one like the original...but it might happen.