Monday, 23 December 2013

Vogue Paris Original, V2323 - muslin

In love with this dress pattern!  Here is the cover of it.  It's my first seriously vintage pattern and I really had no idea how things would progress.  I decided to do a full muslin, underlined in silk, to see how (whether) it would fit and also to get the hang of using gelatin to make the silk easier to work with.  I made the muslin from a leftover piece of herringbone black wool with silver lurex threads in it.  The underlining was a silk chiffon.  I used this technique with gelatin prior to cutting and ironing the silk.

Because this was my first ever muslin, I mean an actual one, I did it in stages so it kind of felt like it took forever, although sewing the pieces together was easy.  I ignored a lot of the subtleties in the instructions and didn't do any gathering stitches except on the sleeves.

The pattern is slightly small for me according to the size chart, but came with all its pieces and they were in great shape.  It seemed like a relatively straightforward construction.  The puzzle piece on the front creates most of the three dimensional shape, and I love how clever it is (although after lots of pinning of Polly tops, I initially suspected it would be very tiresome to sew together!)  In actual fact you are supposed to gather the curves (which I didn't do on my muslin) and it is supposed to hang flat.  (Mine really doesn't since I didn't put much effort into that puzzle piece front.)  I had forgotten that in the 70's, dresses were shapeless sheaths.  Also I think it looks much better in 2 colours!


I was surprised how huge the dress ended up.  The silk underlining, which I sewed onto EVERY SINGLE piece, meant my pieces held their shape - the wool would have definitely started to stretch alone.  So there wasn't distortion increasing the size.  Seems that Vogue in 1970 already ran big!  I cut off 7 inches of the bottom (and I'm thinking of cutting off more), and I considered cutting a bit off the side seams but ended up leaving it.  On my final version I'll just cut my fabric shorter to start with.  Not sure what I will do with the side seams.

My final version is planned in silk velvet.  I was planning to underline as I did on my muslin, but my facings were really annoying and it has you hand sew down the wrist seams and such...so I think I'll just do a normal lining so I can have a neater inner finish.  I was also planning to use cotton voile for the underlining, and now I'm considering using silk or even bemberg, just to make sure it doesn't stick to me - since the velvet is quite heavy this won't be a summer dress!

I was really hoping that I wouldn't need to make any big modifications because I wasn't sure how I would face the puzzle front if I had to do an FBA, for instance.  Luckily I don't need to change anything.

Sunday, 22 December 2013

Long Liberty Anna, at long last

I have no idea what my problem has been with fitting Annas.
I cut a size 6, and measured so carefully so that I would make it bigger than my last size 6 Anna.
I did 3/8" side seams with that in mind, even though I was sad to forego the french seams and clean inner finish.


Result?  ARG!!!!  My Anna is still big!  It's not terribly big, mind you - not as bad as my recent flowered Anna.  But it is definitely not very formfitting.  So whyever was my first Anna so much smaller?  I will never know...

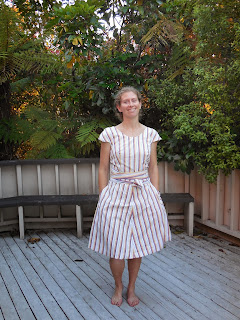
This was my first v-neck Anna.  The facings went in ok and I understitched them with a vengeance.  By this time around there were no construction surprises and all of my seams matched up when I attached the bodice.  I cut 8 inches off the hem when cutting out the dress - no sense wasting fabric - and that was spot-on so I could do a normal 1 inch hem.

Since my dress is striped and is dark I didn't see any sense in hand sewing the slit.  I did hand sew the facings down at the zipper and I'm really pleased with the result.

Overall I love my Anna!  Next one will have to be a miniskirt Anna!  Also, I think that silk is a better choice for the long flowy Anna (or rayon) because mine kept catching around my legs since the cotton sticks.  I know that usually I wouldn't wear tights with this but an unexpected cold front came through.  Silk would behave better...

Friday, 20 December 2013

ok FINE, another Grainline Scout

Fair enough, I made a few weird Scouts.  One was a knit and I totally ignored any knit modifications.  The other was a size 0 and I couldn't lift my arms.  And it was short.  So it seemed fair to give it another try, especially since I had this incredible Nani Iro doubleweave gauze - a tiny piece.  And I couldn't think of anything else that would fit on it.  And it's about 30 degrees outside, and Australia next month will surely be even hotter, so woven gauze sounds like a perfect wardrobe choice right now.


I had to cut the back as two pieces.  Also I was following the Polly top technique for putting the bias binding on so I sewed it to the inside first, and then didn't have enough bias tape thickness to fold it over the front.  So I left the frayed edge around the neckline...that's an, erm, style point!  Not a mistake...

Other than that it was a straight size 2.  I should do a wide shoulder adjustment if I do this top again.  I still do not really like the pattern.  I know everyone else loves it, so not sure what's up with me - my need to be contrary?

I do have to say that the doubleweave gauze is the most awesome cotton fabric I have ever worn.  I adored this during the day I wore it at work, but found myself *really* wishing for that wide-shoulder adjustment.

I'll give this one a more intense test run during my month in Australia and see how it measures up!

stretch silk Lady Skater

This is a living example of how different fabrics change a pattern.  This particular fabric is a (not-very) stretchy silk twill, I think.  It has certain shifty silk characteristics, but with weights on, it was pretty easy to cut out without distortion.  And it's easier to sew than the merino I used for my first skater dress!  I did kind of grimace at just how tight I had to pull the neck binding, but it doesn't show.


The topstitching along the binding edges was unusually awesome and straight!


I have to thank my coworker Jennifer, who is getting quite enthusiastic about taking blog photos (although she insisted on some greenery instead of all urban chic...)  I adore this dress!  Even if maybe it's a bit short for work...

I used the same size as the merino skater - a size 3.  In this much tighter knit, it's a perfect fit (although as always a wide shoulder adjustment would have been awesome).  I noticed after washing my first skater that the skirt weight pulls the dress much longer - this lighter-weight silk doesn't do that.  I managed to squeeze cap sleeves onto my tiny piece of fabric by cutting the skirt 3 inches shorter.  (Maybe a touch too short!)  Using the bad*ss instructions meant I was finishing my seams as an afterthought, but I did finish most of them with a zigzag stitch.  Also, I didn't have the trouble this time getting the clear elastic sewn on.

I have known for awhile that I should start to shorten my bodices, and this dress would also benefit from about 1/2" out of the bodice...and a swayback alteration...I am still so against such an ugly name that I haven't learnt how to do the alteration yet.  What swayback??  I don't have a swayback!!  (except that apparently I do, ugh.)

I waited a long time to make this dress!  I really didn't want to mess up my incredibly beautiful stretch silk, and I'm super happy with the result!  The only thing I notice with the skaters is that I always have so much stuff at the waist seam that it sticks out - the layers of fabric plus the clear elastic don't all settle down flat.  I know it's a fact of the pattern but I still find it annoying because I never ever ever wear belts.  

Thursday, 19 December 2013

My tragic Elisalex is a work in progress

By Hand London and I have some size issues.
My two Anna dresses sadly didn't fit very well - my first size 6 was too small, and the 8 was way too big (but fits my friend Ellie perfectly!  It was fated!)  My third Anna, which I did after the Elisalex, was a size 6 and was also slightly too big.
My Polly top was a size 6 with an inch shaved off the shoulder height.  And it's rather baggy but in an ok way.
When I looked at the final measurements chart for the Elisalex, the 8 seemed pretty reasonable if I accounted for BHL not leaving any ease.

Oops.  Such a wrong call.


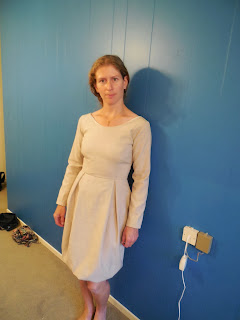
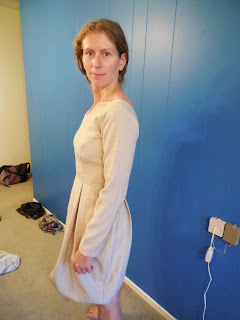
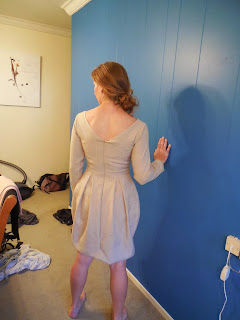
Back to the beginning - my fabric is a linen-silk with lurex threads.  It doesn't have that much body, and in fact wasn't my original choice for this dress.  But I love this fabric and I love the idea of a cream coloured shiny Elisalex, I thought I would prefer the tulip skirt with less out-ness, so I went with it even though it's definitely not long sleeve weather. 

I cut off 10 inches from the bottom to start with and sewed it up without other pattern changes.  Once it was together I had two issues - major hugeness, and not being sure whether I needed to give myself more booby room.  I just can't tell if the princess seams are too tight!  I cut one inch out of each side of the centre back.  That fixed the overall too-bigness (and was possibly too much).  Then I started to shave off the princess seams and now I think they are better but they are lumpy.  At this point I still have no clue what to do with them.  The chest needs work. 

I have pinned the hem up about 6 inches.  (On top of the 10 inches I cut off initially!!  Do not forget to measure the length of your Elisalex!)

I would consider this a work in progress - I'm tempted to take off just a bit of the side skirts so it's not so tulipy.  I need help understanding how to make the princess seams fit my chest.  Probably I should have done an FBA.  I am doing what we do when things go wrong...taking it home for my mother to look at...since I'm moving I am in a crazy busy state of trying to get all my remaining projects at least cut out so I don't have to travel with extra fabric!  23 kg luggage limits are the bane of my existence!

On the bright side, my zipper looks awesome.  It's the first invisible zip I've done that looks invisible!  Hurrah!

Monday, 16 December 2013

Papercut Peter and the Wolf Pants

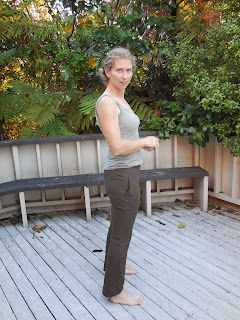
I put these off until after my Thurlows because I wanted to try a full fly and get some practice with pants fitting.  But I was soooo excited and it was hard to hold off.  Then at the last minute I decided to do a wearable muslin made out of leftover brown hemp-tencel.  It's great feeling fabric with zero stretch.  That is a key fact, and maybe not a very smart choice.

I shorted the pattern by 2 inches and made an XS.  I didn't make any other changes although my side seam might have been 5/8 on the left due to my zipper (I'm not actually sure.)  My invisible zip is not very invisible...


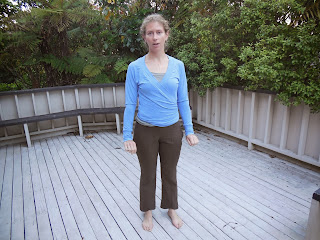
lots of extra fabric in the butt - what modification do I need?


These pants are a mixed bag.  On many they are not very flattering because of the width presented in the hips.  Totally the case on me!!  They are suuuuuper tight across the thighs due to that zero stretch, but I think the hemp will relax, so I'm not going to let them out.  And the length is really not flattering.  I think for my real pair, which is going to be made of a stretchy fabric, I will keep the original length.  On me that will make them normal pants-length, and I think that balances out the hip width.  I guess a curved waistband would be nicer, but I don't know how to make one and I'm not too bothered.

The positive?  I adore the pockets.  I love the topstitching.  These pants, when done well, clearly have the potential to look professional.  And they are super easy to make.

Papercut Coppelia

This was made with an incredibly stretchy bamboo rayon from Mood - a wonderful friend brought it for me when she came visiting from the States.  It's super stretchy!

I followed a lot of lladybird's advice and commentary before making this.  I made a size XXS, and lengthened it by 2 inches (which honestly considering how short waisted I am, was unnecessary and I won't do it again).  I considered taking 1 inch out of the back but decided to leave the pattern alone, I guess I am still a bit burnt by all my unnecessary Thurlow changes...I knew that I could shave a bit off the side seams if I needed to.  I also cut the neckband about 3 inches shorter than it was supposed to be so that it would be a bit tighter.  With the incredible stretch of my fabric I knew I couldn't go too wrong.  What I did notice is that there's a limit to how tight you can pull it because the waist tie is attached at the bottom of the front - you can only overlap up to the edge of the front, which wasn't quite enough.  That makes this a rather loose wrap top, not something I could wear alone.


Construction was straightforward and I didn't have any problems.  I used a stretch needle and I finished the seams with a zig zag stitch.  It's easily a one-day project but I spread it out between other things so it took a few days.

This is definitely another pattern I'd be comfortable making a few of, and tweaking the fit a bit!  I don't mind how loose it is in the bamboo but for my next, Merino version I might take that inch out of the back.  I noticed in the photos that it looks very sloppy and that's pretty annoying - I am tempted to wrap it on the side but that doesn't seem to be very flattering. 

Voila, Coppelia!

Sunday, 15 December 2013

Rainbow lined Colette Crepe


This sat around for awhile and I read about it online quite a bit before I got annoyed with the pile of fabric and dove in.  I wasn't sure what to expect - both with the vertical striping and with the pattern itself.  I didn't make any effort at stripe-matching.  I also didn't know whether my silk lining would be solid enough to function as facings.  I played with the idea of ironing on the facing pieces to the top and armholes of the dress but then decided that was too much effort. It was my first Colette pattern and I have read a lot about people having fit troubles so I wasn't anticipating a perfect dress on the first go round.  On the other hand, my Vogue wrap dress just feels too big and I do not love having it open all the way up to the waist every time the wind blows.  So I thought the back wrap might be a nice change.

I cut a size 4 which matched my dimensions exactly. I do not like facings so I decided to line this dress with some lime green silk.  Also, I treated the silk with gelatin so it would behave (an example of how to do that is here, and this certainly made it less shifty.  That's currently my favourite method for dealing with lightweight silk.  Less shifty does not = zero shifty, so it was still a bit off, but I just made some little folds along the shoulder and that was taken care of.  The shoulders are funny shaped anyway!


 I followed this tutorial for the order to sew with a full lining.  What it neglects to point out is that the wrap belt also has to be done and attached prior to sewing the lining onto the bodice, but I remembered that from my Vogue wrap so it wasn't a problem.  Sewing a wrap dress is easy and the Vogue dress with lining had super instructions, so this time around felt a little bit like deja vu even though I was adding the lining myself.  I sewed it in by hand at the waist, and I have to say, this dress is gorgeous inside.  I did notice that my needle make little lines in the silk - even when I switched to a microtex needle.  I don't know what that's a sign of. 

As for fit...meh.  I don't actually like the loss of control that I get with the wrap in the back.  And I think wrap dresses just feel like too much fabric or something.  The bust of Colette patterns is bigger than in the big 4, and in this case it's too big for me.  The dress is cute and I really like the one piece sleeves.  It's possible that I would make it again, but I'm not totally sure.