Showing posts with label invisible zip. Show all posts

Monday, 4 August 2014

Batik Belladone

This is my second Belladone - quite awhile after the first one.  Luckily I have a good memory for all the things that went wrong the first time around and was determined to make this version as near to perfect as possible.

Size 38 again, in beautiful green batik cotton from www.emmaonesock.com.  It became important to note that it's really hard to tell which is the right side of this fabric!

On the darts: I shortened the bottom bust darts about 3/4" and lowered the upper bust darts by about 1/2".  I did this after assessing how my first Belladone fit. 

I could actually have lengthened the torso on this pattern - probably the only pattern on the planet that is short for a short-waisted person!  But it's not a big problem, and I didn't really notice it until it was too late. 

I made sure this time to improve on my bias binding.  In fact, I decided to do all invisible bias binding, to see how it changed the fit.  My bias tape was weird double fold, so the results are that everything bound lost about 3/4" - I cut off the extra layer when I folded it to the inside but it still was slightly wider than usual bias tape.  I was concerned this would take away too much fabric but it seems to be ok.  I can attest, however, that invisibly bias binding armholes is no fun.  All the bias-goodness of bias tape isn't enough to make that tape want to go around a tight corner.  I had to stop often, cut my curves, and iron as I went in order to get it not to bunch up.  Interestingly, on the first version where I left the bias tape bound on the outsides, I did not have the bunching up in the back that others have complained of.  On this version, I did, but only a tiny bit.

As before, I bound all my loose seams on the inside.  It took forever, but was worth it.  I still don't know how to bind the seams of the zipper though. I thought I could add some seam tape after I put the zip in, but when I tried it I had no success.  I will probably zigzag it eventually as it's the only open seam.

The only change I made to the pattern was that I lined the skirt.  I used bemberg in teal green that matched my invisible bias tape.  Now the insides are secretly gorgeous!  This is the first time that I've made a lining for something that didn't have one - isn't that crazy?  So I was actually nervous to get the pattern pieces right.  The back is the same as the main fabric but for the front I taped the pocket to the front pattern piece, and then cut that whole thing out, avoiding the seam allowance from the pocket.  I also didn't know how to deal with the zipper.  I treated the two layers as one when I installed the zip, but below it I had to separate them and seam them independently.  It is a little messy but is hidden between the layers. 

My close attention to detail meant that this dress - which could easily be done in an evening, actually took forever...in my parlance that means more than a week.  And one reason was because of that little problem with the fabric right and wrong sides.  I accidentally made the back skirt darts on the same side, so I didn't have two symmetrical backs.  I noticed it after I had sewn one side on, and already cut the seam down...then I realised the other panel needed to go on that side, because the sewn on one was definitely wrong-side out.  So I undid it and had to do a lot of shenanigans to figure out how to match up my uncut with cut seams.  Then I redid the one offending inside-out dart.  This ate up my sewing time and I had to leave for a weekend trip with the dress unfinished, grrrr.


Finally it's done, a testament to a great dress after aeons of effort.  I know it's good because I wore it to work, and had multiple patients pause while complaining about how sick they are to say, "Um Doc, maybe this is inappropriate but that's a beautiful dress!"  It seems like you can make a lot of easy dresses in less than a day, but if you want to finish a dress beautifully, a simple dress can take weeks.  A lesson to reflect on, as lately I'm getting stressed by how much sewing I plan into my life, and I'm not always sure I want to be doing all of it.  

Friday, 20 June 2014

Vogue 1351, in wool

I saw Lizzy's version of this and coveted it instantly.  I saw it in person shortly afterwards and this dress jumped to the top of my list.  I oh-so-cleverly went for some plaid directional wool that I found at Tessuti in Melbourne...thinking that it would be edgy and cool.  Rather regretted that- Lizzy's version in crepe is much better suited to the pattern.

I have always cut a size 10 in Vogue patterns and they are always too big.  So I cut a size 8 this time, forgetting that some of the designer lines for Vogue have less ease.  I lined the dress with bemberg in purple (which as you can see I had not hemmed in the pictures.)

Construction is rather confusing because you sew the lining to the inside part of the cowl, and then sew the lining in the rest of the way.  Lizzy's post on this shows the lining.  I had to lay it on the floor and move stuff around quite a bit until I got it right, but I was waiting for my invisible zipper foot and didn't have the zipper in, which made it more confusing as you are supposed to do that first.  It was not too difficult to figure out but a bit time consuming.  My only real gripe was at the end when I couldn't completely figure out how to shut the shoulder seams.  Vogue seems to have a tendency this way - to expect you to finish something perfectly by separating the lining and the fabric, and sewing them separately even though you haven't got room to do it, when I by then only have little straggling ends that won't meet up properly.  I tried to do it the Vogue way on one side and on the other side I just folded the mess together and sewed it as one (it leaves the ends hanging out at your shoulders), and actually the Vogue side looks much better even though I thought I was doing it terribly.


Anyway it got to that point and I finally tried it on...and the top half is too small.  So I guess I should have made a size 10, or maybe a 10 on top and an 8 on the bottom, after all.  I was quite disappointed which is why I just had my lovely friend Dana snap the photos before I bothered with the hemming.  Luckily I found the dress a new and enthusiastic owner so all has worked out well.  Next time (there will probably be one eventually as I still like the style and it does end up with a great finish if you take more care with the seam allowance on the shoulders ahead of time...as the pattern suggests) I would use a finer, drapier material and I would obviously avoid the diagonal directional print - although with a belt this won't look so jarring, I don't actually own any belts and am not keen to acquire them.

Friday, 14 February 2014

silk-cotton Papercut Sigma

I spent all winter making summer dresses.  Hm, deja vu?  My excuse is that when I cut this out it was summer!  Stupid northern hemisphere.

This wasn't my first project to jump into this past week.  However, Necchi and velvet didn't get along so I moved onto this.  My mother finally dragged the Singer/not a Singer out of the closet and after some initial noise that sounded like a lawn mower, it is working pretty smoothly.  I don't know whether to blame the Necchi or my materials for my agony over the latest project, but more on that later.


Yeah...those are my awesome backward pockets...

This sewed up really quickly!  I was sooo excited for it and it's cute and of course will make a delightful spring or summer dress (arggg!  I'm NOT happy about winter!  It snowed today!  It never snows in Seattle!)  However I had some issues.  The first was about the pockets.  The instructions have you put some interfacing on the front of the skirt and attach the front pockets.  They then blithely tell you to attach the back of the skirt.  Um...what about the rest of the pockets?  Since this method was new to me and seemed really fiddly and stupid, I did the second pocket in a more intuitive way (I hear Lizzy saying now that intuition always wins over instructions!) which was to apply the front and the back pockets to their respective skirt pieces, and then sew one single seam from the top of the pocket to the bottom of the skirt.  The only thing that I totally missed in my irritation was regarding the floppy pocket tops, which have to be sewn into the waist seam...um, the front part of the waist seam...so yeah, I have two backward facing pockets.  And I'm not moving them!!


I also feel like the skirt poofs out a lot, it ends up reminding me of the Elisalex skirt.  Other people's don't look that way.  I am not sure if the version without gathers is the same, or if I did something to make it particularly puffy.  I only hemmed it about 1/2".  It feels a little silly but everyone else has said it looks good so I'm not sure.  Overall this dress is easy to wear and comfortable but it does seem a bit loose.  Next time I also might shorten the upper bust darts slightly. 

The silk-cotton was a joy to work with.  The sewing machine got quieter as I worked (oiling itself?) and after my struggles on the previous project it was quite a relief to be doing something trouble free.

Details:

Papercut Patterns Sigma from the Constellation collection.
Size XS, no alterations, view 2
Fabric: silk-cotton blend from global fabrics in Wellington.
outcome: I'll do it again, with some changes

Tuesday, 7 January 2014

Papercut Peter & the Wolf, take 2 & unfinished...


After my muslin version of these pants, I knew that they would fit in this incredible stretchy Marc Jacobs wool.  Very unseasonal, until I land in Seattle in two months...So, I knew they would fit but I didn't realise at all just how much more stretchy the wool is compared to that totally zero stretch hemp/tencel.  In the hemp pants, the bagginess at the butt was a positive thing because it made it possible to fit in the pants.  In these, hm. 

I left these at full length (hits perfectly at my ankle as a full length pant.) and cut an XS.  Construction was good, although it's the first time I've worked with such a loose weave.  Not easy to get stitches out of!  I didn't quite get my seams lined up for the zip....but then I noticed that I could get the pants on without the zip.  Oops.  Then I realised I had exactly 6 hours until I needed to pack up my sewing machine to go.  There went my concentration.

So lovely people, is there any way to fix this problem that you see below at this stage of sewing???  Otherwise I could call these my lounge sweatpants...I did manage to fit another scrap of this fabric into my luggage but I'm not sure it's enough to cut another leg (for example.)


Without the waistband, a problem is found


The front isn't too too terrible


With waistband - so much room that I could pull them on without the zip!

HELLLPP!  I'm DROWNING!

Thursday, 2 January 2014

Sewaholic Cambie

I cut this project ahead of time, but started it just upon returning from my Christmas holiday.  With one week left to go before I move, I was feeling pretty stressed and wanted Cambie to go really well, not cause trouble, and to look awesome at the end.  I have a beautiful second Cambie waiting...if if if this pattern didn't cause trouble.

The fabric is a silk-cotton jacquard that I got from ramie and linen on etsy.  They are a wonderful resource and I have bought many other fabrics there (notably my incredible to-die-for stretch silk.)  The outside has an incredible shimmer to it, and with the lining this is a really warm dress...too warm for summer...


I cut a size 4.  I didn't make any alterations to the pattern, and quickly realised I should have gone down to a size 0 at the hips.  I don't like how much the hips stick out.  For the lining I used Japanese cotton batiste for the bodice and black bemberg for the skirt.  That way it will be a good winter dress.

As has been my issue lately, I have no clue how to finish my seams.  I zigzagged the pockets and left everything else.  Eventually the skirt seams all got attacked by my pinking shears, but I suspect this is not a mature way to end things.  Probably it's another topic I'll have to tackle in a few month's time, but I do see that my sewing machine has some interesting stitches I could probably use to finish my seams.

But overall, this went exactly as I hoped!  I could have shortened the skirt by about 4 more inches, and I did go the lazy way out and just hemmed the skirt by machine.  I really don't like the hips sticking out so much, but by keeping this version of the dress a bit long it does balance out.  And the way the lining goes in, as everybody has mentioned so many times, is magical.  Utterly magical.  I'm in love with how beautifully this dress is finished and I want to do everything like this forever.  And my waist and neckline just about match up perfectly!

This dress fits exactly right, except for that 1 inch bodice shortening that I have not yet implemented.  Another fix for the next version...which won't be coming up soon, sadly. 

Monday, 23 December 2013

Vogue Paris Original, V2323 - muslin

In love with this dress pattern!  Here is the cover of it.  It's my first seriously vintage pattern and I really had no idea how things would progress.  I decided to do a full muslin, underlined in silk, to see how (whether) it would fit and also to get the hang of using gelatin to make the silk easier to work with.  I made the muslin from a leftover piece of herringbone black wool with silver lurex threads in it.  The underlining was a silk chiffon.  I used this technique with gelatin prior to cutting and ironing the silk.

Because this was my first ever muslin, I mean an actual one, I did it in stages so it kind of felt like it took forever, although sewing the pieces together was easy.  I ignored a lot of the subtleties in the instructions and didn't do any gathering stitches except on the sleeves.

The pattern is slightly small for me according to the size chart, but came with all its pieces and they were in great shape.  It seemed like a relatively straightforward construction.  The puzzle piece on the front creates most of the three dimensional shape, and I love how clever it is (although after lots of pinning of Polly tops, I initially suspected it would be very tiresome to sew together!)  In actual fact you are supposed to gather the curves (which I didn't do on my muslin) and it is supposed to hang flat.  (Mine really doesn't since I didn't put much effort into that puzzle piece front.)  I had forgotten that in the 70's, dresses were shapeless sheaths.  Also I think it looks much better in 2 colours!


I was surprised how huge the dress ended up.  The silk underlining, which I sewed onto EVERY SINGLE piece, meant my pieces held their shape - the wool would have definitely started to stretch alone.  So there wasn't distortion increasing the size.  Seems that Vogue in 1970 already ran big!  I cut off 7 inches of the bottom (and I'm thinking of cutting off more), and I considered cutting a bit off the side seams but ended up leaving it.  On my final version I'll just cut my fabric shorter to start with.  Not sure what I will do with the side seams.

My final version is planned in silk velvet.  I was planning to underline as I did on my muslin, but my facings were really annoying and it has you hand sew down the wrist seams and such...so I think I'll just do a normal lining so I can have a neater inner finish.  I was also planning to use cotton voile for the underlining, and now I'm considering using silk or even bemberg, just to make sure it doesn't stick to me - since the velvet is quite heavy this won't be a summer dress!

I was really hoping that I wouldn't need to make any big modifications because I wasn't sure how I would face the puzzle front if I had to do an FBA, for instance.  Luckily I don't need to change anything.

Thursday, 19 December 2013

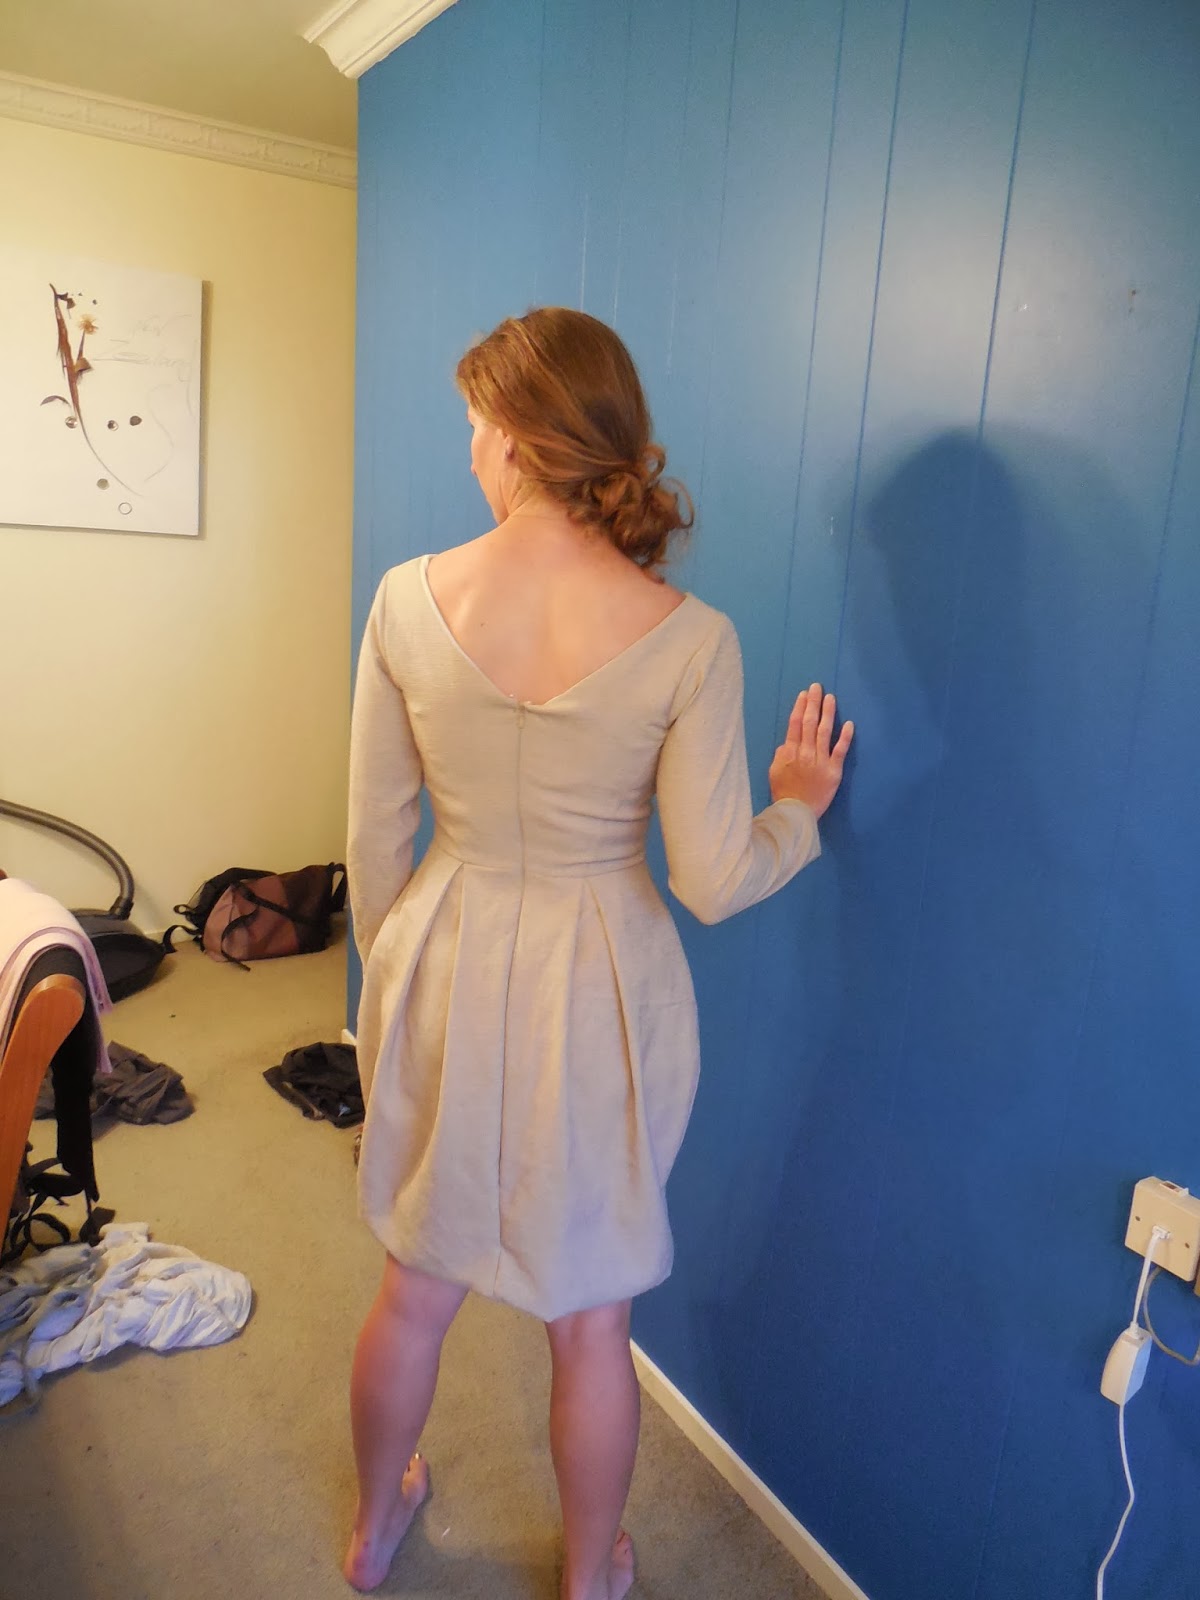
My tragic Elisalex is a work in progress

By Hand London and I have some size issues.
My two Anna dresses sadly didn't fit very well - my first size 6 was too small, and the 8 was way too big (but fits my friend Ellie perfectly!  It was fated!)  My third Anna, which I did after the Elisalex, was a size 6 and was also slightly too big.
My Polly top was a size 6 with an inch shaved off the shoulder height.  And it's rather baggy but in an ok way.
When I looked at the final measurements chart for the Elisalex, the 8 seemed pretty reasonable if I accounted for BHL not leaving any ease.

Oops.  Such a wrong call.


Back to the beginning - my fabric is a linen-silk with lurex threads.  It doesn't have that much body, and in fact wasn't my original choice for this dress.  But I love this fabric and I love the idea of a cream coloured shiny Elisalex, I thought I would prefer the tulip skirt with less out-ness, so I went with it even though it's definitely not long sleeve weather. 

I cut off 10 inches from the bottom to start with and sewed it up without other pattern changes.  Once it was together I had two issues - major hugeness, and not being sure whether I needed to give myself more booby room.  I just can't tell if the princess seams are too tight!  I cut one inch out of each side of the centre back.  That fixed the overall too-bigness (and was possibly too much).  Then I started to shave off the princess seams and now I think they are better but they are lumpy.  At this point I still have no clue what to do with them.  The chest needs work. 

I have pinned the hem up about 6 inches.  (On top of the 10 inches I cut off initially!!  Do not forget to measure the length of your Elisalex!)

I would consider this a work in progress - I'm tempted to take off just a bit of the side skirts so it's not so tulipy.  I need help understanding how to make the princess seams fit my chest.  Probably I should have done an FBA.  I am doing what we do when things go wrong...taking it home for my mother to look at...since I'm moving I am in a crazy busy state of trying to get all my remaining projects at least cut out so I don't have to travel with extra fabric!  23 kg luggage limits are the bane of my existence!

On the bright side, my zipper looks awesome.  It's the first invisible zip I've done that looks invisible!  Hurrah!