Tuesday, 11 February 2020

Shape shape 2 double layer skirt in silk

My library had a copy of Shape Shape which I took home to peruse. I've been on a mission to make a poufy double or triple layer silk skirt and I recently acquired three colours of silk.  I was initially going to do a gathered skirt in three layers, but this caught my fancy instead.

I prepped a size small despite being worried that it will be too narrow in the hips.  The measurement is only off by 1" from my measurements, but I thought Japanese patterns tend to be really tiny.  I expect to make an M in Japanese patterns, not a small.

Ugh adding seam allowances.  But the pattern is only two pieces so I guess I shouldn't fuss too much.  It uses 2 separate rows of narrow elastic instead of a single wider elastic, which I thought was interesting.  Basically in the end you have 4 separate pieces of elastic around your waist. (Good? Bad? I'm actually thinking not very good.)

I used two of my three silks: silk organza in a very light gold colour, and brown crinkled silk, heavier than chiffon weight.  Because both are relatively transparent I did french seams on the sides and on the bottom where the two fabrics connect.

This turned into an exercise in imprecision. The crinkle silk was crinkled when I cut it, but obviously stretched when sewn.  I ended up with this:


I cut off that edge!

I overlocked the waistband before folding it over, and because of my french seams I then did the two waistbands separately, folding the waist over enough to hold both, but sewing down the top one, inserting the elastic, and then sewing down the second one.  The organza could have done with a tighter fit - the elastic slips around in the casing and it does rotate.  Since there are 4 elastics which are all slipping and twisting separately, the waistband isn't that comfortable.


End result: The waistbands bother me a little, but the concept of the skirt is still pretty fun. I can wear it in four ways - I think twisted looks more interesting than straight, and time will tell if the waistbands shift around a lot with movement/life/walking.


It's hard to tell if my fabrics make the skirt large, but it's definitely big enough.  The small was fine. The crinkle silk obviously stretches a LOT, and I will admit I cut out the organza without many pins (which is still more than usual!) ...so it might have shifted.

This would be fun to make in voile, and I think fabric that doesn't need french seams is better - you can use the technique in the instructions for the waist elastic, which will lead to it being tighter and not twisting as much.


Monday, 10 February 2020

Tamarack Time at last!

I've been about to make a Tamarack Jacket for about 4 years!  Seriously!  I bought the pattern as soon as a snap front option was available.  I cut it out once.  And then I just didn't believe it would fit.  I couldn't find good binding.  I left it behind and never came back to it.  Then I cut it out again another time.  I decided that fabric was a terrible idea and I ditched the plan. (true, it was neoprene, it would have been horrible.)

I think it is actually too bad I didn't make this back the first time I was prepping it, because I struggled for ages with jackets due to trouble fitting my shoulders. The drop shoulder in this pattern is a lot more forgiving than other patterns coming out a few years ago, and it might have inspired me in different ways at the time.  Anyway now we have so many drop shoulder options, it's no longer an issue!

Third time was the charm.
Fabric is pre-quilted Nani Iro from Miss Matabi.
Size 4.
Binding is linen from The Fabric Store.
I added patch pockets because I still did not TRUST this pattern to fit me, for some reason. I wasn't willing to commit to welts.


To my surprise it was so easy to make.  I sewed the bias tape to the inside first and then to the outside, because I have zero faith in doing it the other way.  I was annoyed by the instructions, hoping there was going to be some really cool method for mitring the bias tape, but in fact the way it has you sew the bias down is pretty cool and definitely effective.


I have a wild idea for a dramatic modification and I've been thinking about it and collecting the bits for months, so there's an underlying plan going on here.  I'm already thinking of another (third) Tamarack, with the welts, maybe even in quilted silk (I have some really precious bits of silk around and it's annoying that I haven't found a use for them yet.)  But my Prym snap kit is not up for the task so then I start thinking about how I need a proper snap setter.  Hm...

Anyway, I'm really happy I finally did it and made a Tamarack! 

Sunday, 2 February 2020

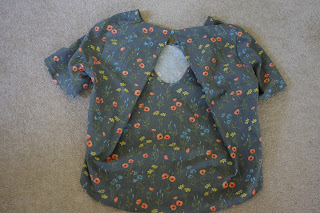
Papercut patterns Kobe top in linen

I bought this pattern when the Sakura collection came out. I bought it because I was buying something else, and because I was so curious to see exactly what was happening. The model photos are some of the worst I've seen for actually showing you what's going on with those pleats.

(The answer: a bound keyhole with the pleats meeting over top where they button together.)


For some reason my curiosity rose again and I suddenly had to make this top.
I used a piece of linen blend that I got from Miss Matabi and have been holding onto.  This was a bad fabric choice - it's so pretty!  But this top (and presumably also the dress) need fabric with NO body and ALL the drape.  Learn from my mistakes!

I made a size XS and I shortened the pattern quite a bit.  I shortened the front one inch, just folding away at the SA marking on the hem.  For the back I went crazy and I think I did a decent job...I could shorten the back even more!  I started a curve at the final side seam marking, and tried to make it the same as the curve already there. At the centre back, I had removed 3.5 inches or so. 

It was actually a really fun and satisfying make.  You do some binding first, and then the pleats, and then you are basically done with the whole thing.  I put it on and discovered how linen was a bad idea.  The pleats in the back create a huge amount of potential space, and this all lurks in the armpit area.  It would likely be fine in a really drapy fabric, but I don't like the way it sits in the linen.  It might also be a lot better in the dress, because that excess fabric would be useful over the hips.


The front is also really short compared to the back.
I was a bit disappointed after making this but now I'm kind of getting inspired to make one in some drapey silk.  Also, it goes really nicely with these red shorts!

Saturday, 1 February 2020

Megan Nielsen Dawn jeans, take 2 in yellow

I was pretty hyped up after I made my first Dawn jeans. (See them here.)
That turned out to be good news.  I immediately pulled out my yellow fabric and pattern tracing paper and got working.

I removed 1" from the rise all the way around, sort of midway between the crotch and the waistband.
I deepened the pocket opening a whole heap* (more on this later.)
And I used the Persephone crotch to adjust the upper thighs.  What I discovered, doing this, is that the Persephone wanted me to widen the upper leg and extend the kind of triangle bit of the crotch by quite a bit in the front.  I would have expected to do changes in the back, but I trusted.  I cut my pants out (cropped version.)

THEN I had to recover from my Dawn Jeans. This took awhile and if I hadn't done those adjustments I would have totally forgotten what I needed to do.

What finally spurred me was: going to Hamilton for sewing day with one of my best friends. I thought it would be great to get this huge project done in a dedicated day.  I am still working through a sort of queue of projects and then I plan to take a big relax break.  But each project takes time and energy, so it's nice to have the really big dramatic ones done and out of the way.  I mean obviously I don't actually need any clothes.

I sewed this on a cheap Brother sewing machine.  Tessa and I have sometimes been amazed how great this little mechanical workhorse goes, and this was a case in point.  Her overlocker is DYING for a service so my overlocking is shabby, but I had no threadnesting even with the topstitching thread.  Also, unlike all the other machines, it does a 4-step buttonhole.  I was really happy to get my visible fly out of the way, knowing that at home I have NO functional buttonholing.  Apparently the newer model of the Pfaff passport has added a manual buttonhole option.  I like making jeans enough that I'm trying to figure out how to make it less miserable - another machine?  Like an industrial one?  What can I do to actually have a machine that will make buttonholes?


I had to leave off before adding the waistband, sadly, and more sadly in retrospect because then I had to do it at home.  I did learn from my first Dawn experience.  I took off the IDT early and I bar tacked the belt loops.  I used a jeans needle for everything and I also didn't stress too much about the heaps of bird nests inside my waistband.


These jeans, as I commented on instagram, were all about just getting them done and worn.  I didn't aim for perfection.  The Brother machine didn't do particularly straight topstitching, and the quilting foot made it hard to actually measure my 2 rows of stitches against each other.  Those were the trade-offs for using that machine.  My Pfaff makes visibly neater, straighter topstitching.

I worked through all the dramas in one big push because of course I had already tried these on and knew that I'd achieved a jeans nirvana regarding fit.

It worked!  My Persephone adjustments worked!
Unfortunately, my changes to the pocket were ill-advised. I still can't really get my hands into the pockets because now the openings are flush against my hips, AND the less fabric in that area, due to dipping the curve of the pocket, means they pull open.  Drat!  I'm going to wear these around and see if the settling of the fabric improves the problem, otherwise I might even decide, horror, to sew them shut.

Other note: I used my second Megan Nielsen hardware kit for these, so I didn't source the bits myself.  Easy.  I even went crazy and added another label inside.

Arg now I'm TOTALLY addicted to making jeans.  Help!  I have even printed out the Ginger pattern.  When will sewing not be a slippery slope?