Monday, 27 December 2021

A multitude of tops: LB top, Hemlock, Glacial

This was prompted by a need to make a top for a friend, first of all.  But also, I had had a Vision, as you do and needed to follow it through. 

First off: the LB top by Paper Theory. As I have done before, this is without the funnel neck and without sleeves and without any other modifications. It creates a simple little shift top.  In this lovely flannel like fabric from Lamazi fabrics it's so cozy and drapey - I bought the wrong colour (it's hideous!  Haha the combination of dark green and gold really isn't my thing) and will suit my olive skinned friend Regina to perfection.  I use a small piece of bias binding for the neck, just folded over the sleeves on a double fold, and same to hem the bottom.  


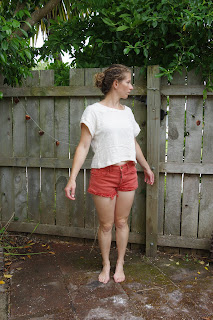
Grainline Hemlock with minor modification of the sleeve 

This is a one-size pattern. 

This was my vision.  I have worked this pattern to death and my pattern pieces are a mess because of that, many pieces of badly labelled and taped together tracing paper.  Am I the only one who only accepts wrapping of my shopping if it will be wrapped in white tracing paper that I can reuse for sewing?

This version has just a bit of the sleeve added onto the shoulder compared to the original (which is a FREE PATTERN) - really just enough to create a seam allowance.  I have long since cropped it from the original which is a long shapeless top.  I then did a cuff of the same size as that sleeve bit - think maybe I should have tapered it a little. The cuff is folded double.  This fabric is by Mind the Maker.  It is their oeko-tex 100% cotton "organic slub jacquard".  It is quite heavy, almost sweaterlike, with only mechanical stretch and texture woven in.  Therefore a bit tricky as you need to think carefully what pattern it will suit.

 When I made this top I was really disgruntled the entire time because it looked so big and so...meh.  But the pictures show me that despite various neck band issues (I think I was planning to do it as a facing style band but that stretched out like crazy so then I did a tshirt type band instead), it matches my vision exactly.  I wanted a cropped but oversized pale top to wear all summer.  I need to get on with that next step - "wear all summer" cause the hot days are here. 


Pattern Fantastique Glacial skivvy, S 

This is the third of the tshirt bundle from Pattern Fantastique.  The price for the bundle was good.  I suddenly wanted a nice baselayer top (which I won't wear for months, honestly) and I thought this would be a great choice.  I didn't size down as the fabric I am using is a medium weight and not super stretchy, and the pattern is specifically drafted for merino blends.  This is another one of the Oeko-tex fabrics I got from my european shopping binge, this particular one from Ansje Handmade.  It is Mind the Maker organic woolen ottoman, 85% cotton, 15% wool.  It has a kind of horizontal rib look on one side and a smooth other side, and has a bit of a sticky feel ie none of the drapey dampness of rayon or viscose.  I went with the short waist length and to my surprise for a baselayer I could even have gone longer.  The long sleeves are just as the pattern says they will be - they go perfectly to my knuckles.  Near the end of winter and in early spring I was wishing for a top like this so I assume once the weather cools again I will wear it a lot.   


These patterns don't have any instructions, which is why they are cheap for the 3 patterns - but there are some instructions online if you need them (I think the Aeolian has more detailed instructions somewhere online too.)  I'm really enjoying this tee bundle!  The Equinox was lovely, though now that I've worn mine I will stick with the smaller size I made - and I'm sure once I get the itch to make the Aeolian I'll go crazy and make 3.


Friday, 24 December 2021

Vanessa Pouzet La Boheme skirt review

I saw this and I was so sucked in!  I have needed ("needed") skirts lately after many years not wearing skirts, and trying to figure out what I want in a skirt has been a challenge.  Well, this was it.  I read all the blog posts.  The two in English insisted that it's easy and also one of them said she has written English instructions and sent them to Vanessa - but my email asking about these never got a reply. Like everyone who speaks a few romance languages I can piece together some French, but it doesn't make the sewing process easier.
Overall I would say the instructions made sense to me, but I glossed over them, and my errors and dramas are more likely due to me than to the instructions failing.  

I cut size 38 from a lightweight cotton I had been saving for a Wilder Gown (the ONLY FABRIC in my stash that I had in 3m).  I cut 3" off the bottom.  My notes suggested I would want to take off anything from 3" to 15 cm and I went with the minimum.

The almost mistake I made is that you cut two identical side pieces AND 2 snail pieces - I initially thought just one, but I did have enough fabric for the second.  PLUS two full width waist pieces, but the truth is the length of those doesn't matter as much. The shape of all these pieces is what eats up fabric, and that's a harbinger of the sewing experience.  

I found the sewing to be exhausting.  However, I was having an exhausting week, and this skirt which really is about a 3hr effort took me a week and was FULL of drama.  I planned to french seam the whole thing.  No prob, seamed the back, applied the waistband just to avoid stay stitching - ALREADY I was setting myself up to fail.

The hem of the ruffle - either don't hem this, or use a skinny rolled hem foot.  I don't have that foot for my Pfaff.  I am going to fix this.  So I did a manual skinny rolled hem.  It sucked. It doesn't look that great.  It took forever because it's many meters of sewing and on a constant curve.  This skirt is all about sustained sewing.  You only actually go to the sewing machine something like 5 times, but each time you are sewing many meters long and it's funny how tiring that is.  So then I french seamed the ruffle (it's not actually a ruffle, it just behaves that way due to the grain it's cut on, so clever!) to the skirt, this was a BAD CHOICE.  I realised after all that, that I didn't have a way to finish the upper side of the skirt.  In fact I was upset because I thought the ruffle should go all the way to the waist.  I think the instructions do specifically instruct you to do the following: 

-(don't sew on the waistband first)

-sew the ruffle to the skirt 

-overlock or finish that seam all the way from waist to waist 

-iron it upwards towards the skirt

-topstitch

Then you can apply the waistband.  

If that's not what the instructions say, they should.  

I kept trying this skirt on and being grumpy and realising it looked really good despite all this drama.  And that was when I faced a trying fact of life and sewing: sometimes you just need to do a muslin.  This was my muslin.  Thank god for my friend who I send clothes to....no muslin ever goes to waste.  So before I finished the skirt I was piecing together the next one in my mind.  Other key feature: linen so I don't have to finish the hem.  And I will shorten it another 3". 


The rest of the skirt was simple, you have been instructed to fold the SA up already on the waistband and you just topstitch it all together, then make a buttonhole wherever you want so that one waistband goes through the other.  I did put some interfacing on my buttonhole area before I shut the waistband.  And yes, I love the finished skirt, at least the idea of it.  In fact I don't think the ruffle should go all the way to the waist, it would add some annoying flopping around near the top, whereas the way it's drafted the front lies flat.  On mine I will add Pomona pockets.  I have even managed to go to The Fabric Store in person (!!) and swanned around through all the linen until I settled on a dark fir green, so that will happen soon.  I'm happy with the size, there is a great amount of overlap, and the ruffle on the underlayer sort of holds the top layer in place so they are less likely to split open - even when they do I think you can't see much higher than my knees.

Thursday, 23 December 2021

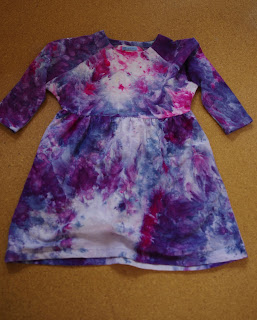
i am Cassiopee dress + some ice dye

 I've really wanted to make a second Cassiopee (first is here) and maybe cut down the sleeves.  In silk.  I bought some lovely flowered silk.  Not enough.  Drat!!  This dress is so wide, I think optimally a super light fabric will be amazing but I have to quit my habit of buying 1.5m of everything.  It's easy to think a simple dress doesn't take up much fabric, but these huge raglan sleeves consume, and any gathered skirt always needs more than you think.  It would be possible to narrow this pattern by taking out some of the side seams of the skirt and sleeves, but it would be quite a major change to the pattern pieces.

Cue my new ice dye obsession.  White jacquard cotton from The Fabric Box (along with so much other white fabric!  White is not safe!  Ice dye it all!) Colours are fuscia-navy-cobalt which according to the Procion colour chart should create a mixed dark purple.  I purposely added different amounts of the dye to different parts of the dress by cutting out all the pieces, overlocking all the edges, then dyeing them, and then sewing it!  (triple the work!!  Plus I am not sure you can even tell!)


So of course this is not really a lighter fabric than my first attempt, but at least it has pockets (did you need to ask? Bardon pockets.)  When I made the first dress, my love for Orla Kiely was outweighed by my annoyance at oversized things and I gave it to a friend who wore it as a tunic over leggings.  Now I'm looking at it and it seems all the great oversized fashion of NOW, so I was just ahead of the trend.  I don't know how this particular version of the dress will go but I'll give it a chance in my wardrobe, might try layering it over a silk slip or something. I also might chop down the sleeves at some point.

Still want to make a short sleeved one in silk.  I think that's really where this pattern would shine! 

Friday, 17 December 2021

Friday pattern Co. Adrienne blouse review


I became interested in this top via instagram.  (Specifically when @s.is.for.sew posted a ribbed version, that's it, I was lost.)  I have been kind of put off by the Friday Pattern Co because they are pretty heavily advertised by paid instagrammers, and though I have eventually been curious about a few of the patterns, I like a lot of things.  So it took awhile for me to warm enough to decide to test one of their patterns for myself.  My enthusiasm peaked when I realised people were taking volume out of the sleeves, and that it didn't necessarily go off the shoulders (I can't stand off the shoulder tops.) 

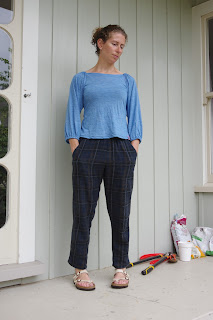
So this top is a knit, relatively fitted and short waisted tee with a boat neck, elastic over the tops of the sleeves, which are billowy and bracelet length, also with elastic.  The recommended elastic is bra strapping, which is genius.  The sleeve pattern piece comes with a line to decrease sleeve volume.  

Fabric: The Fabric store Merino/viscose blend

Size S (It's very fitted so I didn't size down) 

I didn't lengthen or shorten it.  Shortwaisted for the win here! 

I removed 4"  YES 4" from the sleeve volume.  No other mods.  

The way this top comes together is unique.  It is a breath of fresh air.  You get a knit top without realising you've just finished because you are doing different things than the standard tshirt.  Initially I thought the angle where the front and back come together with the sleeve would irritate me (it's a bit bulky.  And it's hard to get even) but once the top is on, you can't tell.  Also, the top is symmetrical front to back so my technique was to try it on and go with the front as the side that looked better as a front.  I um made 3 

First one was a win


Second one is for a friend.  No mods though I experimented with the shoulder elastic being a few mm shorter.  This is the end of the some grey cotton blend from Mood.  Enjoy the weird light as I wandered around my house testing every angle for good enough shade.  


Third one is a tshirt.  I cropped the sleeves at 3".  As you can see they kind of poke out.  For a tshirt, I'm not sure this will be a summer win, it's the combination of quite tight which is too tight for summer and with sleeves that take up space, which doesn't fit under a cardi - but we will see.  I had a catastrophe moment when I cut my beautiful label in half which was going to Make the Top and I had to turn it into a Design Feature.


I considered making a fourth but I thought I should really stop here.  Thus I can say my first experience with the Friday Pattern Co was shockingly positive. The pattern took up very little space, best to print on A4 because it's not even a whole A0 page.  The instructions were great.  The drafting is fab.  No complaints (for once!)