This was another Goodwill interpretation. I found a size-XL Halston stretch silk muumuu, and got to work destructing. (Still forgot a pre-demolish picture, sorry.)
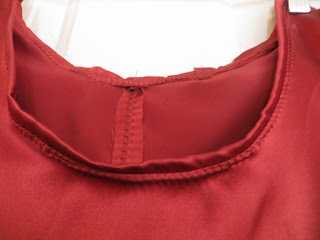
First I made another mission tank. I got a bit lazy by the bindings because I had to piece them. I used a zig zag on all the edges for finishing, which started out when I zig zagged the center back and then just carried the theme through. The new sewing machine doesn't seem to have very many settings for the zig zag - you can't get it very wide, and it pulled the silk into a little tunnel which was irritating.
Unfortunately, stretch silk may indeed be stretchy, but that doesn't mean you can indiscriminately use the same sizes that you use for other stretchy fabrics. This top is way too tight in the bust. I did extend the line from the bust to the hem a bit more A-line than the original pattern so it skims below the bust, but not on me! Best for my friend R!




After I finished that, I made an Emmeline - using my old pattern with the Polly top hem. My energy for this was flagging by the end and it sat around awhile. I wanted it to be much nicer than my blue Emmeline - I didn't cut my French seams before flipping them so the blue one has lots of threads leaking everywhere. Not to mention that using the rolled hem foot didn't really create nice armholes. The stretch silk was a great option for this because it has a nice loose drape but it's stretchy and comfortable to wear.
For this one after the French seams, I inspected the armhole and then did a kind of accordion maneuver instead of binding it. I got this idea from some RTW and I hope it doesn't end up looking ragged, but it followed the natural folds that the French seam had done and it was relatively easy. Then I carried this effect through by only sewing the bias to the inside and then cutting it all even - again, will this turn ragged? Not sure. I made a fine rolled hem by hand just because. My design features mean that this shirt functions reversibly! The matte side is the technical exterior, but the French seams of the shiny version are all matching design lines and I could absolutely see it being worn both ways.


I was sick of the Emmeline pattern after this. My initial goal with the Emmeline pattern was to do something really simple with silk, and the indistinct armholes (not even mentioning the other two versions of the Emmeline, which I think are terribly drafted in the arm), make it hard to get that nice clean finish, and so I doubt I'll play with the Emmeline anymore.
Whereas eventually I'll make a few more Missions : )
First I made another mission tank. I got a bit lazy by the bindings because I had to piece them. I used a zig zag on all the edges for finishing, which started out when I zig zagged the center back and then just carried the theme through. The new sewing machine doesn't seem to have very many settings for the zig zag - you can't get it very wide, and it pulled the silk into a little tunnel which was irritating.
Unfortunately, stretch silk may indeed be stretchy, but that doesn't mean you can indiscriminately use the same sizes that you use for other stretchy fabrics. This top is way too tight in the bust. I did extend the line from the bust to the hem a bit more A-line than the original pattern so it skims below the bust, but not on me! Best for my friend R!


After I finished that, I made an Emmeline - using my old pattern with the Polly top hem. My energy for this was flagging by the end and it sat around awhile. I wanted it to be much nicer than my blue Emmeline - I didn't cut my French seams before flipping them so the blue one has lots of threads leaking everywhere. Not to mention that using the rolled hem foot didn't really create nice armholes. The stretch silk was a great option for this because it has a nice loose drape but it's stretchy and comfortable to wear.
For this one after the French seams, I inspected the armhole and then did a kind of accordion maneuver instead of binding it. I got this idea from some RTW and I hope it doesn't end up looking ragged, but it followed the natural folds that the French seam had done and it was relatively easy. Then I carried this effect through by only sewing the bias to the inside and then cutting it all even - again, will this turn ragged? Not sure. I made a fine rolled hem by hand just because. My design features mean that this shirt functions reversibly! The matte side is the technical exterior, but the French seams of the shiny version are all matching design lines and I could absolutely see it being worn both ways.


I was sick of the Emmeline pattern after this. My initial goal with the Emmeline pattern was to do something really simple with silk, and the indistinct armholes (not even mentioning the other two versions of the Emmeline, which I think are terribly drafted in the arm), make it hard to get that nice clean finish, and so I doubt I'll play with the Emmeline anymore.
Whereas eventually I'll make a few more Missions : )


