Showing posts with label silk. Show all posts

Friday, 6 March 2026

Sew Liberated inspiration: Fancy Chanterelles in D&G

 My first pair of Chanterelle pants were a huge success.  I wore them all the time all summer.  The only tiny adjustment I thought would be good was to shorten the rise just a bit.  So when I was buying ridiculous and expensive fabric from the UK, my justification for buying some transparent Dolce & Gabbana seersucker silk was to make Chanterelle pants.  Of course it was.  And to do it quickly before I got scared of the fabric or overwhelmed by the very idea.  I used the same pattern pieces - size 6.  I also had actually made cardboard pocket things to fold over my pocket edges when I made these the first time (unusually thorough of me), so I used those.  

Transparent fabric needed some underlining.  I underlined the pants to below the level of the pockets with some soft white cotton/silk that I had lying around.  This is sewn into the pockets so it really can't flap around much.  I shortened the rise as planned by about 1 cm or maybe 1/2".  The fabric frayed quite a bit so things needed to be done quickly and efficiently without too much error.  Luckily these are very fun and a straightforward sew.  I didn't have any particular issues with construction.  The fabric was well enough behaved that other than using a lot of pattern weights I didn't do anything extra, I didn't use gelatin to firm up the silk. 

I was however worried that I might be making clown pants.  They are pretty loud.  


I thought they deserved a solid photoshoot and time was on my side: we ran the Hobbiton half marathon last March and I had them done before we went away for the race.  (Side note: It was one of the hardest trail races I've ever done, mostly along goat paths with very little formed trail down the side of hillsides that look bucolic only from a distance.  There was an optional swimming hole dip at km 10 and I forfeited a good race time to have a good swim instead.)

So here we are the day after the race, limping slowly through overpowering sun on a Hobbiton tour.  I'm very glad I went, ran and toured but I'm not a movie fan and so a lot of the detail was probably lost on me.  And no, we did NOT sign up for the race for next year.  My pants made me feel very sophisticated but I think I didn't really need the change in rise, it ends up pulling at my waist when I bend over.  Probably I need that rise as ease for movement, so I will stick to the original pattern in the future.  

I was considering making a cropped pair of Chanterelles.  However summer has already come...and is going...so we will see. 

Tuesday, 27 February 2024

The Friday Pattern Co Victoria blazer review

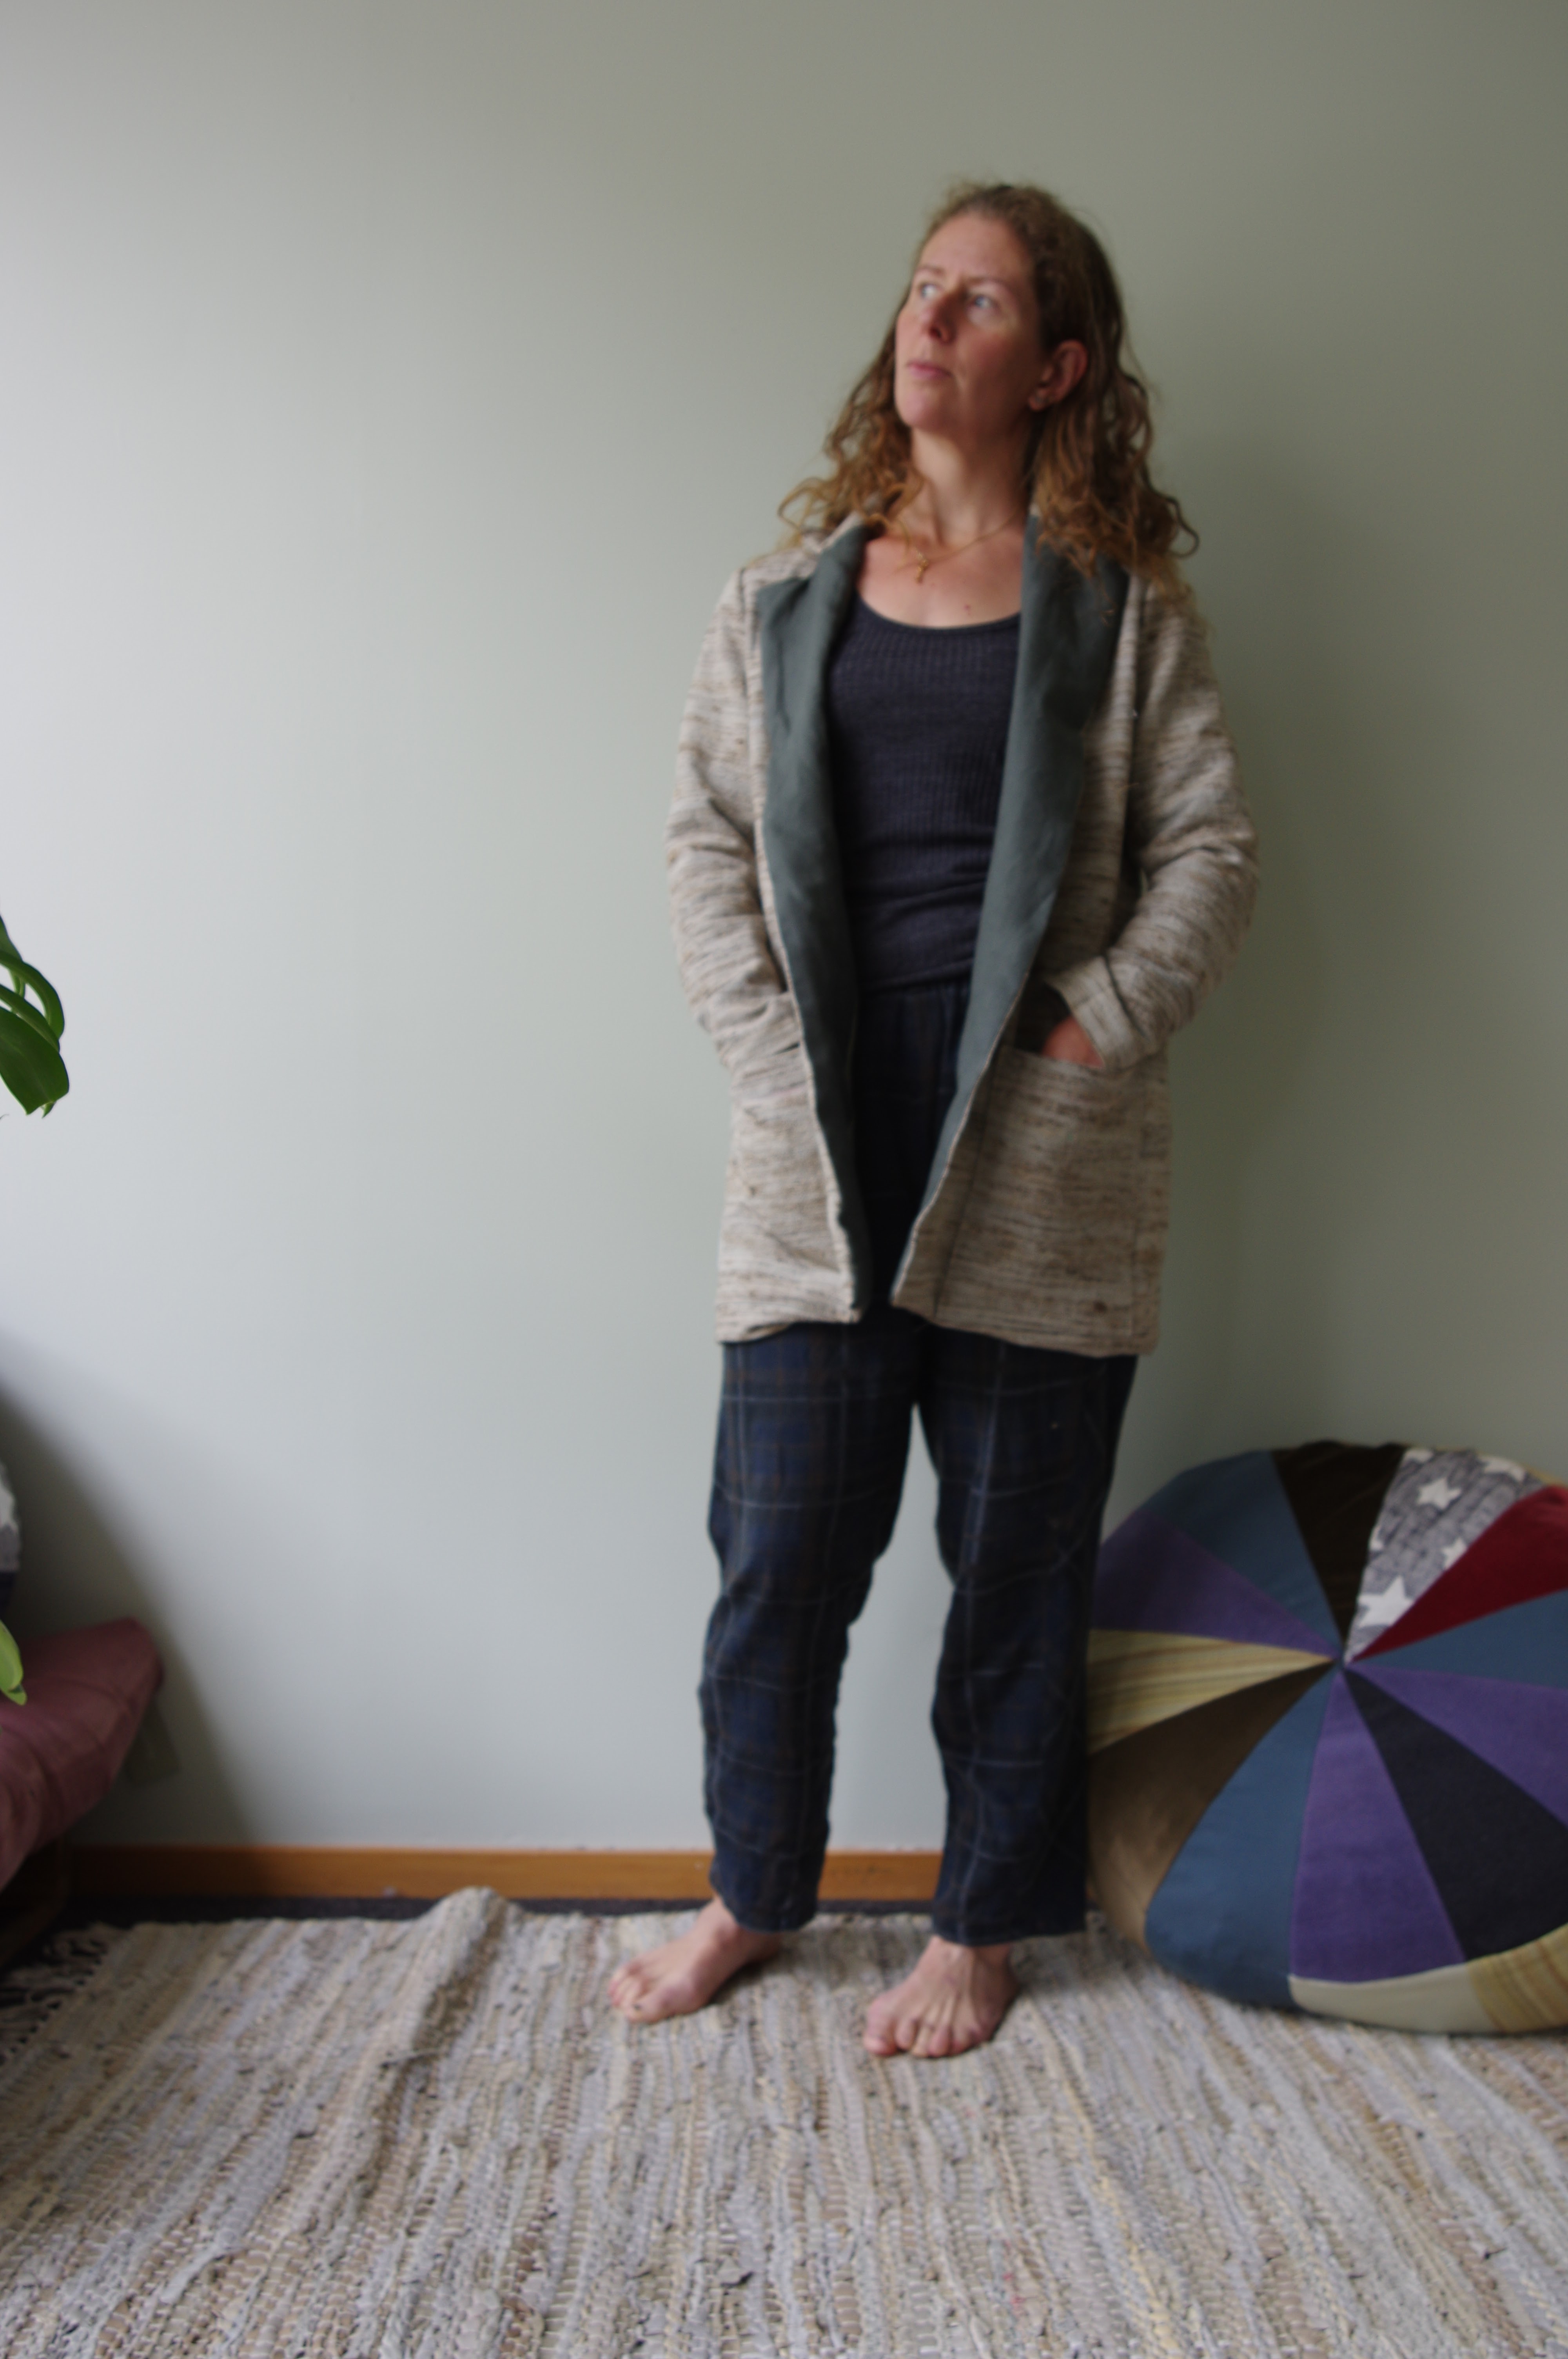
My experience with the Friday Pattern Co has been intense in the past few months, and it has seriously been pretty checkered.  I knew ahead of time that this pattern has a rather tight sleeve - during our sewing weekend in Auckland I got to try on an XS in progress.  Thus I went with a size S.  I knew it would be long and so my vision was a kind of coat/blazer crossover.

I did not really anticipate how much fabric this needs. I'd considered a lot of different fabrics for it, but settled on a loose woven silk from Nepal, and it's a loomed width (110 cm) and it was not enough...so for the facing I went with a contrasting green linen.  I did NOT at any point think about how the facing of the front lapels would be actually so visible.  Once I realised that I committed this in my head to pretty solid muslin territory because I was not super enthused.  

Things started with some challenges.  The pocket placement is extremely and oddly low, the marks line up the pockets near the hem of the blazer, so I moved them up in order to have a hem in the end, this was still not really helpful as the pocket location meant I couldn't vary the hem upwards by much (unless I wanted to sew into the pocket).  The lining gap is in a strange location, and so I moved it a less obvious location.  Naturally I managed to octopus my sleeve hems into a mobius strip and had to undo the first one, ugh.  I did hand sew the seam allowance of the sleeve cuff together so it wouldn't flip out, and that small amount of extra work did seem to improve the sit of the lining in the cuff, and keep the cuff from unfolding outwards.  I'll keep that in mind for future makes.  I think there are recommendations to sew the lining of the hem like this as well and that makes sense because my hems of lined jackets always droop.

I was already pretty down on this because of the non-matching facing, and so when the hem went to hell in a handbasket I didn't fight too hard. Nothing lined up.  In order to create a semblance of closure I had to create a hem from nothing and the result is this totally horrible curve to the hems and some super dubious handstitching.  Far from finally learning a cool way to get that tragedy of hem, lining and front facing to meet in a friendly fashion, this was a ruin because the length of the facing, the amount of seam allowance of the facing towards the lining, and the lining/hem interface did not match as the instructions suggested they should.  It certainly could be due to interfacing the facing, so it was longer and pulled differently than the silk. Maybe it cut differently than the silk.  No idea.  

My final feeling was that although the fit of this isn't terrible - it does fit -  I never really like lapel things and I don't like this lapel thing, and I would never make it again and never try to figure out what has gone wrong with these instructions and placement of things.  I have previously mused that I will only be happy with a real coat or blazer when I commit to a serious one with layers, pad stitching, shoulder pads, and other tailoring realities that I only know about in a hazy vague way.  I think that's still the case.  I'm too picky to like an easy sew when I want the result of a complicated and well-designed project.  


This might suit someone who really wants that easy sew (which is most of Friday's market) but I don't have advice for the hems except to say maybe it was just me.  I recommend putting on the pockets late in the process when you can double check you are happy with the location.  I don't like the way it fits across my back - maybe I need some kind of wide back or muscled neck adjustment, but overall the fit is not the problem with this pattern.


Tuesday, 6 February 2024

Vogue 1821 - Rachel Comey dress review


I really thought hard about this project before I started.  My friend Tam had made it and sent me the pattern, recommending I leave off the pockets.  I thought this kind of fit might suit me very well indeed, but I did want pockets for my first attempt.

On size: because I was tempted to size down in the Merchant & Mills Box box dress, and the problem with the slightly dropped shoulder is that it actually needs to be oversized to hang straight down, when I sized down, the entire bodice fit poorly.  I was considering that when I evaluated which size to make here, thinking long and hard about oversized vs too oversized.  I checked the measurements of the sleeve to make sure they'd fit and I think that's why the size XS seemed ok, as I knew it wouldn't be too snug on my biceps.  I think maybe the hang of the dress would be better in S, but it's such a huge tent that I'm not sure that would change how I feel about it.

I was really excited prior to sewing this and was willing to commit this silk - woven in Nepal - because it was a big enough piece with the recommended weight (oops, I was supposed to give half of it to Tessa...)  There's a shop in Kathmandu willing to sell me these pieces of silk yardage, the factory is outside Kathmandu and although I haven't toured it to report on the conditions I am making the assumption it's not a huge or crowded factory.  

For some reason once I started sewing I lost all the enthusiasm.  Maybe because the order of sewing didn't feel very neat.  The fabric is a rough weave, and it's not that much fun to sew.  The pockets hang kind of straight down, going out to the hips, rather than hanging to the front as usual pockets do (it makes sense when you look at the pocket/hand angle) and I didn't like all the weird extra instructions for them - I followed the instructions, but I think I got a worse result than if I had just stitched and undersewed in the standard way.  It's been a long time since I made a big 4 pattern, and in my memory the instructions always taught me things, and had really clever ways of doing stuff.  Now, however, I disagree.  The pocket method is crap.  Once you understand how the pockets will hang I do like the fact that they are there, and I like their position.  If they were a bit bigger they would turn this dress into a nice purse, with big handy storage areas...they definitely, however, add a lot of extra work to the pattern.  I have read in some comments that they are valuable in balancing the weight of the skirt in the back to keep the dress hanging straight, so that's interesting (also a good reason to make them larger and put lots of stuff in them.)

The sewing wasn't particularly onerous after that but I felt like I was slogging through at that point.  I skipped the extra sleeve detail and just created little cuffs.

I tried on the dress as I went along and felt very meh.  It feels like a huge, heavy tent.  The pockets are flapping all over the place.  


Then of course I took my blog photos and I have to say I like the way it feels when I'm out and about wearing it.  It's not a seasonally appropriate item and because of these conflicted feelings I decided to pack it away for winter and see what happens.  When I leave things sitting out I tend to donate them if I don't wear them right away so this way I can give it a break and see what I think when I pull it back out in the autumn.

I did think that I might like this as a sleeveless dress. I know others have said a heavyweight fabric suits the style better but I would be tempted to make it from linen, and sleeveless, and see what I think. (Very tempted!)


Thursday, 3 February 2022

Ethel dress by PM patterns, a review

So, this dress is like a recipe!  So many options and very nice, tempting photography.  I bought it right away.  Don't be like me!  There are so many other designers creating similar designs, and I would not recommend this one. 

The pattern has no A0 option, instead it's a nonstandard size.  My print shop prints these weird shaped things sideways on A0 paper, which uses a lot of paper.  Then, the layout of this nonstandard size requires you to tape pieces together, and literally I mean tape a 2cm scrap from the bottom of one page to the top of the skirt piece!  It's really bad planning on the part of the designer.  The front and back skirt are the same, except that you tape a different scrap on for the front and back, oh but HOLD YOUR HORSES if you are using the empire waist you have to beware of all these scraps as you need a different set yet again. 

I'm not sure whether this tetris is hilarious and clever or just a pain. You be the judge. 

I cut size 38 instead of 36, erring on the side of just bigger rather than just smaller than my measurements.  And then for my first version I did the following recipe: 

-waist length

-crossover front, which I cut four of to self line

-short skirt

-with ruffle 


Fabric is Rag and Bone white windowpane cotton which I ice dyed!  Isn't it so pretty?

And I added the Bardon pockets which I have already made clear are the best pocket shape known to man.

AND it is huge.  I gave it to a friend who's breastfeeding because this dress with the crossover front is breastfeeding friendly.  That's how much access you have!  

Clearly I should have made the 36.  I was going to leave it at that but honestly I've gotten this far so I wanted to make a long diaphanous silk version.  Yes, cue the future high blood pressure from sewing diaphanous silk.  I know.  But then I realised this silk I have is still available in the shop (I'll need like 6 m to double the bodice and the skirt piece so it's not see thru)...and figured I should do it.  But after this?  Never again. 

I managed to cut the same pieces down to 36

This recipe:

-empire waist

-v neck

doubled front again, same story

long sleeves

long skirt

with ruffle 

Narrow silk chiffon

Gelatin

Blood pressure cuff for data collection purposes

Actually it wasn't that bad but I was kind of over it after all the excitement of planning.  Also it was apparent early on that the empire waist is A Mistake.  It ends at nipple level, creating a kind of french dressing gown look.  It was bad.  It was slightly better after I washed out the gelatin.  This crinkle chiffon actually behaves ok once it's had gelatin applied, it has some texture but irons flat.  I think only a few pieces cut off grain (as you can kind of tell since the stripes aren't uniformly horizontal in the bottom tier.)


Ah well, live and learn.  I sent this on to a friend and hoped she is less picky than I am. This was among the final cluster of stress projects before moving so I count it as a total success, because I finished it.  My interest would not have survived a move. Unfortunately I miscalculated something and ended up with still 2m of the fabric left over (which is how much I started with before buying more for this dress) so I suppose I'll still make the simple flowy top I was gonna make in the beginning...