Showing posts with label Emma One Sock. Show all posts

Sunday, 25 August 2024

Jalie 2679 jacket with some variations

 I made this jacket in some very lightweight softshell a few years ago.  Size R, up to S at the hips. There wasn't any reason I didn't like it, but it wasn't something I ever found a use for so it was dispatched off to a friend.  Thank god for friends!  I mean, I know I can offload unwanted makes to the secondhand shop but it's really a joy to pass things on to people who actually love to receive them.  

So anyway I had this fabric lying around.  It's been lying around for too long.  I love it so much and didn't want to mess it up, could obviously have made some snug legging style pants - it's something between a ponte and a scuba and I think I got it from Emma One Sock - just one m. 

I had a vision not too terribly long ago that actually this jacket pattern would be a good match for it, a win, because I wear my lightweight hoodies to work all the time so unlike 86% of my wardrobe, it would get used.  Also I adore my yellow non-hoodie which it really seems I never blogged (here's the first post on that pattern), but I stupidly gave away the pattern.  So this managed to move to the top of the winter queue!  I've been a sewing MACHINE on my week-long staycations in between work.  It's been so satisfying, I'm trying to mix up the projects that have sat in my queue for years, with new ideas, so the sewing juices can get creative again instead of feeling mired down in ideas I thought up in 2021.  

I did inspect the post from my previous jacket. Not liking how tight it was around my hips, I thought of some ways I could widen the bottom of the jacket - the way the pieces tetris together makes this less straightforward.  I ended up adding width to the side back and to the front bottom pieces, probably quite a bit, like 4cm total.  I made sure all the pieces lined up - added this to my actual pattern pieces before cutting out (shocking!) and then construction proceeded without dramas.  I didn't like the zipper method when I did this the first time, but this time I did follow the instructions and they were not actually terrible.  


I do find it has a lot of bagginess in the armpit and upper arm.  It's not an issue for work, but it's actually really a lot.  Enough that I think I wouldn't make this pattern again - it's not very flattering, exactly?  Maybe I'll even overlock it off? But anyway sewing with scuba is very satisfying, and this is one of those projects which is so pretty on the inside too, which is nice. 

Wednesday, 10 November 2021

My extra long Grainline Tamarack

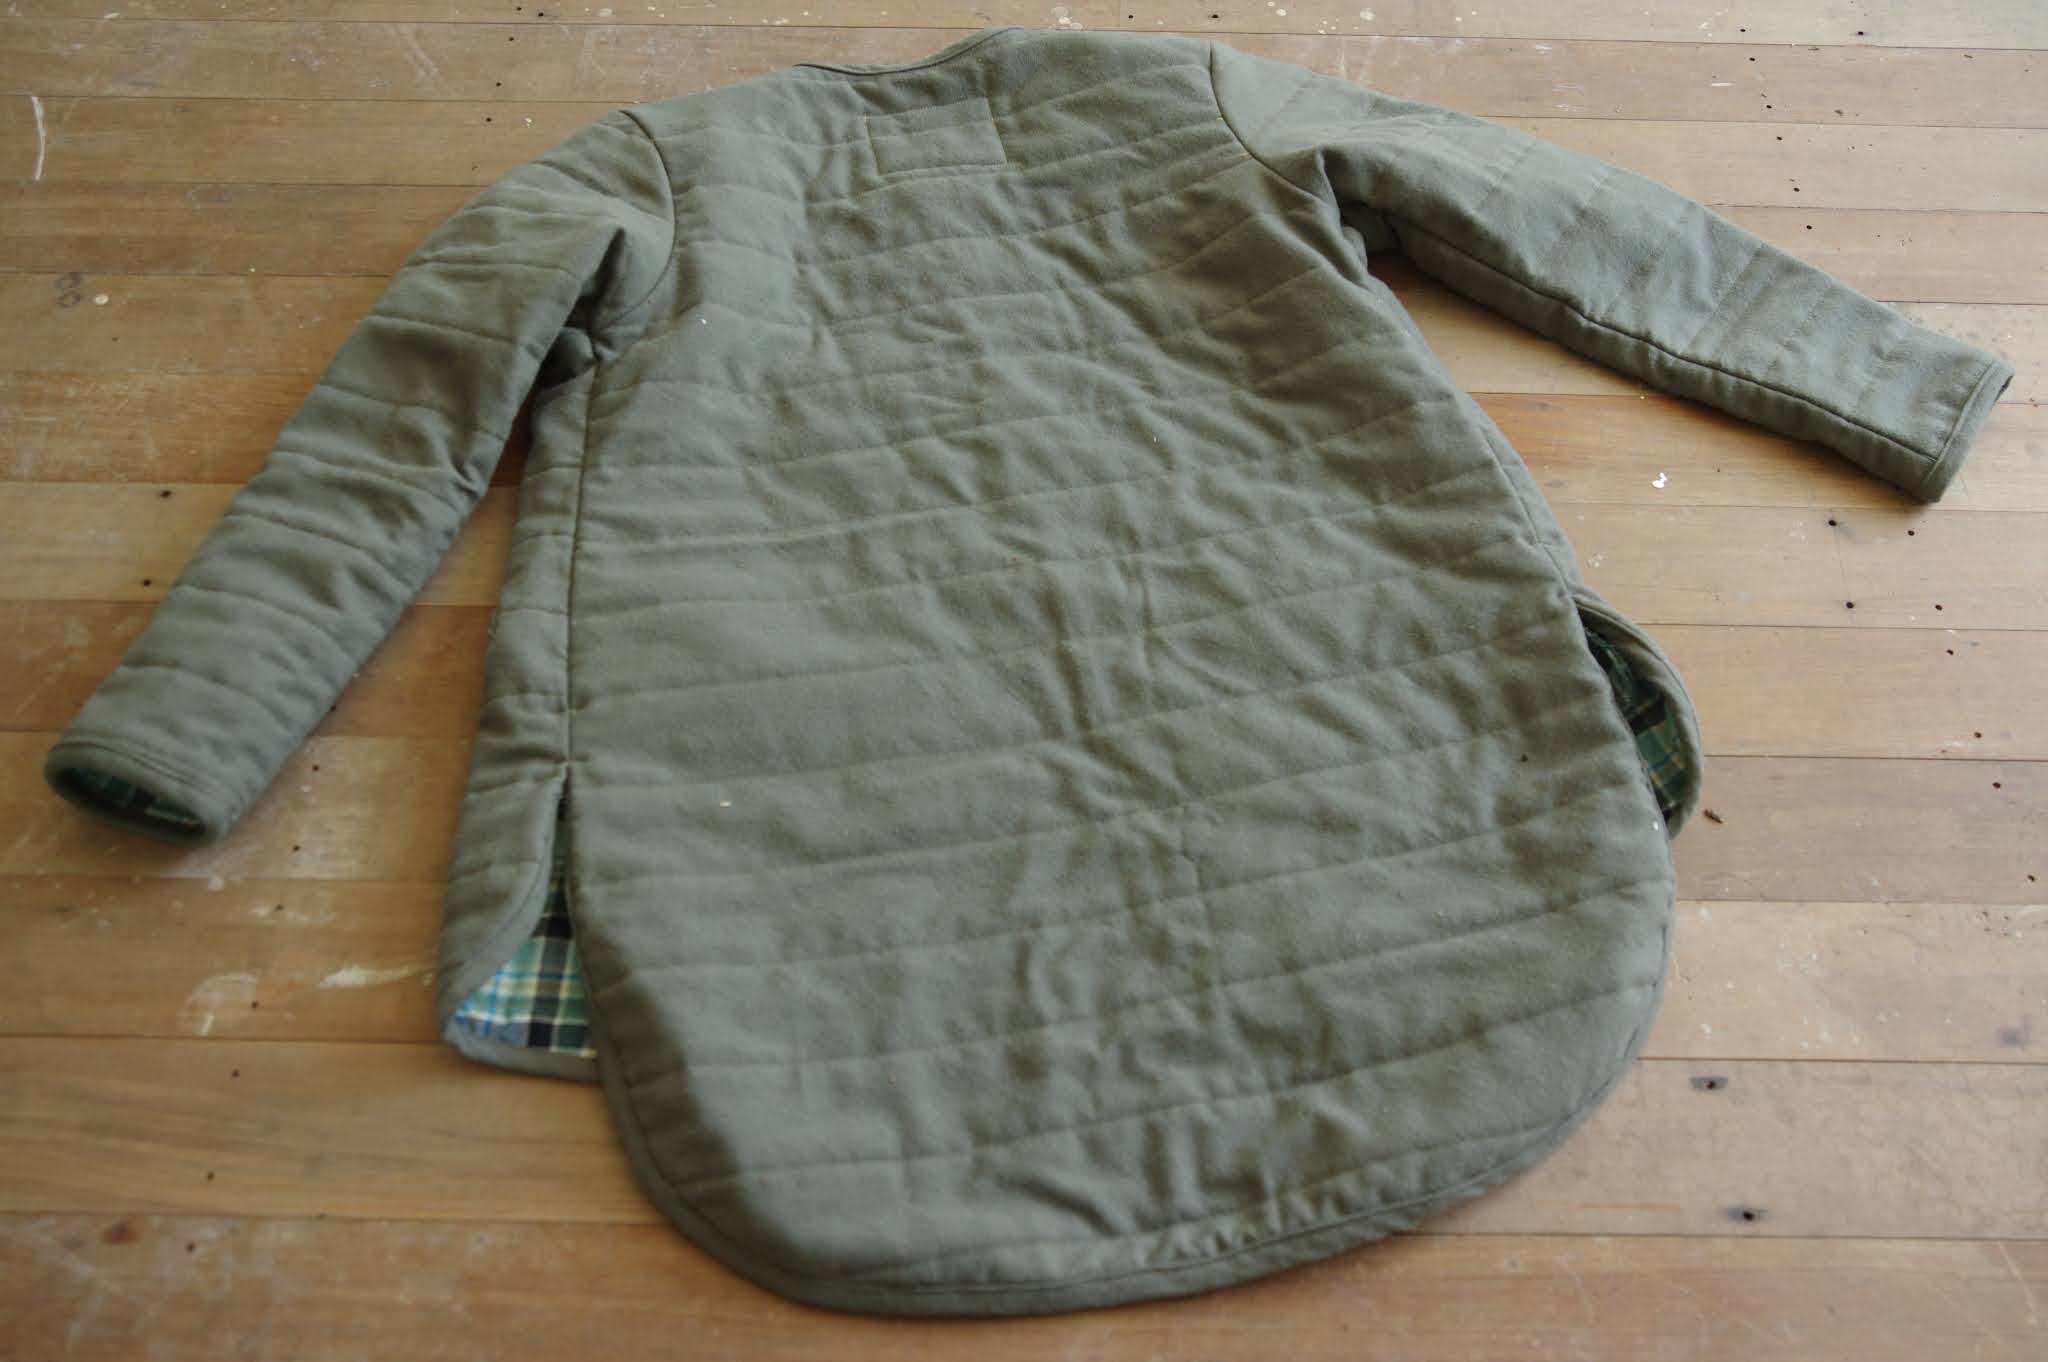
I have made two previous attempts at the Tamarack jacket.  Maybe I should have just followed through on my first one so many years ago, which I wasn't going to quilt, but anyway, I really wanted to do it properly and after my second one, which was of prequilted fabric and with patch pockets, I wanted the experience of doing it all.  Having made a quilt took the fear out of a lot of things, and quilting is one of them.  

I will say: making a quilt was horrible but it has paid such dividends in new skill learning!  So worth it!  

When I finally got on the road to making this particular Tamarack, it was due to inspiration from a RTW jacket with plaid lining, maybe a year ago.  I made the black quilted Tamarack which seemed to fit ok, (I made size 4) and which I gave to a friend, and then had the confidence to trust I should quilt one for myself.  I had this fuzzy wool blend from Mood from a few years ago, and after investigating plaid linings I got this wool woven from Emma One sock last year, but then I had to wait - because I was going to use the same batting from my quilt, so I had to make it first. Hah.  (The batting wasn't enough and I still had to buy more...)

My big vision was that I needed to shorten the front and back separately so they would still meet quite high up.  I lengthened the front 2" and the back 6".  Once I had done that it was straightforward to cut everything out and quilt it and then trim everything down to shape - but it did take time!  That upleveled the feel of the jacket because quite a bit of effort goes into it.  I used a bias binding on the side seam edges and the shoulders.  It doesn't look particularly good, I'm not sure how other people kept it from being lumpy.  I overlocked most of the other seams because I didn't have enough pretty matching bias tape and it seemed kind of like a wasted effort anyway.  

My major drama was with the welt pockets.  After quilting, you've already done a lot of work and you want it to go well.  I found the instructions bad, of the vague variety, and they didn't lead to very successful welts because I didn't cut the sides down properly.  For this reason I recommend with these instructions to do a practice welt on scrap fabric so you can understand what they are saying.  It's hard to know what edges to finish, and in the end I had to hand tack the top of the pocket in place - both the top of the pocket inside the jacket, and the sides of the welt outside the pocket, where there were sad huge gaps.  The insides look ok because they hide the messier bits, but it's not a satisfying aesthetic for me.  I've now done a bunch of welt pockets this year and I think I'm starting to itch to FIGURE OUT the welt pocket so I can just do them my way and know they will satisfy me. 


Also, the fit of the body is comfortable, but the sleeves of this jacket are slim cut.  On me, it suits as a spring jacket with a tee underneath.  I would not be able to wear any more layers. The prequilted version felt very very light, and was much looser, so this is an effect of quilting.  Of course I knew that quilting would make it smaller...but it's different to actually experience that fact.  Quilting also makes it feel heavier and more substantial especially with this heavier outer fabric.

For the snaps, I considered using my prym snap kit but I'm very suspicious of the quality.  Maybe unnecessarily - I recently used it on my Landgate and the snaps were perfectly fine.  Anyway in this case I hand sewed snaps in place, and I'm really pleased with the secure feel of them.  


I'm really glad I made this.  Too bad I took so many attempts to get there!  It's not a pattern I found particularly fun, and the fit of it is only ok.  Now, in the meantime quilted jackets have gotten popular and I think there are other patterns that suit me more.  I will most likely try the Hovea pattern next year. 

Thursday, 9 September 2021

Merchant and Mills trapeze dress experiment

 I've been planning this dress for about a year.  I first made this pattern ages ago (here) and was surprised how good the fit was.  I was going to make another one but the dream fabric was a bit too narrow and I stupidly didn't realise I should do it anyway!  So the pattern languished without further attention...until now. 

I used size 10 which fit well, so no changes there.

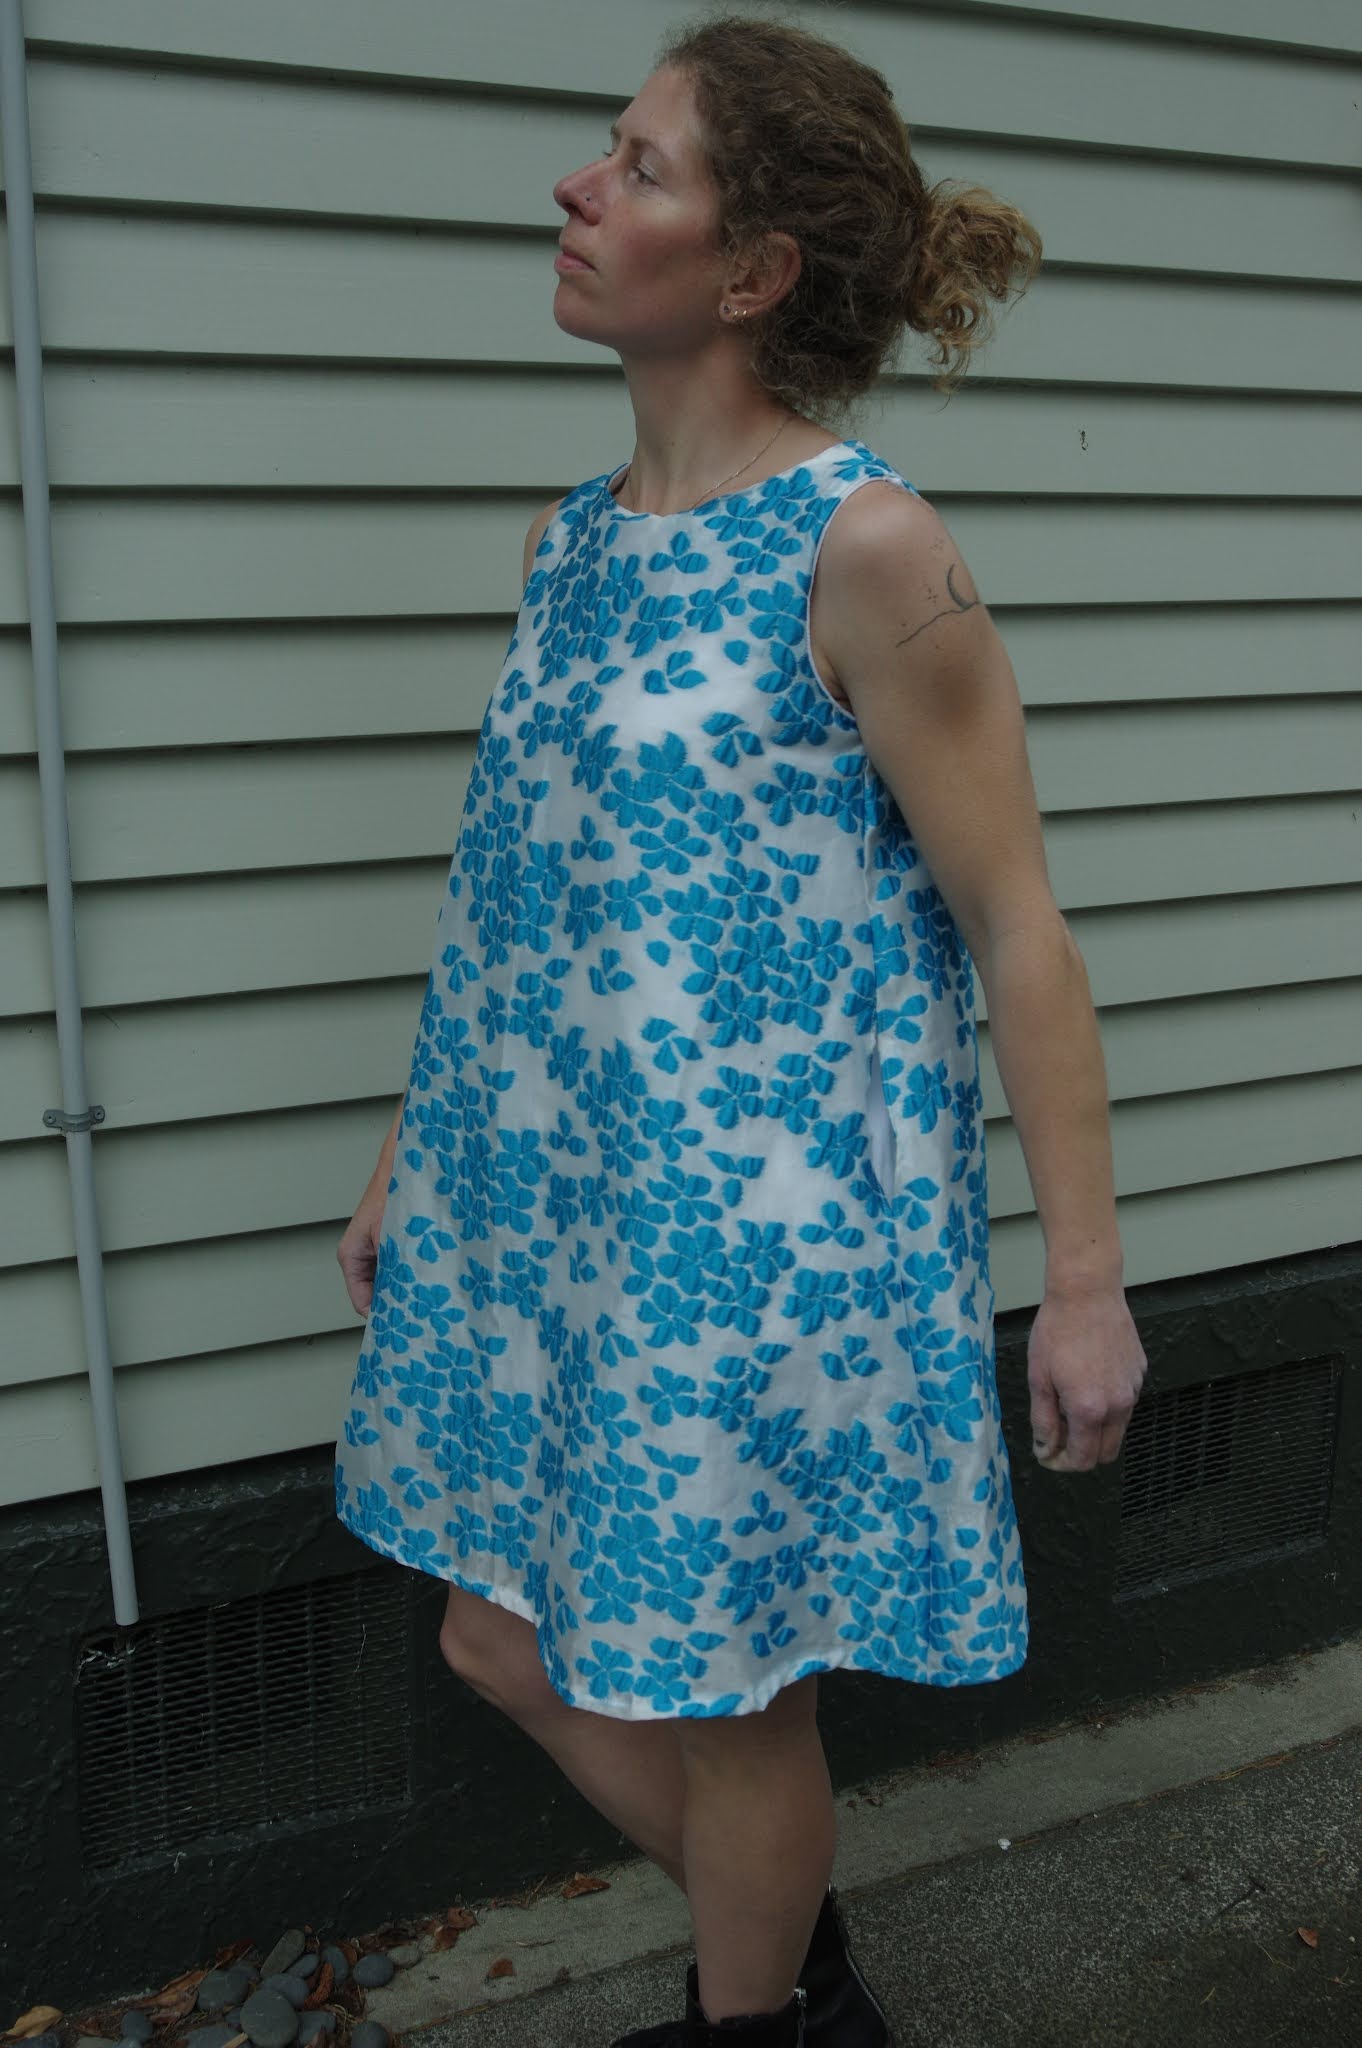
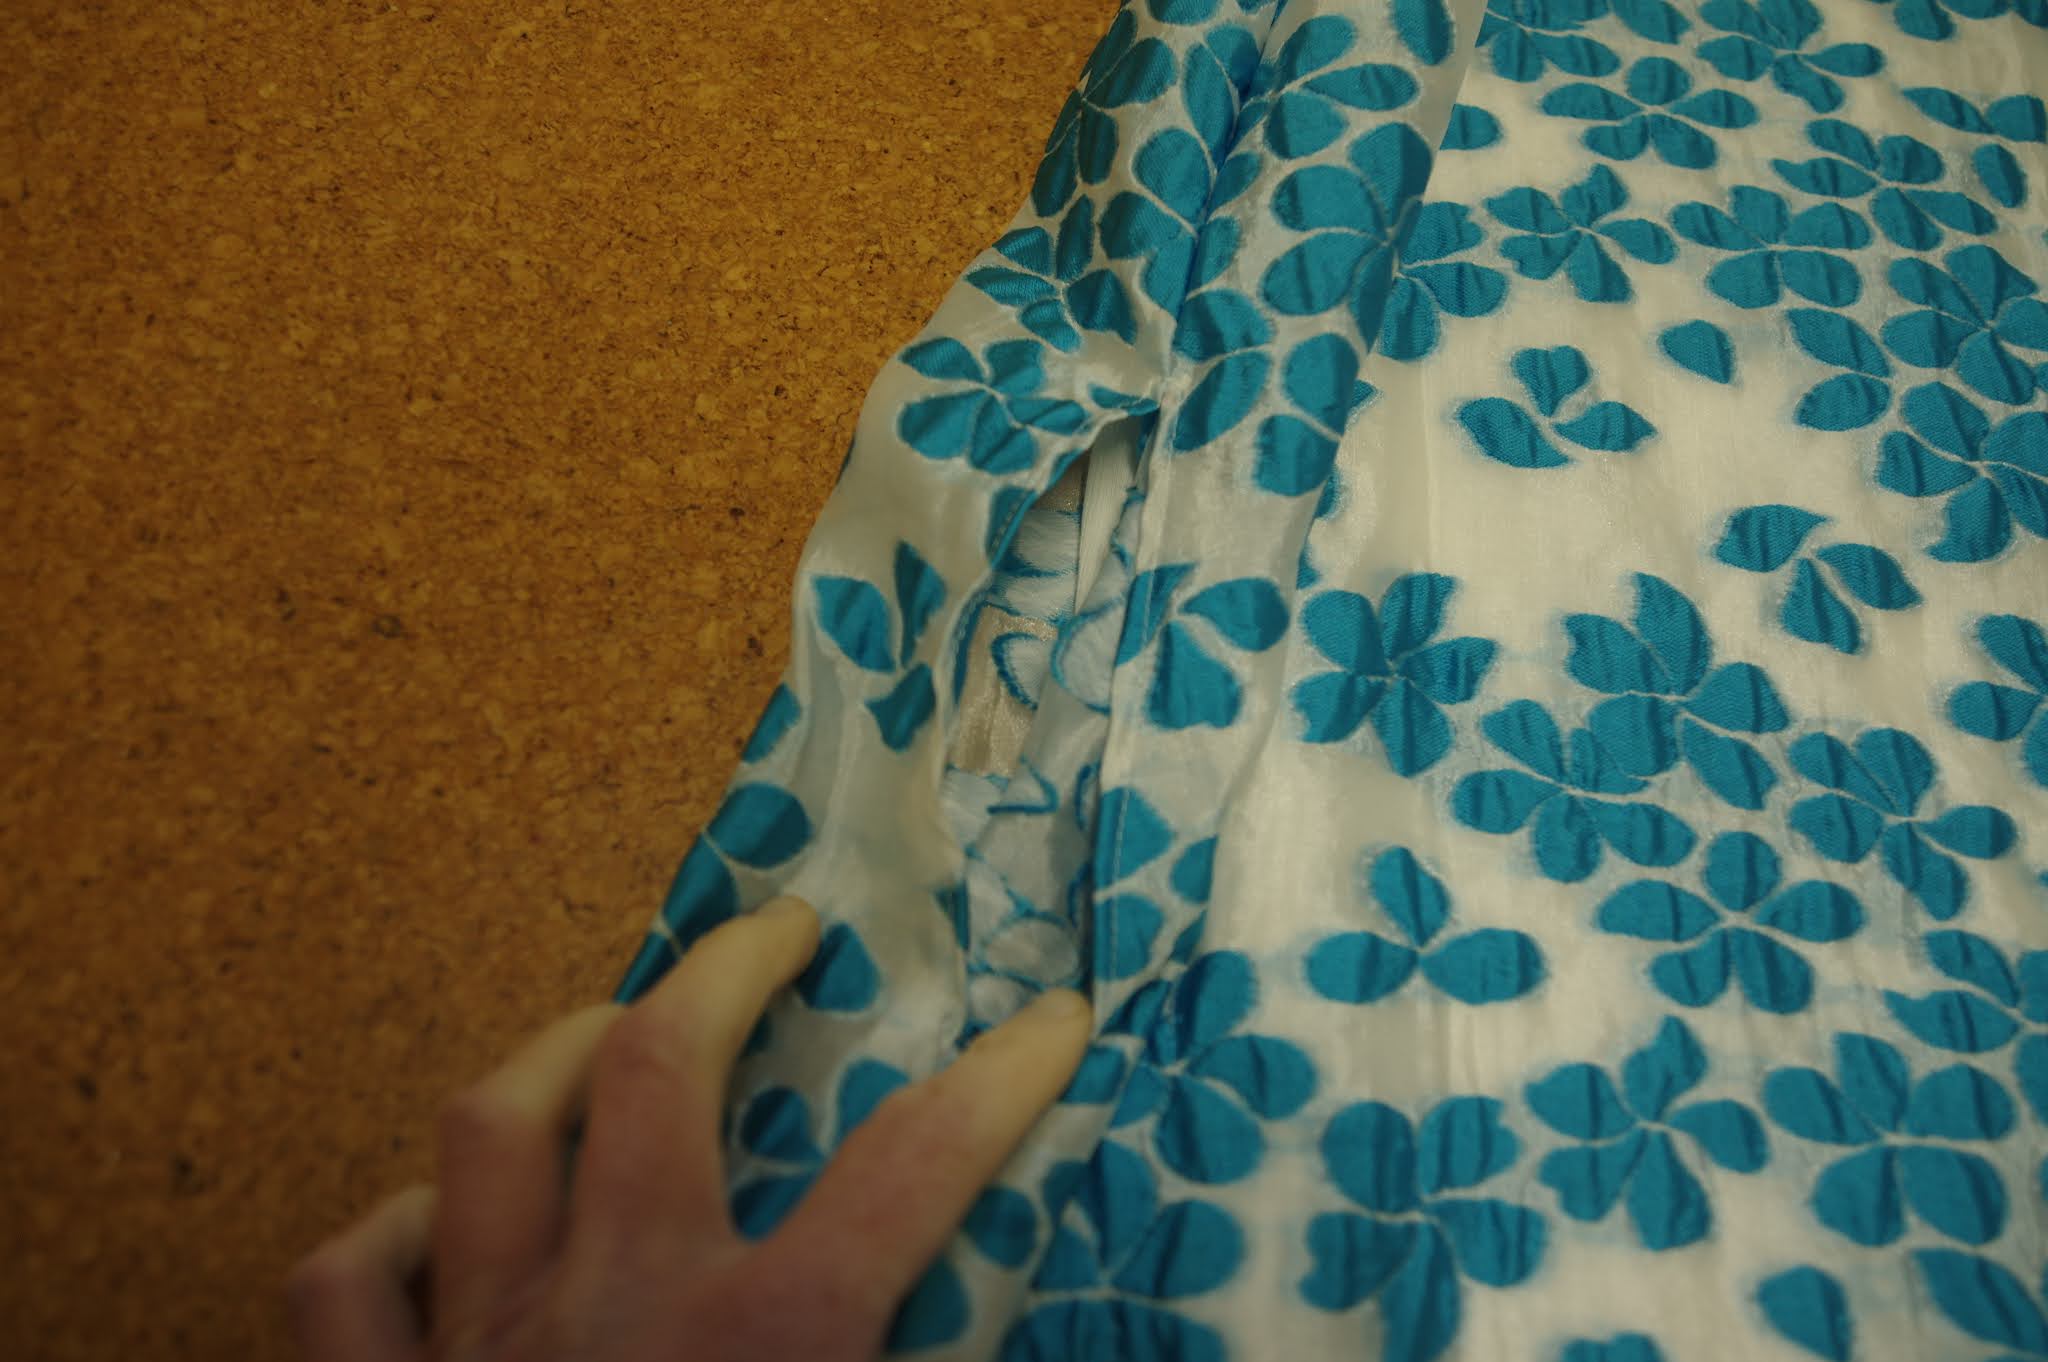
 The outer fabric is a weirdly out of character poly blend from Emma One Sock and I bought it with the idea of doing this!  A two layer dress, and something about pockets.  I was not sure where I'd put the pockets at first.  It took months for me to find some white rib knit (in retrospect it totally didn't need to be rib, any white jersey would have been fine).  And finally I just needed it done.  I decided on a single kangaroo pocket in the front of the lining, and then sleeve gaps in the outer layer so you could reach the inner.  That way the two aren't touching, and the pockets don't touch the outer (which has so much volume on its own.)

I had been sort of mulling over the process for days.  I cut out the lining using the dress pattern but just cut off the trapeze shape below the armscye.  I could have used a tank top dress pattern and saved on fabric but I was insistent in my head that I follow the vision (eye roll) so I did it this way and ended up overlocking off about 5 inches from the side seams afterwards.  I wanted the lining to have seams on the inside so I couldn't treat it like your average lined dress, which has all the seams between the two layers.  For this reason I left the SA open when I burritoed the sleeves, sewed the lining first, and then sewed the outer layer.  This also had the advantage that I could cut off that extra fabric from the lining.  The neckline was fine, but on the sleeves I had extra, and so I just overlocked any extra away.

The rib knit ironically bought for this project was not enough in length, so then I added an extra panel on the front and back to make it longer.  I didn't pay attention and ended up with the front seam on that facing out, but if it's ever visible, it's actually kind of cute. 


In the end I accidentally made an amazing piece of art!  I think this dress is fantastic.  It feels like I have upskilled a level in sewing.  A few years ago, I'd have a Vision and I'd Sew a Thing and it would....NOT match the vision.  It was just...an Experiment...  so it's a shock to have a vision and fulfill it and have it literally be everything I hoped.  

That said, I am giving this to a friend who actually needs dresses and she will hopefully love it as much as I do!  The pocket is so spacious you can fill it with all the things AND it's all hidden.  The amazing fit has reminded me about how great this pattern is, so maybe I'll feel the inspiration and make more for myself. 

Monday, 8 February 2021

Elbe Textiles Staley top, variations & review

I bought this pattern awhile ago and had an idea that it was a heavy sweatshirt pattern, which it is not.  I liked it ok but didn't feel much imperative to sew it.  I even printed it out and set it on my pile of to-do-soon but it didn't make the cut for my tshirt binge a few months ago.  (Too many pages, ugh, pdf patterns.) 

Like many patterns now, with so many sizes nested you will invariably have a lot of paper wastage if you cut a small size.  I don't see a great way to fix this, as everyone benefits from a few nested sizes in order to have flexibility - so clumping sizes in units of a few sizes (like Style Arc does) would solve the problem a bit, but would make people sad who are on the limit of one nest unit.

I cut a B.  I initially made view A with no changes, and view B with 3" shortening.  I shortened 1" at the upper lines, and 2" at the lower lines.  I am 5'4".

View A is in a stretchy and ridiculous gold lame stuff from Emma one Sock (still available!) It was fabric meant for a dress, but the dress pattern was from an op shop and it didn't contain all the pieces.  Also very sadly my life doesn't really have a need for gold dresses.  The fabric has a great drape and was easy to work with.  I did actually read the instructions before I made this, and the interesting prep for the side slits is fun and novel.  When I got to application of the hems, I was suspicious.  You do a lot of things that seem like they belong to woven fabrics.  Worth the effort?? Sewing in the ditch? Gahhhhh.  I mostly did what it said for the front to test out the clean finish, but I didn't sew in the ditch.  On the back hem I ditched the effort and, after sewing the sides of my binding and flipping it right side out, I just overlocked it to the hem.  The disadvantage: overlocker ears on the edges.  The advantage: fast and easy.  It's in the back, so I don't notice it, and thought that seems totally worth it compared to the drama of trying to sew knits in the ditch.  


View B: hm very short oops.  In a linen knit which is a bit sticky to work with but has a good drape.


I loved these immediately and wore them immediately and so I set forth to make a second set. 

View A: flowers from Guthrie & Ghani that I loved enough to pay the postage. It is a tencel rayon sort of knit, very drapey.  It has since sold out. And in fact I bought it planning to make this very top.  This time 1" shortening.  I shortened the sleeves 1" as well, they are very very long otherwise.  I used the quick and dirty hem method and now I am a bit contrite.  You know, that clean finish?  Maybe worth it.  Overlocker ears?  A bit annoying.  Ok you choose.  


View B: stripey stuff from Miss Maude.  This time only shortened 1", at the upper line.  I think this is a good compromise length on both of them. Maybe I'll shorten the tee one more inch, but I think on view A I'm happy. The side slits make view A more flexible too so even the long version doesn't seem long. 

 I also read the instructions for view B this time and did my hem coverstitching before I sewed the sides together.  I am still not really comfortable with the coverstitch machine, and doing all the pieces on the flat definitely is easier than stitching in the round.  I guess reading the instructions can be good that way...


Taking photos at 6 am = very good light.  Also in evidence, my dubious new/secondhand jeans from R13.  I have strange strange obsessions and R13 is one of them, but this particular pair seem to be too big.  Lesson learned...I'm about to copy an R13 jacket and one of their silk dress designs. 

I am really happy with this pattern, and it's nice to discover a new tshirt pattern I'm so enthusiastic about.  It has some of the nice features of the Briar, a good fit, two interesting options...I will probably finally commit and use this pattern for some designer fabric I've been hoarding.  Probably.