Thursday, 2 March 2017

I am Cupidon rayon top

Browsing Anna ka Bazaar I discovered a new pattern company and immediately snapped up a few patterns.  I decided to sew up this Cupidon nice and quick in some rayon jersey.

It became quickly apparent that the pattern is better suited to heavier knits.  This is a super fast sew, and reminds me of the Coppelia top by Papercut patterns, although it overlaps rather than having a tie.


I made a size 38 and I wouldn't necessarily go down, but in this loose rayon it really is big, and I could take some fabric off the sides and underarms.  I think this size works out in a bulkier fabric.  The bindings are very small and I had trouble getting them to lay flat - they are supposed to be a bit tight, but not really tight, as you don't want the bottom to pull inward, and so I had to press quite a bit for them to look as desired.  This is another issue that would be better in a more stable fabric.

This was a nice muslin attempt and I liked the instructions, which are cute and efficient.  They are available in English, which is a definite plus, and the seam allowances are included, although a bit funny: it says if you are using a serger, the allowances are added, and if you aren't using a serger, to add some specified amount and then use 3/8" SA.  But I think it said to add 1/2" and that the final SA is 3/8" so obviously confusing.

To get around all this I ignored it and just used a 2/8" SA on my sewing machine.

I don't adore the fit of this but my friend Dana, who's a totally different size and shape to me, ends up loving it.  I can see coming back to it with a heftier fabric though, and the other reviews are by people who did just that.  

Monday, 13 February 2017

Megan Nielsen Cactus Karri dress

This was one of those projects that became an epic before it started and jumped the queue right away.  Because I bought 1. meter. of cactus fabric.  And 1. meter. of silk georgette stretch lining.  Whyyyy?

And why stretch lining, you ask?  Hehe that's because of my recycled black tshirt side panels, of course.
Maybe I should start from the beginning.

Pattern: Megan Nielsen Karri, size XS
Fabric: 1 meter of textured cactus "canvas" (it's not) from Miss Matabi, it's actually dressweight and has got the most amazing spongy texture.
Side panels: three large black tshirts donated by one of my nurses
Lining: 1 meter of Theory black silk stretch georgette from Mood.  I might need to buy more of this and put it on the exterior of a dress too.   This was supplemented by something very similar - a black stretch silk I was saving in my stash for something else.  Well, needs must.
I made an XS.  My waist is 27 ish, but with the stretch I was not worried.  Same about fit adjustments... I just decided all my jersey would save me the trouble.

First of all, don't plan to make it with just one meter of anything even if you are a size XS.  Second, for best pattern continuity, put the front pieces together and cut on the fold instead of cutting four little pieces. 

But after that it came together really well.  Because this was my dream dress, I spent a lot of time thinking about which seams needed to be finished, and where, and how, and wishing I just had a serger!  I didn't finish the seams of the bodice, but I french seamed the lining of the skirt and I bias bound all the skirt seams.  I was going to sew the waist to the lining but then I just decided not to.  I did hand sew the lining onto the sleeves, which was actually easy and left me with a real sense of satisfaction. I notice a theme lately in the projects that matter to me.  Maybe there's hope I won't be a fast-fashion-sewist forever?

So it took ages to make my blog post for this because I was determined to take pictures with some cacti.  (Naturally.)  But when I'm near cacti, which happens often enough in Arizona, I'm not generally wearing dresses, nor do I have photo opportunities.  So finally I gave up but I promise if I get near some cacti and take pictures I will update them!


Initially I freaked out because the black of the three tshirts is, of course, three different blacks.  But I got over it.

I love my cactus dress.  I'm going to make more.  (Karri dresses, not all with cacti).  This dress feels so luxurious because of the silk, and the stretch, and the jersey, and I think it's probably my favourite pattern of ALL TIME.  (finally!!)  I will lower the front neck next time, and I might make one without sleeves...I have ideas.  Just not so much time!

Here are some (ahem, phallic?) cacti pictures from the Cactus Botanical Gardens in Phoenix, where I sadly did not have my cactus dress along.


Saturday, 11 February 2017

Deer and Doe Safran pants

I was really excited about these pants.
I got stretchy fabric from emmaonesock, which was nice because I knew the % stretch was the right amount.
I read a lot of reviews, including how to make various adjustments.  The pattern itself comes with suggestions for adjustments to make.
I made an (unnecessary) adjustment (I seem to do this a lot to pants patterns...).

I made a size 38 going by the measurements chart.  It's possible, with such stretchy fabric, that I should have gone down a size.  Waist 27, hips 37.

I cut the pants out and then a lot of life got in the way and although I'd been so excited to make them and WEAR THEM right now now, it didn't happen and I had to kind of regain my enthusiasm.  Which was hard.

I love Deer & Doe and I think slowly I'm making nearly every pattern they have put out.  But this one, as far as I'm concerned, is a loser, and I don't recommend it.

Everyone complained about the kind of reverse-mitre of the pockets.  The instructions aren't clear on how many layers to sew, and I think even when you sew the layers correctly, it is very difficult to get a clean corner on the pocket.  It's not worth the pain.  I do like this pocket shape in theory but I think the only way to salvage the pattern is to not use them, unless you are willing to muslin just the pockets until you get a technique that works reliably.

Next, the fly instructions and the fly pieces for the front zip confused me.  I never got this straight.  My zip is really visible, because I have no idea how to do it otherwise.  I reviewed the fly instructions from Lauren's Thurlow sewalong, which has saved me many a time, and while it did help to straighten out which pieces belong to what, a (theoretically) invisible front zip without the fronts overlapping seems impossible. And that seemed like what the pattern wanted me to do.

Plus the butt increase that I added was totally unnecessary.  I don't like the shape of the butt, it's way too flat and baggy, and I don't think my small (a few mm) increase is entirely at fault.  The waist is also really truly a high waist, and it's a bit exaggerated for me.  I like a high waist, but I'm not sure I like it this high, or that I like having such a long front zip.

I was so annoyed so I put in a snap rather than a button cause it was easier.  And actually I really like the snap!

Overall, this pattern could likely be salvaged by skipping the pockets and by totally ignoring the fly instructions and doing a fly per any other pattern, like the Thurlows or the Grainline Maritime shorts. (although you might need to cut slightly different pieces...).  The only reason to do this is if the fit of the legs is utterly bomber.

And yes, after these sat for awhile and I forgot the sewing trauma, I noted that although they aren't really that flattering, and my front zip is ridiculous, they are comfortable and the pockets are stretchy and useful.  The pants are so stretchy that I think they will stretch a lot and feel too big! 


looks better blurry...


And yes, that's a bonus Renfrew.  I thought I made it 2" shorter than the pattern but I think I might have mislabeled my pattern piece, and only shortened it one inch.  I'm going to make sure to shorten it another inch next time. 

Megan Nielsen Reef shorts

I bought the Reef pattern to make the top, but I had some of this fabric left over after making my Grainline Willow so I cut out the shorts (yes in August) on a whim.  However, I didn't have enough for the inside of the shorts hem pieces.  These two relatively small pieces literally held the process up for months, because the main fabric is a spongey, very drapey rayon woven, and I wanted something with the same fluidity.  Everything in my stash was sort of earmarked, and I wasn't sure I had enough yardage, so I waited.

I cut a size XS, and I didn't cut the pockets because I thought they would mess up the lie of the shorts, and anyway I don't need pockets in lounge shorts.

Finally after a possibly bad idea shopping spree online at Mood, I had fabric.  Enter the pale blue Rag & Bone stretch silk.  I'm not sure what I'm going to do with the rest of it - I'm thinking of making a two-layer Briar...

Easy to put together.  I used french seams on the sides and zig zags on the centers.  I did sew in the ditch for the waistband, very painstakingly, but I admit I'm finally flipping sides on this issue.  Sewing in the ditch invariably misses something.  I like it in theory - I mean, I like the action of sewing in the ditch, but the results are not very nice.  You can see the line of stitching, missed fabric on the inside, and it looks messy.  So I sewed the silk hems up by hand.


I can't say these are the classiest, or that they are the most flattering, but I quite like my haphazard pattern matching, I love the luxury of a bit of silk in there, and they are super comfortable.  Of course, they aren't exactly season-appropriate...and it looks like I'm planning an endless winter this year, so it may be awhile before they become season-appropriate...but they were amazing on my recent trip to Thailand!


Ironically I think I will get a lot more use out of this shorts pattern than I will out of the Reef top.  I'm still kind of puzzling how to improve that top for a wide back, and how to avoid the facings, but for now it seems like too much work to tackle.


Friday, 10 February 2017

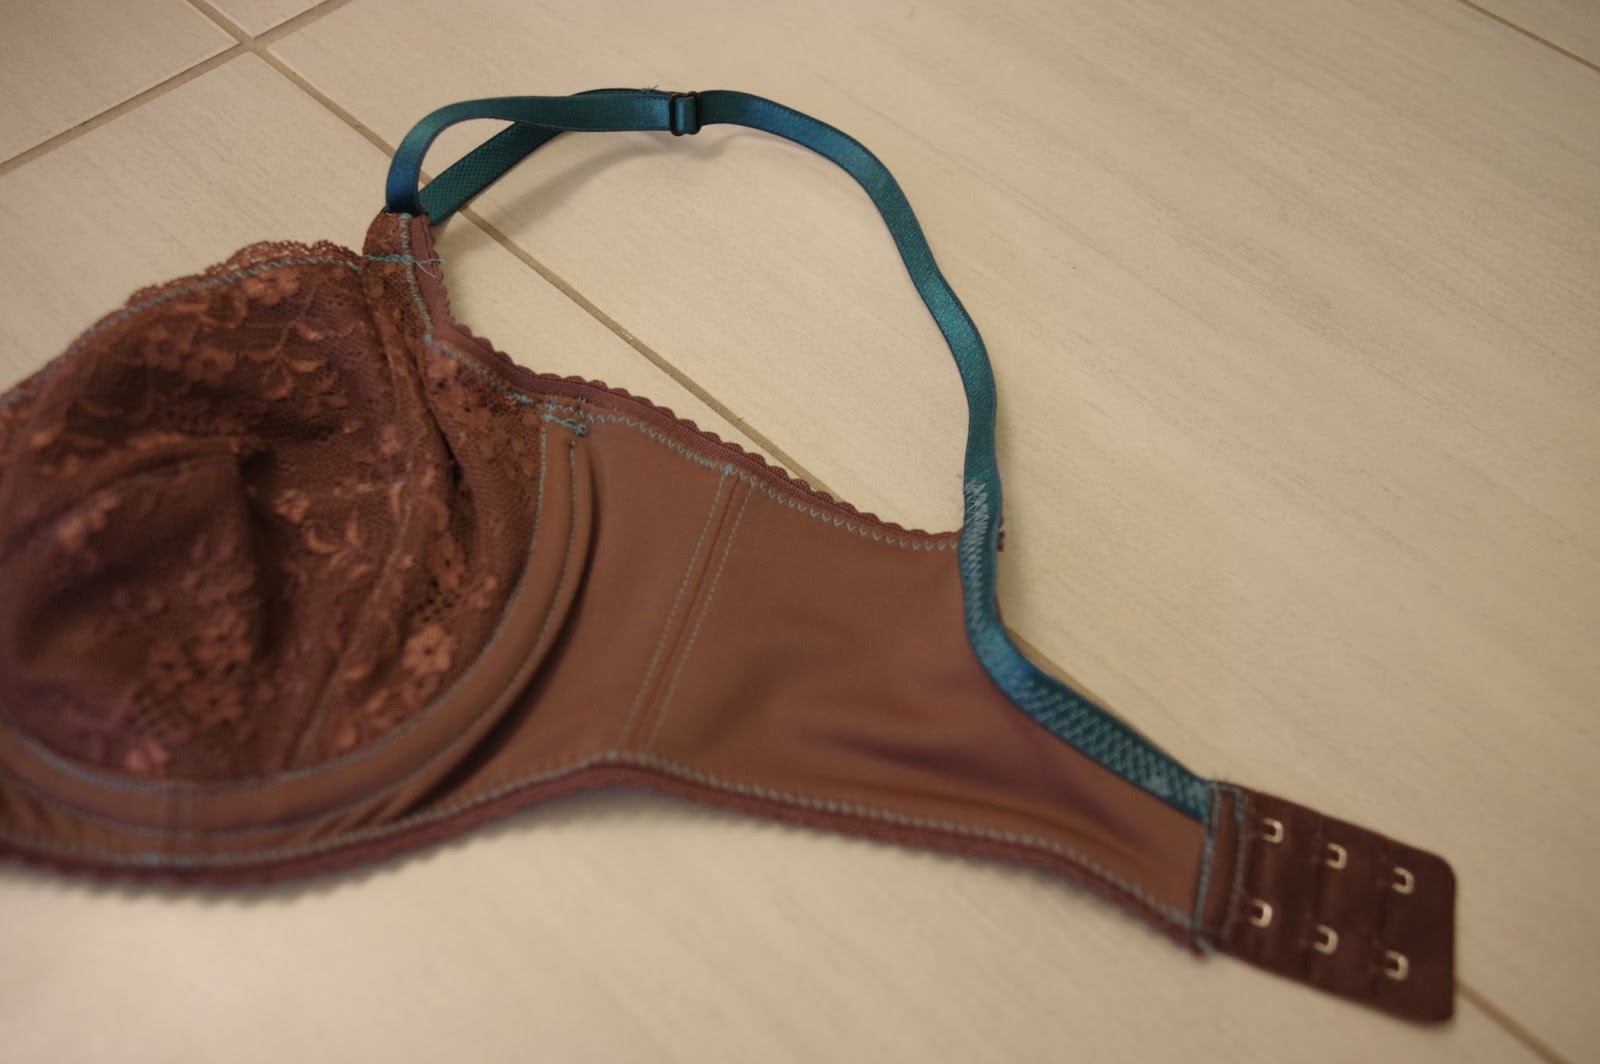
Orange Lingerie Marlborough bra in brown


Once upon a time, I proclaimed that I had no UFOs.  Well, this is like, the ultimate in UFO-action: I cut it out in Switzerland and then carried it around for 1.5 years and now here we are.  So, I'm guessing by this bra that I made a 32C, and I hope that I made these changes which I have documented as necessary:

-tighten underarm elastic (I remembered, and did this)
-lower height of center bridge (it looks a tiny bit lower, maybe)
-sew the bottom elastic on a bit higher (done)

I thought I had wanted to remove a bit of fabric off the outer side of the powerbar, to make it not come up so high in the front of the armpit, but I guess I left that, in the hopes that tighter elastic would fit better.

However in all the excitement I lost my brown bra strapping, so in order to make it less muddy I went ahead and ordered teal- all my recent bra supplies have been from tailormadeshop, who I am in love with for their cute supplies and quick shipping.  I used teal thread too, which I knew was risky because when you can see everything, you can see the messes...

The bra came together pretty fast, and unlike in my first bra experience here, I underlined the lace cups with powernet.  This makes it feel like a real bra, it's substantial!  I didn't have any issues putting it together.


However, I made my own bridge (as previously) following the book Demystifying Bra Making, by Norma Loehr.  My bridge is narrow compared to average, and so I discovered that the wires overlapped.  I'm debating whether I could shorten the height of the bridge to use shorter wires, or whether I need that medial support.  I don't have much tissue on the top half of my breasts, so mainly I need the lateral support, and some of my RTW bras don't have high cups in the middle - something to consider for next time.
There is a lot of wrinkling in the upper cup - I could pinch out a centimeter of fabric - best seen in this view.


The sad end of this story is that a bra prepared two years ago doesn't fit today... It's comfortable but the cups are a little bit too big and I think the lace is scratchy.  I've probably lost just a bit of weight since then and of course my boobs are the first thing to shrink. I'm not totally sad, I know I'll fluctuate and fit this bra again, but I'll measure myself again before making my next attempt.