Monday, 17 July 2017

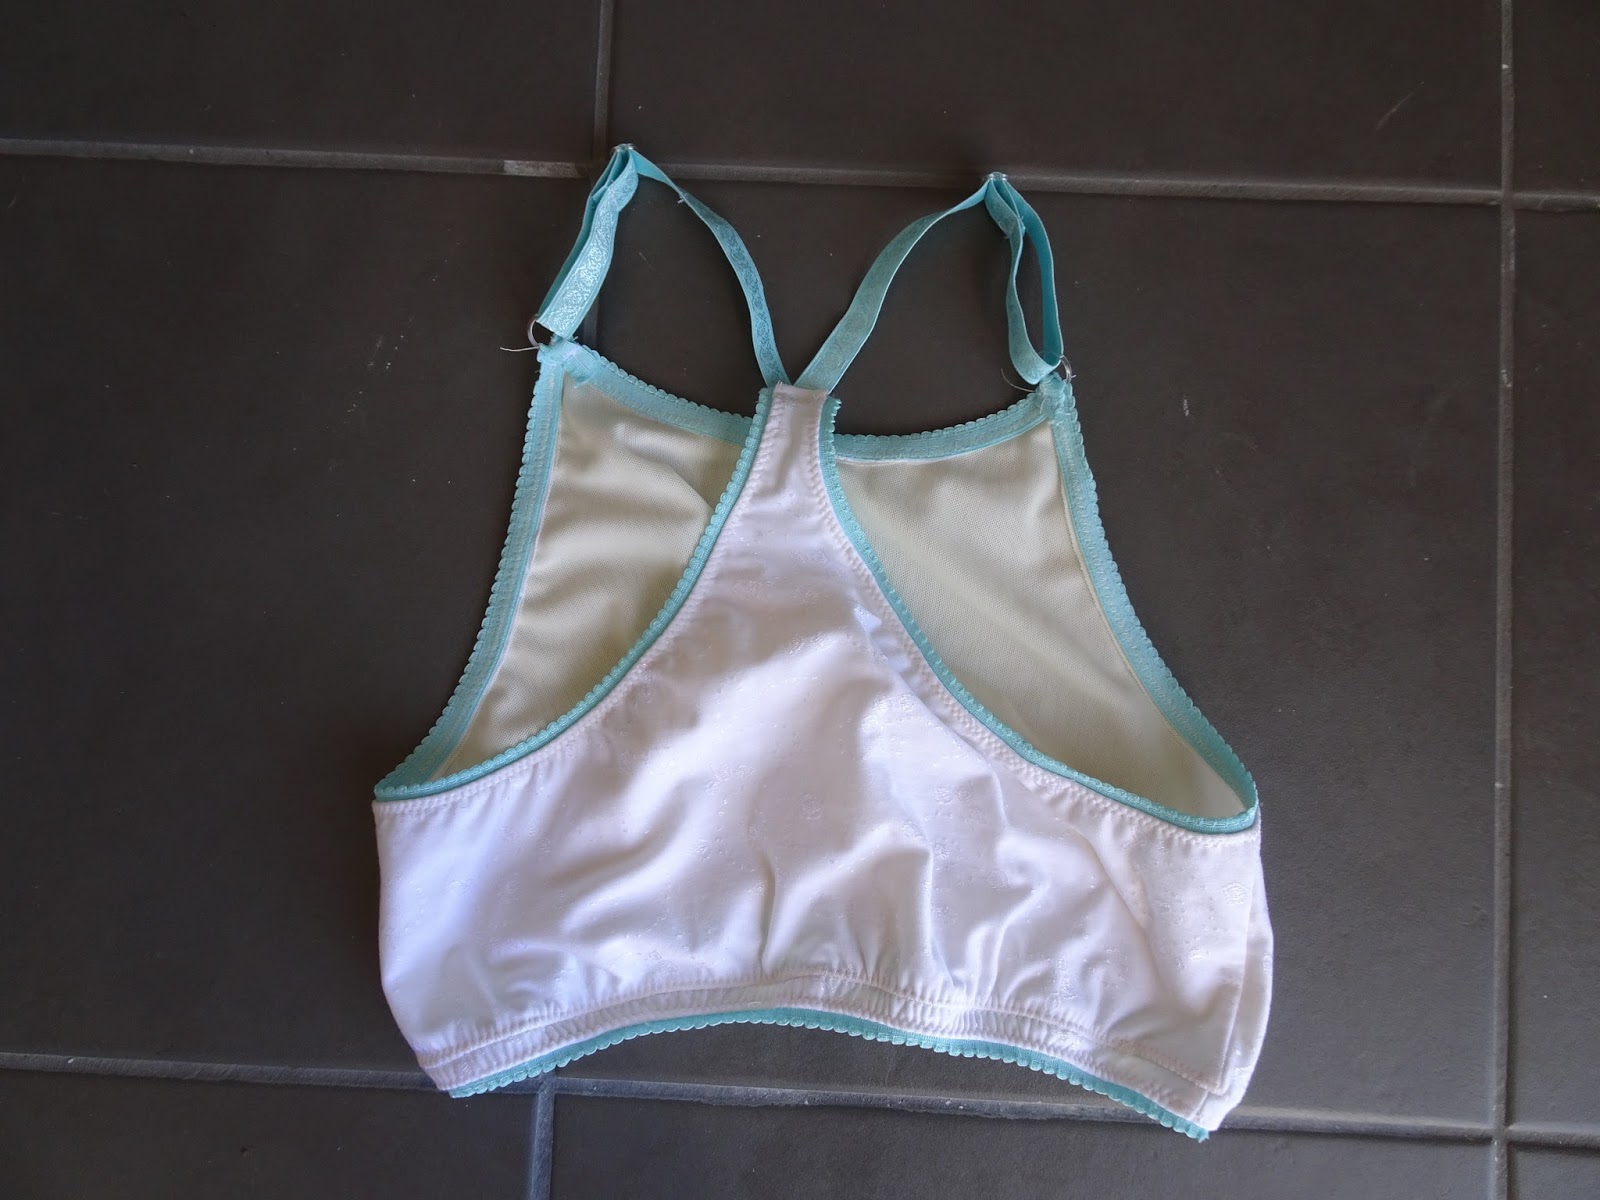
Mallori Lane by Madalynne

I found this while browsing on Madalynne's website when I realised the Noelle was a free pattern.  I thought this bralette might also suit me so I downloaded it right away and made both bras on the same day.  I cut this in an XS.  I really didn't expect it to work, and I was just going crazy with my leftover lace.  I glued the lace to some power mesh (my glue is terrible but slightly better than nothing.)  Then I tried to catch the loose bits of lace in as I sewed, since on the bust it wasn't quite long enough.


This was a fun make, probably the most fun I've ever had making a bra.  I was also totally blown away when I realised that it fit!  After the Noelle bralette, I expected another long line bra to be equally badly fitting.  It still feels substantial - it covers most of me, really, but it's comfortable and supportive.

This is waist length on me!

This is hard to get on and off.  Also, it's hard to get the straps lined up properly.  I have a muscular back and the straps mean all sorts of fat seems to stick out everywhere.  And it's itchy.

All this said I will definitely experiment with this pattern some more, prioritising softer fabric and maybe playing with the straps.  One way to make things more stable would be to use boning on the sides, which I might try.

Sunday, 16 July 2017

Noelle bralette by Madalynne

Madalynne has made it impossible, via Instagram, to avoid the Noelle bralette.  I had not realised that it was also a free pattern, and when I realised this, I had to make it immediately.  (I also discovered that I liked the Mallori Lane and so that followed, also immediately.)

I used size S.
The fabric is a leftover from a german bra kit, I think it's from www.sewy.de The trickiest bit is sourcing a single round thing for the back.  I didn't have one so I just tried to make my straps arrive at the right angle.

Once I got it all together (very easy) I determined that the long-line part of the bra was totally ridiculous on me.  I am short waisted.  It means I have like no rib length and no space between the end of my ribs and my waist, so this thing came down to my waist.  I took off the entire bottom panel except a bit to attach the elastic to. 


After that it's totally wearable.  I think there is still somehow too much fabric in the back so I am thinking about how to change that, and I also don't like that the strap adjusters hit right on my collarbones.  I am probably going to try again and make some changes, including just skipping the long line and using some heavy elastic below the bustline, and then maybe cutting out some of the back. 

Most Amazing Papercut undercover hood & Named Geneva raglan tee

I'll just smash these into one post since I made them the same day!

First was a Geneva Raglan tee, by Named patterns.
Done here.
I wanted to see if the size I've been making, 36, would work for a more sweater-type feel.  I was even armed with wrist and hem bindings.  I used up some scraps, as you can see.  Unfortunately I wasn't paying close attention and the left arm fabric had a right and wrong side...which I flipped thinking that there was a notch when there wasn't.  The right arm is made of ribbing, and didn't have a right and wrong side, so I didn't notice until it was too late (I did wonder why I had to ease the arms in so much on a raglan tee!)


Ridiculously, this worked out really well.  I did have to take in the arm with the ribbing, as that ribbing has proven to be really loose and floppy.  (See my Geodesic).  I ended up cutting about 2 inches off the hem and the hem binding looked stupid so I took it off and just zig zagged the hem and the wrists.  I'm not sure how well that will hold because the left sleeve fabric is kind of terry cloth and sheds, but I will see.

Then I made my Undercover hood which I've been dreaming of for weeks!  I have to majorly thank the Fabric Store, as I ran in straight from the airport with ten minutes before closing time and dithered over the knits, (Ah plus the new patterns from Papercut!  Exciting!)

I had envisioned an orange hoody.  But the orange wasn't the right shade and right next to it was...this.  It's drapey, thin weave merino and basically is a sweater weave.  Heavier than usual merino.  It so happens that I adore this colour, which is a dusky terra cotta. This thin, but drapey fabric, I know from experience, is totally the wrong thing for the Undercover Hood, which works better with moderate structure...


So I doubled the front and back.  I lined the hood and the pocket with a leftover, also merino, also from the Fabric Store, that was more stable, and I used the changes that I have written on my pattern from ages ago.  It's XS, with 1 inch removed from the length and from the sleeve length.  I narrowed the front body by about 2 cm but not the back.  If I had read my notes I might have been encouraged to shorten it by 2 inches as I still think it's too long, especially as this drapey fabric pulls down.

Anyway I think despite the length this is the most fabulous undercover hood I have ever made.
Plus I have an embarrassing admission to make. Until now, I have always used a straight stitch for all my knits, all the time.

For some reason I thought I'd try a very narrow zig zag.  And my mind was totally bent.  I somehow had never realised that was the way to fix knits which are just too tight in the seams!  I thought any zig zag would show up and look silly. 

So I have stretchy cuffs and a fabulous hoody.  It's a bit sad to me that these unglamorous basics are the things I wear All.The.Time but that is my life...


Wednesday, 5 July 2017

Aomori twist tee by Papercut Patterns

Ah yeah, I dropped everything when this collection came out.  The last Papercut collection held little of interest for me but I love the aesthetic and I love something about the simplicity of Katie's designs so I was enthusiastic to try anything at this point.  This top was the most interesting thing to come out of the Sakura collection as far as I was concerned, also I was looking for long sleeved tops right now so it was good timing.

I picked up the pattern at The Fabric Store in Auckland along with this cheap tencel - only 4 $ per meter!  It's a fine and drapey knit.

Overall the pattern came together quickly. I was puzzled by the binding and somehow reasoned that I had to sew it into a circle and then apply it, which I did, and which was wrong.  You apply it flat, and I think the directions are relatively clear on that.  I was able to salvage the binding without any unstitching by a lot of stretching on one side, which is now not visible in the twist.

My one gripe with Papercut is that she seldom shapes the sleevecap and I don't really need more batwing tops in my collection.  I know you can whittle that down into a better fit, but it would be nice to have shape in the shoulder and upper sleeve.

However.
I made an XXS.  Reminding, I am 32-27-37 with a super short torso, I'm 5'4" and apparently most of that height is in my neck.


My friend Ellie, who took these pictures in Dunedin (she said she took a thousand pictures) also tried this on and it looked the same on her.  She is often the recipient of my sewing and is proof that some things I've sewn have stood the test of time!  She has a bigger bust than I do but it did not help with the chest being uncovered, if anything she had more on show.  But I obviously opted to wear a tank top underneath for the photo shoot.


My reflections afterwards are that a twist creates a >< shape in center of this top, which means that by the nature of the curve, it's dipping low at the bust and high at the belly.  If I elevate the shoulders about 4 inches, 2 front and 2 back, it brings that twist up to something more reasonable but leaves my belly totally exposed.  Suboptimal.  I would have given up on this and left it at that but then Fiona posted her top which looks great.  It seems like she has a lot less open chest space than I do, and the twist itself sits right below her bust, whereas for me it was hanging rather lower and most of my bra was on display.

So I might scavenge all my merino scraps and make one from merino to see if a denser, heavier weight material occupies more space.  Tencel is one of the recommended materials for this top but I think it probably pulls too much, pulling the chest more open.  I recommend heavier knits unless you want the top to expose a lot of cleavage/bra and pull downwards.

I have made one other item from this collection and it also seemed really huge to me.  It could be part of the theme/aesthetic to have these be less close-fitting but when I'm already in the XXS I don't have much leeway to size down.

Thursday, 29 June 2017

True Bias Sutton tee in silk

This is the second Sutton top I've made.  Here is the first.

Still a size 2, and this time I shortened it 2 cm.  Er, I definitely shortened the front, anyway, but more on that later.  As I mentioned on version 1, the size chart would have me make a size 4 and I sized down because I don't like things too oversized.

The fabric is a silk charmeuse remnant from The Fabric Store in Auckland.  I immediately know I'd use it for this pattern.  I thought the combination would be low key and just perfect and I was right.  I love it and I've been wearing it a lot.


(These pants are my very first Sewaholic Thurlow trousers.  They are now more like boyfriend jeans because I have lost weight.)


This pattern is really top notch and I enjoyed it the second time around as much as the first.  It's a pain to finish the side seams on a silk top without a serger - I used a zig zag which creates kind of a mess, but I think it is stable, at least and won't fray.  And I can keep pining for a serger! The rest of the seams are done as french seams and I took my time and did a lot of ironing for once.

So I got around to the bottoms and noticed with some suspicion that all my dots on the back were about 2 cm lower than on the front, so I think somehow I didn't shorten it properly.  To make up for this I used the front (shorter) dots as the main ones and I ended up folding the back hem up one time extra.  The silk didn't like this and it is a bit messy on the inside, but the outside looks fine, and it makes a heavier hem which is nice. 

Sunday, 25 June 2017

Wanted tee by Vanessa Pouzet

I think tshirts are the most satisfying thing I sew.  I knew I'm supposed to love getting deep into major projects.  But the truth is that tshirts are the thing I wear, and when I can wear me-made ones I prefer them every time.  Other, more complicated makes, usually end up being experimental.  I like the challenge but I don't need the item in my wardrobe.  If the experiment doesn't totally succeed then I'm far too likely to give it away.

Anyway that's all to say I always need more tshirt patterns and I drooled over this amazing Vanessa Pouzet top when it came out.  I like her designs but most of them are not very practical for me and I also get sad at the very idea of trying to read french patterns.  However a tshirt is straightforward, so although the pattern is in French, you don't need more than the diagrams.

This first version is a scrap from The Fabric Store which is purple on one side and black rib on the other. It's a merino-poly blend and is very warm and has good recovery.  I was going to do black and in my head that couldn't be changed...which is why the neckband ended up black.  It makes it hard to match things in my wardrobe as purple/black aren't a combo that I wear much.  But it does layer under scrubs very nicely.  Unfortunately I still wish I had made it black.

I cut a size 36, although I also traced 38 as a backup.  My measure: 33-27-37, and I'm 5'4".  I'm starting to bounce back from my habit of cutting things too big which was going on all last year. This rebound likely will eventually lead to cutting things too small.  We shall see. 


I thought that maybe the neck would be too low in the front.
In fact it's more like it's a touch wide and carries over into my armpits.  This also makes it slightly less bra friendly.

So I took out 2 cm of the centre front, including of the neck band, and then re-added the same amount as a strip down the side.  I considered changing the armscye as well but left it for now.  I am still really nervous about making changes to patterns!  I might be better off using fewer patterns and learning how to modify them better.

Plus we made pancakes on the beach...


I was surprised how much the front neck gathers when it's just sitting around, but when I wear it, it looks fine.  I think this was a small fix that I prefer - I can barely tell the difference except it doesn't feel like the shirt is sliding down into my armpits.  The second fabric is a very lightweight cotton/cashmere/something else blend and is glorious.  Unfortunately, I was sewing this when I had a friend over and I didn't pay painstaking attention to the neckband, which is necessary.  Therefore, it's not got very nice corners.  Please don't stare.  I managed to somehow salvage the mess and I'm happy.

The first of these two tops was the beginning of about 2 weeks tshirt sewing like a sweatshop, and the second one was the end of the two weeks when I had already had a knit-free few days and just wanted to finish one last tshirt!