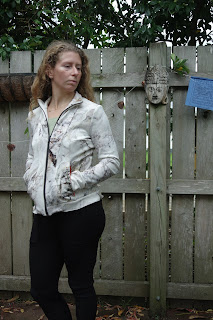
This has been on my queue for a bit, and I have promised friends I would make my own merino jacket to wear hiking, which prompted me to get on with it. I actually have loads of hoodies and lightweight jackets and interestingly....none that I've made myself. I have made nice ones but somehow they have always gotten wings and gone to new owners. I'm suddenly thinking, as I write this, of a nice scuba hoodie I made, and loved and was proud of... and wondering who it went to.
Anyway so I committed an entire day to this. Would have cut it out the day before but I didn't manage. It takes full concentration. I cut a size 38 as I'm not a perfect match to the size chart and I thought 34 1/2" was a better bet for a jacket than 32". I didn't look at any measurement below the bust.
The fabric is lightweight scuba, I bought it awhile ago and made a top out of it then found it beautiful but totally useless. I love the fabric and hoarded the last piece for this project. It was quite a leap of faith to use this fabric rather than the merino I have for a second version - especially since I have 3 meters of the merino and it was really really cheap.
The instructions are nicely illustrated but they are not particularly well translated. With knowledge of what you are aiming for in general everything ends up where it should be, but in terms of properly finishing seams it was hopeless from quite early on. This is something I had foreseen and that's part of why I used scuba, but it's always that wee bit sad to have catastrophic pocket/zip/jacket intersections.
The jacket got put together in the day I had allocated, but sewing down the facings was another story. Really this needs to be heavily understitched on the facing, collar and hem. My scuba does not iron. I mean, ironing doesn't do anything to it at all, so I had kind of puffy parts, like the hem just puffing out. Understitching would have helped. I've taken a lot of notes for the upcoming merino version. After about 2 weeks of sulking about I finally took a very deep breath and stitched in the ditch to get all the facings down. I strategically tacked the pockets to hold them in. The facings kind of overlay the pockets, but a few tacks here and there are helpful.
Result was good. I topstitched the bottom of the hem to get rid of that puffiness but decided not to meddle anywhere else (it kind of lettuced but I hope it settles with time, and it's better than the previous puffiness.) I adore this jacket. Everything comes together pristinely on the outside! The fit is good and I'm glad I didn't size down. Of course, a wee bit shorter would have suited me but this type of jacket can be a bit longer without looking oversized on me.
I think I prefer the pocket side with the open pocket, it's perfectly angled for hands and objects, and it's easier to get a good finish on it. Zip pockets in stretchy fabrics are always a crapshoot and this one does need to be held at the top as you open it so the fabric doesn't pull, but it's a nice secure pocket - both of them are huge and fully fit hands! This is a functional jacket! Don't be led astray thinking it's a wimpy fashion piece...
I would add to the instructions the following clarifications:
-on the open pocket, understitch after attaching pocket to the body
-really understitch everything - the facing against the zip, the neck at the top and the hem.
-For a clean finish fold the hem in by the seam allowance before sewing it to the side facings. Also, baste a line along the front facing and the inside neck piece to know where to fold it in afterwards. Stitch in the ditch in one go from front up the neck and back to where the pockets get in the way.
-re the pockets: finish every single edge before you start. So, overlock the pockets all the way around. Overlock pocket openings first. Then sew together. You will not get a second chance!
The good news is that the mucky bits of my pockets are on the invisible side and actually it looks reasonably neat now. The only zip that fit is a precious Riri zip which I think I bought in Switzerland so once I'd committed to that this project had no choice but to be awesome. I'm now quite keen on making the second one and seeing whether I can get perfect innards too!


No comments:
Post a Comment