So apparently I don't learn from my errors. Or possibly I just think that following pattern instructions and fabric weight recommendations...is optional. Because version 1 of these amazing pants was made from a lightweight linen-silk blend that suffered from just not being heavyweight enough.
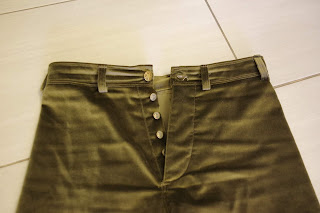
Thus for take 2, I naturally pulled this fantastic Hermes cotton velvet out of my stash. It's a one meter long and rather wide piece that I bought in Copenhagen and it is just so beautiful that I want to make everything out of it. Naturally again...it's not heavyweight. It um has great drape.
For this version I made size 4 again. I removed the pockets. They sit right on my hip bones and I can't get anything into them easily. When something is in them, it hurts my hipbones. So - no pockets.
Then by comparing closely to the first version, I removed 1 inch from the upper part of the waist. I did this because I saw that the entire butt and crotch area fit me well, but I had excess fabric bunching at the waistband - the upper part of the rise was too long. So I couldn't use the lengthen/shorten lines, since they are in the crotch and I didn't want to change that part of the fit.
I made parallel lines up high and used those. I would lengthen the dart just a little next time as my modification led to a really short, fat dart. I had to shorten all elements of the fly as well, and then make my own button placement.
I sewed these in one day. It was amazing. Except for the buttonholes. I had small vintage buttons from etsy and no hammer, so I didn't test the buttons ahead of time. And it ends up the crappy Singer I'm borrowing WILL make buttonholes but it does not align them correctly. I had to do about 25 practice buttons before I could correct for the weird alignment. That was when I realised that these buttons are some kind of vintage that look like they have to be soldered together. Etsy fail. And since I had made 4 13mm buttonholes I was stuck with an irregular size. I ordered So Many online buttons and nothing fit. After a MONTH, I finally gave up and bought normal buttons at JoAnns.
And then once I finished the pants...the buttonholer Would Not make the buttonhole for the main button because of the many layers of fabric now present. It's really frustrating to finish a pair of pants and feel like you are Just About to wear them but are stymied by a few small steps. I seriously considered hand sewing the main buttonhole, but then I read a bunch of posts on how to hand sew buttonholes and decided I couldn't learn that before my frustration overflowed. So in preparation for a 3-day Thanksgiving sewing binge, I took these plus some big puppy eyes to someone I knew, who after much begging, grumpily sewed me one buttonhole on a Bernina. I was never that excited by Berninas before but now I wish I had one. It used a buttonhole foot rather than the long buttonhole thing, and because of this you have great control over the entire hole.


And my Persephone pants are done! And they are amazing! And it looks like I need to size down for my next pair! Which I will make in the correct weight of fabric, I promise!


