Showing posts with label pdf patterns. Show all posts

Tuesday, 26 April 2016

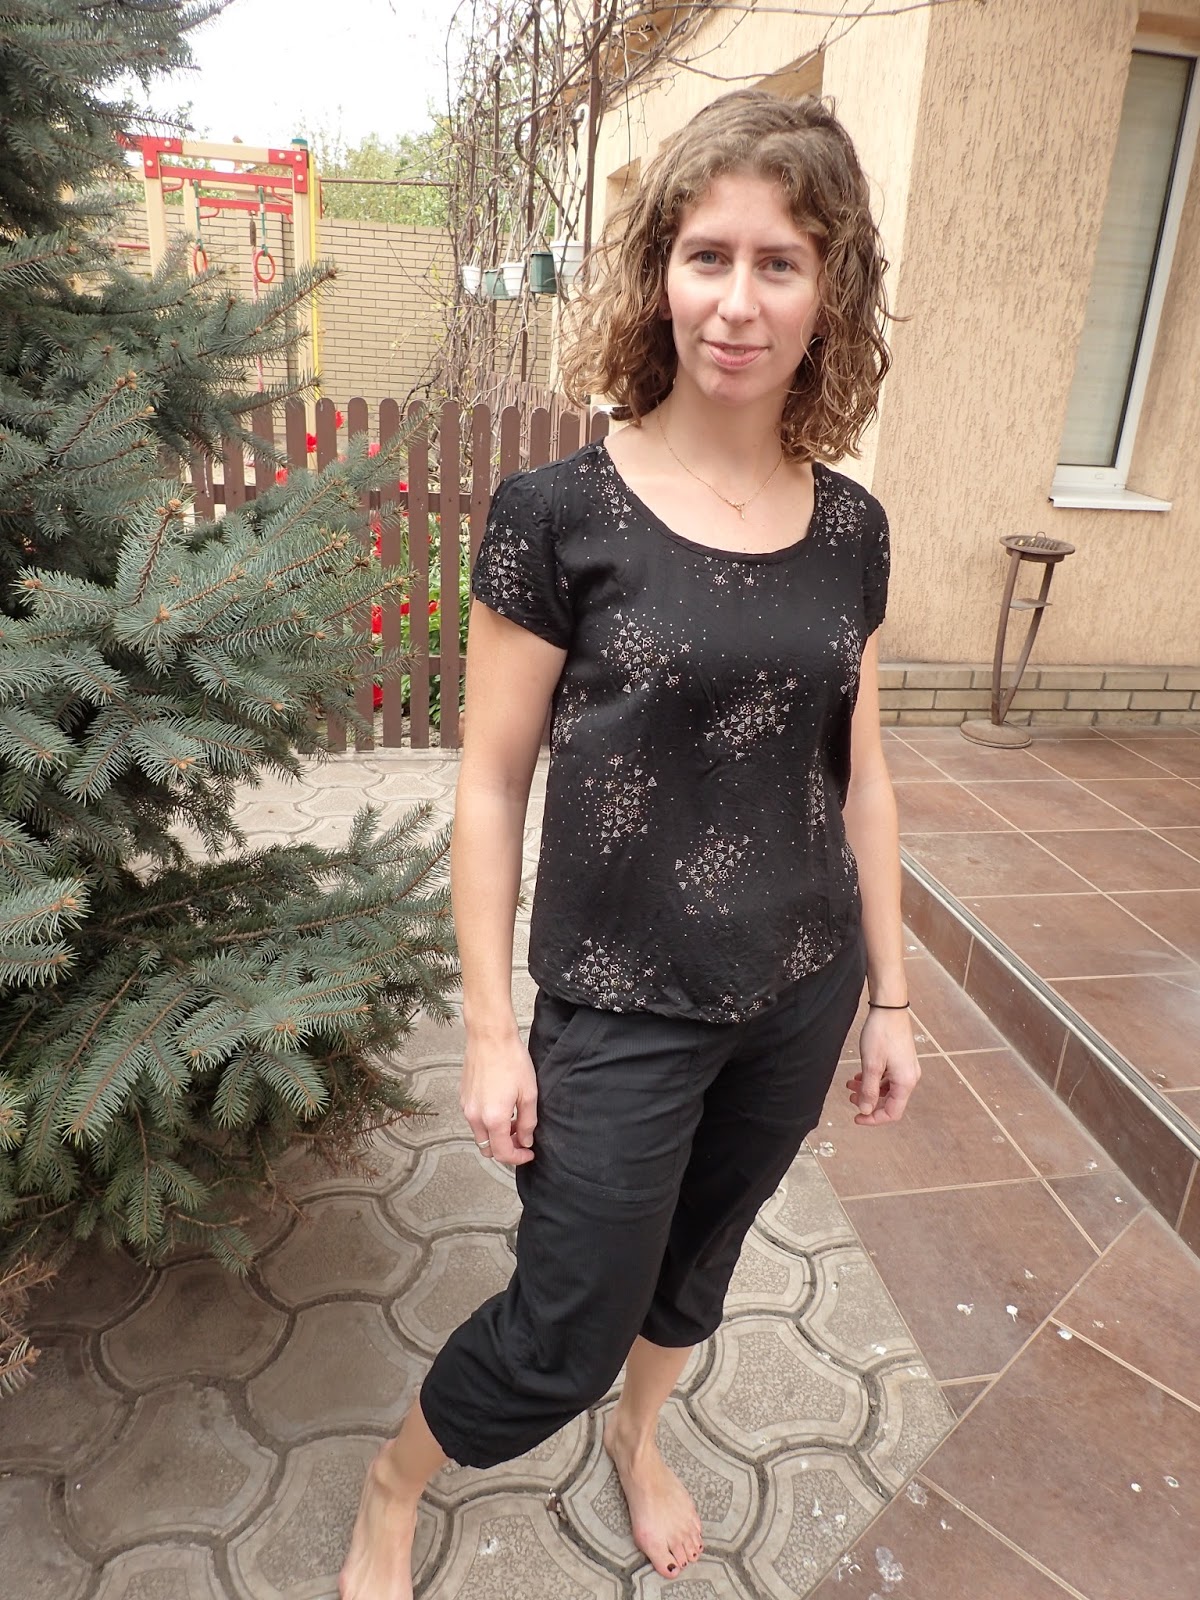
Grainline Scout: the Goldilocks problem

I've had enough time to review my past Scout mistakes and improve, so I totally thought this was going to be nirvana.  I also had weeks to prepare for my sewing vacation so it's an embarrassing oversight that I didn't review my old posts and the size of Scout I've used in the past! I cut a size 6 sleeve and a 6 top, tapering to a size 4 below the armscye.  If I had paid attention I would have known to taper from a size 4-->2, as I have made both a size 2 and a 4 in the past and wasn't really satisfied with either of them.

I increased the width of the bias piece, which has never been enough for me.
I changed the bottom using the Polly Top bottom, which adds shaping but also adds width towards the bottom.

The fabric is a drapey rayon that I got from Anna ka Bazaar.  I have seen people rave about Anna ka Bazaar, and the shop is cute and the girls in it were nice to me when I was in Paris, but I find the fabric quality, when you buy online, can really vary.  This fabric is a lovely, not-quite transparent rayon, and I've seen other people using it as well - Republique du Chiffon used it for their Madeleine dress (which yes, I would totally make if I had more time.)

Small rant: I know everyone loves Grainline.  I don't love Grainline. I'm always lukewarm about the patterns and then eventually because everyone loves them, I try them, and then I keep trying and keep trying them, but I never seem to arrive.  I'm additionally grumpy because I had to re-download all my pdf patterns, and I had some expired links (it's been many travels and many computers since I started sewing!).  Every company that I wrote to sent me a new link for one more download.  Except Grainline.  They ignored my email entirely and I had to buy the Scout pattern again.  This doesn't make me change my mind about kind of not loving Grainline.  Rant over.


And, in fact making this Scout made me grumpy.  Black is hard to see and the rayon is just slippery enough to make you pay close attention. The results are still not totally satisfying me. In this size the back looks ok but there's extra fabric in the front - I could easily take out 2inches from the entire front.  Also, the extra width from the Polly bottom makes this feel like a capacious, shapeless top.  The drapiness and beauty of the rayon balance it out ok but in the end it's still not perfection!  Arg!!

So for next time - read my notes!!  Cut a size 4, tapering to 2 below the sleeves!  Don't change the hem! Also I really loved the feel of double gauze (I used a Nani Iro gauze for my first Scout and I only recently gave it away because my muscles finally were too much for the size 2 sleeves...)  Nirvana is almost in my grasp...or do we feel that with each sewing project? 


Friday, 22 August 2014

Deer & Doe Plantains: birds and stripes

I was excited about this top ages ago and was even thinking of making it in Switzerland, but the onerous task of printing and cutting and taping held me back (although it wasn't terrible in the end).  When I finally made the first one, it was for a friend but whetted my appetite...so since it's my birthday and I can do whatever I want, I made two!
BIRDS!! Charley Harper birds!!!  What could be more amazing?


My coworker Alexx wanted some attention too!

Thanks to Chris the xray tech who took these nice photos. 

This is a super easy pattern to make.  It depends basically on your bust measure and is free flowing from there.  I cut a 38, which is the same as my Belladone.  (I'm 34.5, 27, 37)  I made the vireos up in a day in between working on two other projects, and did the stripes later the same week in between 13-hr shifts at work and surfing for my birthday! 

Westport, WA.  My local surf beach, and my birthday!  Best combination : )

The pattern is four pieces and comes together like basically all simple knit tee shirts: front, back, sleeves, neckline.  The amazingness of it is in the cut - dips a bit low in the front, and with this fabulous flare at the waist.  My evil Necchi did fine with the very stable knit vireos.  I sewed it up with a straight stitch and a ballpoint needle, and zigzagged to finish each seam. 

I used the recommended mid-length sleeves for the vireos, and so I lengthened it a bit on the stripes because that fell at an awkward spot for me.  I skipped the elbow patches because I don't care for them.  I made a single effort at stripe matching but cutting the stripes with the underarm at the same spot.  You can see that it just about worked.  I was disappointed in the striped version - it's so me that it feels a little too much like me circa 1996.  In fact, when I pair it with navy jeans, I think I had just about the same outfit in 1996...


I can see making this up in a sweater knit...hm...in fact...I have an idea!  You may see another Plantain soon. 

Monday, 6 January 2014

By Hand London Polly 2

For my second Polly top I had so many awesome scraps I wanted to use that it was hard to choose the best ones.  Finally I settled for the silk-linen that was leftover from my Lisette Jacket as I adored the drape of it, and I paired it with the never-ending silk that was my Victoria Blazer lining (and my Papercut Saiph!)

I used a size US 6.  I took 1 inch from the centre front and about 1 inch from the top of the shoulders.  I cut about 2 inches off the bottom.  French seamed, and in order to show off the very cool selvedges I left the back open at the bottom since I didn't have enough fabric to cut it on the fold.  That also helps get it on without a zip.

I adore my new Polly top!  The fit is magical and actually the horseshoe front went in more easily this time as both my fabrics had just enough give.  Unfortunately this was the project that got shunted to the very end so I was sewing my bindings with the wrong coloured thread and it shows some on the front...

Photo update!  Thanks Mum!


Wednesday, 13 November 2013

Colette Sorbetto

This is a quick and easy make.  It's a 2 piece pattern and the most time consuming part is applying bias binding.  I cut a size 4, which seems to be my size in the other Colette patterns I have seen, and it fit well.  And I did french seams on the sides to have a clean finish!


I made this in one evening out of a very flowery Liberty fabric.  I'm not totally sold on this fabric...but I do like the shirt.  As part of my Fall/Spring essentials sewalong, it fits the bill - I can see it as a go-to when I want something light to wear.

  I got to play photo shoot in Napier while a friend was visiting me.  (We went biking along the ocean.)  It's nice to have friends around to take the pictures...


Saturday, 19 October 2013

By Hand London Polly top

So if you haven't seen the new pattern out from By Hand London, here it is!  And it's a free pdf download!  I had the perfect pieces of fabric to do this so it hopped straight to the top of my list, and took one evening to make (once I did the boring part of cutting and taping).

I used a greyish green raw silk for the body and a scrap of Mitzi Liberty for the front and the bindings.  The directions are awesome, as always for BHL, and they are correct in that it's hard to put that front panel in without a lot of careful easing and a mess of pins.  I had to redo a few spots and one edge still doesn't sit quite perfectly.

I cut a size 6/10 as that was true to my measurements and it's what I've used for their other patterns.  This is a much looser fit and probably would fit best on a tall person (or anyway, someone who isn't short-waisted.)  I did a quick fix by removing 1 inch from each side of the shoulders, which brought the armscye and the shaping up to my bust level.  The shirt is still quite long but as long as I think of it as a tunic I'm pleased - it has a great shape along the side seams that keeps it from being shapeless.  The hem is really exciting since it's rounded, and it was fun to do, too.


My awesome friend Angela conducted a great photo shoot.  Thanks, Angela!  We even paired Polly with my incredible suede Victoria (which I haven't taken off in the week since I made it, seriously.)  Overall the Polly is a cool make, with some thought required. 

Tuesday, 1 October 2013

aimecommemarie - must have, plus fabric shopping in LA

Hurrah!  Vacation has ended!  Since I spent the first day of it fabric shopping at the garment district in LA, I spent a lot of the rest of the time hanging off cliffs dreaming about what I would sew when I got home.  The result was a fabric mess all over the living room, dining room, etc...and it was hard to pick something and just get started.  So I went for something simple!  Then I got totally hung up on how to finish the neckline and this has dragged on for days, until I got sick of looking at it.  I'm definitely no good at keeping UFOs around.


This is my first finished product by aimecommemarie.  When I first saw the patterns I knew I was in love.  They are hand drawn and overlap (boo to necessary tracing) but the instructions are also hand written and drawn with illustrations.  They are inconveniently in French, but luckily French is pretty easy to figure out.  This shirt comes as a pdf and is only three pieces.  I traced a M to start, recognising both that I need to start sizing up if I want things to fit (re: my poor Anna), and remembering that euro sizing is much more fitted in general. 

Fabric: leftover from Anna.  I didn't have enough to fold the back piece, so I sewed two halves together.  Possibly made the back a bit wider by doing that, oh well.

The pattern gives you a few options for finishing the hem and neck, but no definitive instructions.  This might annoy some people.  It left me in limbo for about a week.  I finally used black bias tape and sort of tried something new by folding it to the inside.  I like the look but it makes the neck droopy.  So I just zig zagged the sleeves because I didn't want to change their look at all.  What do you do to avoid that droopy neck??  It seems like all non-knits are prone to this problem any time you use bias tape.

Ok...so regarding Los Angeles.  Well, I had a backup plan, which was a beautiful selection from Mood fabrics that I ordered ten minutes after that 20% off sale ended.  Stupid time difference.  I shipped it to my nice friends in Salt Lake City so it was waiting for me when I got there.  In LA I wanted to find linings - Bemberg, to try it out, and some silk..  Linings have been the hardest thing to buy online, I've found.  Oh and I wanted some leather to make my Victoria Blazer because I'm totally copying Kim.  As many before me have noted, the garment district is not a great place to go when you have a flight to catch in 3 hours.  I'm also a newbie and still not great at differentiating fabrics.  Things like the Michael Levine loft were wasted on me, because too much of the fabric just felt plasticky or yuck, and without knowing what it was, I wasn't interested.  I did have some success with silk at a random shop, picking out a few colors for about $12/yard.  Compared to New Zealand prices that was total success and now I wish I'd gotten more...Michael Levine stole the rest of my time and money.  I may end up making a short-sleeve Victoria though because I'm not sure I can magic two sleeves plus the body out of the three lambskins I found on sale.  But either way - leather jacket for $50!  I'm excited...and I really hope I can manage to get that to fit!

My new return crazy enthusiasm hasn't quite worn off and I have about ten pieces of fabric in the wash and patterns have taken over the living room.  I'm trying for a few simple projects to see if that helps me get focused! 


Wednesday, 7 August 2013

Jalie thermal underwear (and a shopping spree in Wellington!)

Took a little break from dresses in favor of a bit of practicality.  I was hunting for awhile for a men's thermal underwear pattern.  I had gotten some nice black local merino wool and my boyfriend was keen for a pain of longjohns.  Via various forums I found the out-of-print Jalie thermal underwear pattern, available for download on their website for $9USD.

I am so far not in love with pdf patterns.  The Jalie pattern was particularly confusing because it has an unreliable amount of overlap and doesn't outline each piece clearly so you know where to cut.  Luckily my boyfriend was willing to help since he got something out of it : )  He did the cutting and we taped together.  He's a skinny 31 waist and he chose a size U (the pattern covers toddler to big adult), which in retrospect was a touch big, but he says he likes it that way (I also cut off about an inch of the waist to make it sit slightly lower toward his hips.)


It was my first time working with knits!  Jalie recommends first zig zagging the seam, then following it with a straight stitch.  I did that in some places, although it seemed better to do the straight stitch first which held the fabric and then I did a zig zag to better hold the edge.  The instructions were a bit funny for the fly and I had to undo some mistakes there when I sewed the front and the back together, but it was otherwise straightforward construction and my first ever elastic application went well.  I did use a ball point needle, and I'm not sure it's totally necessary but seemed like if that would improve the final product I might as well go for it.

Overall it is a functional result but definitely a quick job - the fly bias tape is a bit funny and I didn't cut the top above the elastic totally straight since I shortened it by guesswork.  I'll admit I still don't own any kind of a ruler except for my measuring tape.  My next attempts at knits will probably be tshirts as another project that will be quite straightforward.

Speaking of which - I went to a conference in Wellington last weekend, just for a day.  Quite a rushed day because of course it was a priority to get to the fabric store!  I had to choose which lectures to miss of the conference, and I was still late getting back.  Global Fabrics has changed its name to The Fabric Store, a bit dull but this *is* New Zealand.  And they were having a sale!  My frantic hour in the shop taught me something about needing to have a plan before you enter the shop!  I ended up with some merino wool in aqua and green, green twill for my upcoming Minoru jacket, some green wool I couldn't resist, just in case, rainbow striped shirting, and some interesting stuff for pants involving lurex threads and silk-cotton blends. 

Of course I'm totally sure I left some incredible things behind but I suppose there will eventually be another trip to Wellington, and I definitely have enough to keep me occupied already!