Showing posts with label merino wool. Show all posts

Monday, 16 July 2018

Jalie 3248 - Drop pocket Cardigan

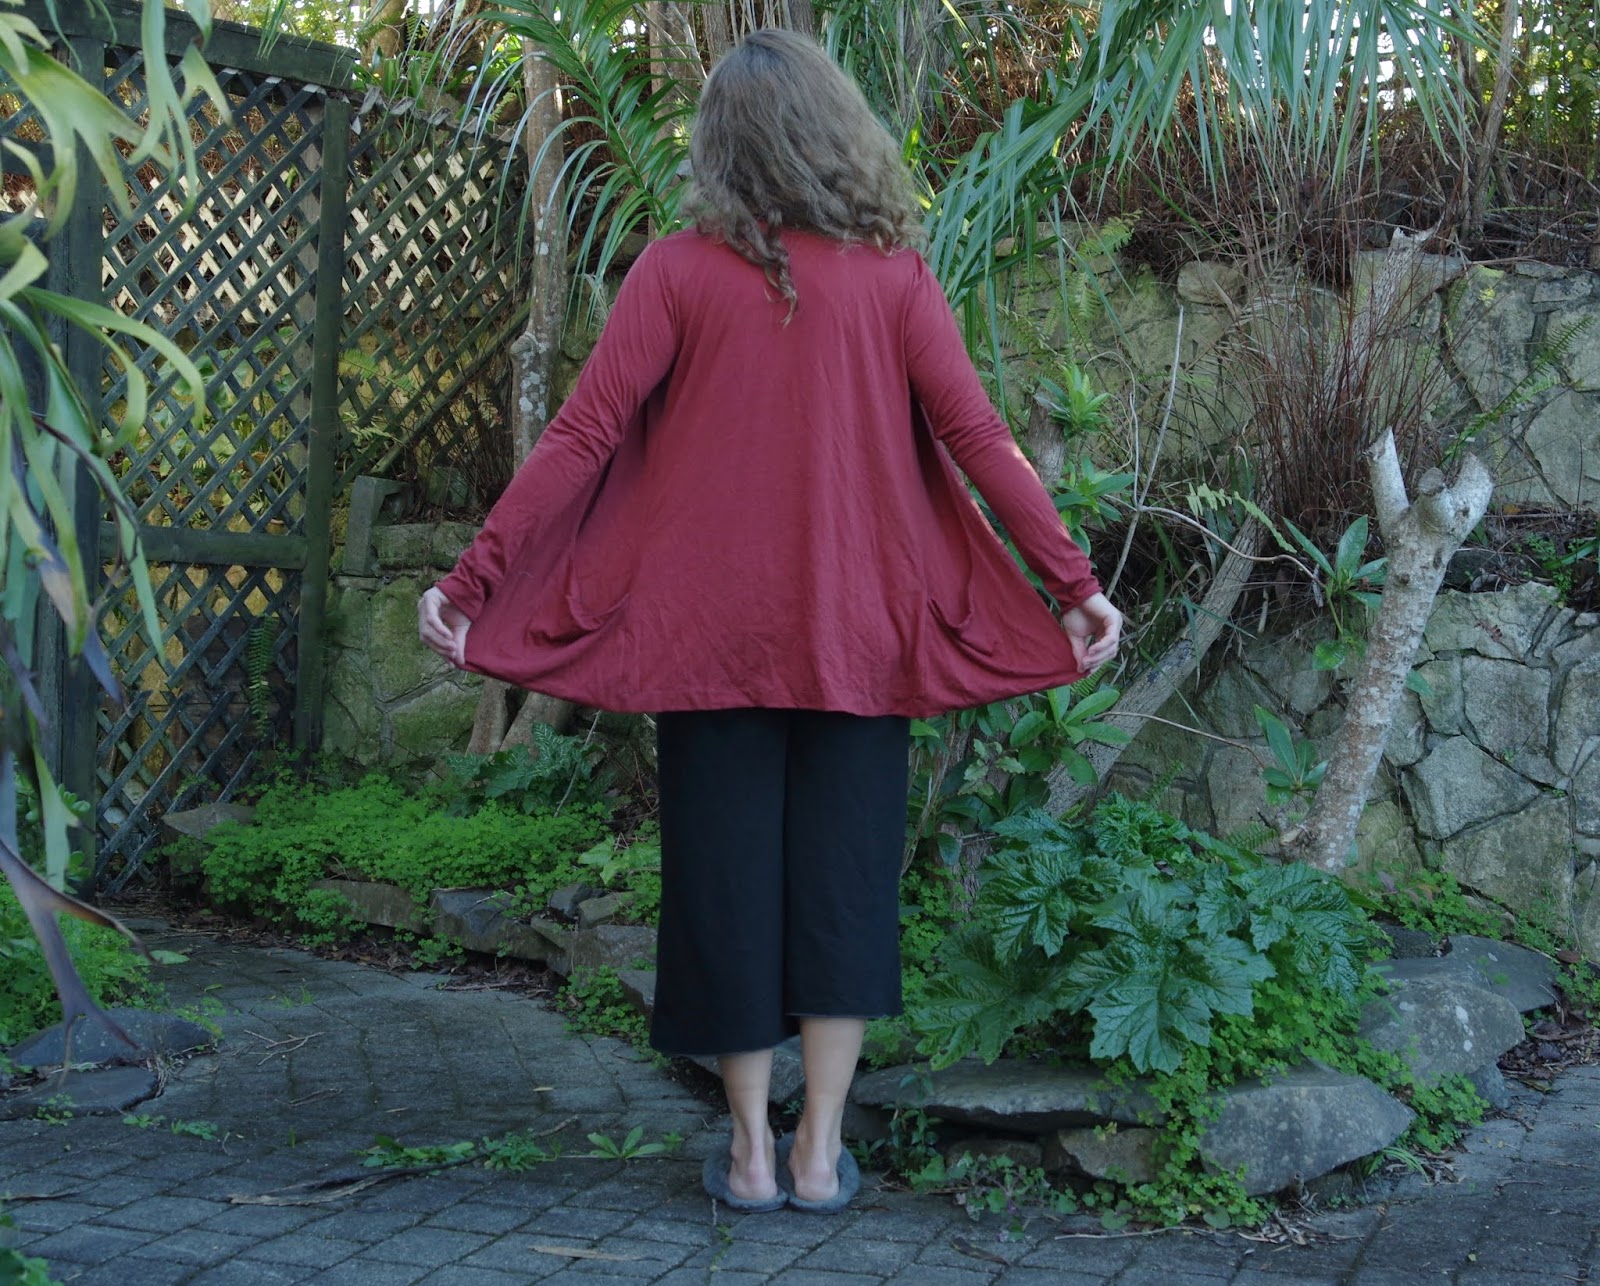
This pattern was totally a spontaneous make.  My sewing friend Tessa has just Discovered Jalie, as one does.  So I have Rediscovered Jalie!  I was browsing something and this pattern totally caught my eye because of the crazy pocket action.  I bought it pretty much that minute, printed it within the day at the print shop, and started sewing with a piece of fabric that I had been planning to use for a tshirt.

This was a much better idea than yet another merino tshirt!  The fabric is from Merino Heaven - my name for a cluster of shops in Otara in south Auckland.  Merino in this little cul-de-sac goes for about 8 dollars/meter, making it worth the helldrive to Auckland.

I cut a size R based on my measurements.  I am happy with this size. I am a bust 32 and waist 27, but with wide shoulders and a muscular back and upper arms.

I read through a few reviews, but there are a LOT of reviews, and most of them are the annoying type that just say they love the pattern and it's so cool and they want to make 5 more.  So I didn't read too many and I didn't think too far ahead and I didn't consider shortening the pattern.

The instructions are sufficient but not wordy.  Construction is ingenious.  I do not recommend sewing this on a normal machine, as I did.  I think too many of the seams need to stretch well, and of course I used a straight stitch.  I have indeed discovered the uses of a zig zag but I still don't always feel like it's as strong.  Since in the front you functionally have 4 layers of fabric, a lot of weight hangs on your stitching.

I lost the very first piece - the neck binding, and made another one from whatever was handy, and now I really like the contrast.

This took two separate sewing episodes, but mainly because on night shift I sometimes sew when I should be sleeping and I was smart enough to stop before I made any mistakes.  I wore it to work right after finishing it.

What people didn't bother to mention in those reviews: this cardigan covers your back very fully.  It does have slim fitted sleeves that will go well over a tank top but not a tshirt.  And the front goes to about the nipple line.  You could certainly pull the front more closely together, but that's not how it hangs - it's made to hang open and the pockets are quite far away from center.  My instinct is that it should be lots shorter so that I can easily access and put things in the pockets.  However I see that the line of the cardigan looks good long.  If I made it again I'd be tempted to shorten it.  As it is, I wouldn't put heavy things in the pockets because they seem far away, like the entire cardi half would then pull away from my body and things would fall out of the pockets.  But they are spacious.


Everyone else really likes it on me.  I have been on the fence about it.  But I do like the look and I think it will go with a lot of my wardrobe.  

Wednesday, 25 April 2018

French Navy Calyer pants: tacky lounge pants for the win!

Like most people these days I discover new patterns via Instagram.  I saw a few pictures of Calyer pants sneak up before the pattern was put up for sale and I was already drooling at the lovely front, the spiraled side seams and the clever pockets.  Plus the fact of no closures on pants that look so stylish had me full of fancy aspirations.

I bought the fabric at The Fabric Store in Auckland to make these pants.  The fabric is a marled grey woven in a weird blend of merino, plus linen? silk? rayon?  who knows.  When I washed it the fabric kind of shrunk in on itself, getting a bit denser and rougher feeling.  It doesn't really have stretch, but it has a lot of mechanical give in the horizontal direction.  It has basically no drape.  The fabric is also super narrow.  I think I bought 1.5 or 2 meters, which is of course less than the pattern calls for.  The pattern calls for a lot of fabric because the back piece is very wide.  So, note the width of your fabric if you want to use less!  I could not fit the pieces across the width and had to cut my front legs in two pieces and make a seam just above the knees.  I actually quite like doing that and I think of it as a design feature, but if you aren't keen on such things, then ensure your fabric is wide enough to cut the back pieces on.

My sewing friend Tessa had made Calyer pants a few weeks ago so I saw her learning process as she didn't leave the seam allowance for the pockets and had to backtrack.  She also cut a size smaller than the size chart recommended.  (Size chart for her measurements were L, but the finished measurements suggested she'd be fine in a M, so that's what she cut.)  It was also very good to see her finished version as the pattern does not make clear that the pocket lining will be visible when the pants are worn.  Tessa's fabric was extra wide, so she could fit the pattern pieces on something like 1 meter of fabric!

The directions are so precise they are almost micromanaging.  However, this is an "advanced beginner" by which they mean intermediate pattern.  That is because the shape of the pattern pieces diverges from "standard" pants, and because the order of construction is original.  By precisely following the directions you are basically guaranteed a fantastic result.  Seriously.  These look amazing.  There is basically no spot that doesn't line up, no edge that's crooked.

As for me, I cut a size XS and I am glad of it.  I considered cutting the S.  My waist is 26-27 and hips 37. I am scared, because my Orla dress was fit for (and was given to) an 8-year-old.  So I was tempted to size up.  Truthfully though I think I had a psychosis moment because on the Orla dress size chart I was not an XS or whatever I cut, but something like an M, so that was my own mistake.

I made no changes to the pattern, and I used some faded rose coloured silk for the pockets and for the front waistband facing.  That was good as the nice stable fabric was easy to work with.  I liked the pop of colour which is subtle but blends in with grey.


I did these during my sewing day, so they took about a third of a day.  I had no problems and my only pause was when Tessa went out to buy my waistband elastic.  I also did not shorten the hems, though they are drafted for a person sized 5'6" and I am more like 5'4", the inseam seems fine on me.  If you are tall these will be slightly above ankle length.  I like the length as it is though.

All my photos are taken at the Mount, aka Mt Maunganui.  The pants did well for a movie night, followed by a morning stroll and a climb up to the top of the mount, though I was pretty sweaty by the top.  (Google says it's 231 meters up.)


My final thought was that the pants look so super cool lying on the floor but when I put them on, the gathering from the back elastic makes my bum look terrible.  They are not form fitting, and so they are kind of like a pair of classy lounge pants.  However then I realised that I basically live in things that don't fit very well which are takes on classy lounge pants.  Also, it was my own fault for not using drapey fabric.


I wore these to work and they were comfortable and made me happy (I am working night shifts and thus basically wear takes on "fancy lounge pants" in order to not wear scrubs.)  I don't plan to make more now, but if I made more I might take a tiny wedge out of the front waist just to dip it down in the centre front.  Other than that, and using a drapey fabric, I wouldn't make any changes.  I suppose theoretically I could size down from the S at the hips to XS at the waist, to decrease the amount of fabric entering the waistband gathers.  But I think first trying a lower profile fabric might make a difference.  So pay attention - if your fabric has a lot of body it will not lie flat due to the elastic!  Also make sure to leave precise seam allowances when sewing the pockets.

Overall I am really happy with these and the pattern.  It was sort of a mystifying experience as I went along but it came out great.  I still don't really get whether the weird angle at the hem of the pants mattered, but I guess it's good when life leaves us with a few unsolved mysteries. 

Friday, 30 March 2018

Chalk and Notch Pony tank and a sewing day!

I am whiling away time in New Zealand waiting for my Australian visa.  It's all pretty good, but my luggage...is in Australia.  So I am knitting.  But it's been over a month and I started to get a little itchy for some sewing.  I wrote up a friend who sews locally and she invited me over for a sewing day - something that she does weekly.

I prepped the Anima pants and the Pony tank.  She offered to show me how her serger worked and of course I was jumping with excitement!!  So a mix of a new pattern and an old pattern seemed about right.

Nothing to say about my Anima pants.  I have made this so many times that I could basically do the changes in my sleep.  What I could add is that the new, updated A0 pattern came out...literally 10 minutes after I got to my friends house...so I spent the next hour cutting and taping.  I make a size XXS, remove 10 cm of the length, remove the fly and the pockets.  And no drawstring.  For this version I went with tulip cuffs.  I added 2 cm width to each cuff and then visualised the tulip shape, cut all four ends together and then just sewed the edges shut before flipping it right side out.  I realised afterwards that I didn't need to add any width, because my overlap was the same amount as the seam allowance would have been.  So the cuffs are loose, but look great.  I love this little feature that makes my SERGED Anima pants the best ones I've ever made.


The Pony tank is basically as advertised.  I cut the size 2 based on my measurements.  There is a lot of commentary about how high the armscye is.  It is high.  I was all proud of not trying this top on before I applied the armbands.  Don't be like me.  I still need to fix them - I took it home and tried really hard to wear it and the armholes just are not working out.  Unfortunately stuff that has been overlocked...is not much fun to undo.  But it will happen soon!


Sunday, 4 March 2018

Sew House Seven Toaster sweater in double faced merino

This is one of the final projects that I made last winter before going off to Nepal.  It hasn't been worn much yet but it was an easy make and I really like it, so I expect it will eventually gets lots of wear.

The fabric is double faced merino from the outlet fabric shops in Auckland.  It's dark olive on the outside and a more subtle dusty aqua on the inside.  I went with version 1, and size S.  I loved the inside colour but I couldn't think of any nice way to use it as accents, as the olive is very clearly an exterior sort of fabric - it won't catch on anything, but it's also not as nice against the skin, whereas the texture of the aqua inner is more like usual merino.


A raglan sleeved sweatshirt is pretty simple as sews go.  The fit is good, and I'm glad I didn't bow to temptation to make an XS.  I wouldn't make any changes to this pattern for fit. 

Thursday, 8 February 2018

Muse Jenna Cardi in merino sweater knit

When this first came out I was interested.  Cardigans are a big part of my wardrobe and I wasn't sure if I would ever achieve knitting one myself, or be dependent on Anthropologie forever for cool quirky knitted items.  So a pattern for sewing a cardigan, I immediately thought of sewing up some sweater knits, and also right away had a lot of modifications in mind.

Which was why I thought over this pattern for a very long time.  It seemed like a slippery slope of a pattern: make one, assess, then make 4 more with various modifications.  This is indeed exactly what is going to happen, but I managed to make that first one right before moving to Nepal, so the mods will have to wait a bit.

The fabric is heavy merino wool sweater knit from The Fabric Store, which I also used for one in my endless supply of undercover hoods (see here).  This would also have benefited from a double layer of fabric, both to give it more body and to make it thicker and cozier.

I very sadly don't know what size I chose.  But it was consistent with the size chart so I would say don't expect to be surprised if you follow the size chart.  The surprise is the sleeves, they were very very long and I lopped off a decent bit and they are still longish and a bit loose.  I would consider tapering them more in the future.


It took me a million years to get the button holes done, which was a terrible terrible experience.  I recommend topstitching that seam allowance down on the far side of the button placket, so that it's out of the way of buttonholes.  I could also have interfaced the placket, but didn't.  On loose fabrics, consider that!

This first cardi is as I expected.  There are many things I plan to tweak for my Magical Perfect Cardi to be.  I'll make another version in something stable, to update these pattern changes like the sleeves.  I will eventually raise the front neck by a solid 3" because I like my cardigans to have full front coverage.  I would lengthen it above the wide hem band by 2" and then add pockets!  And eventually I plan to also add a hood.  And try the other version with the cool little shoulder gathers...

Overall I do like this first version and I am pretty pleased I found a use for these glass buttons.  I am looking forward to that slippery slope of pattern modifications which I also expect to be a fantastic opportunity for some upcycling.  My op-shop-addicted self starts literally drooling at the idea of all the different bits that I could mix and match to make more of these...

Sunday, 1 October 2017

Cocoon Cardigan x 2 by Patterns for Pirates

I saw a reference to this cardi, and to this pattern company, a little while ago and completely discounted it for a very good reason: you have to measure and cut out your own bands!  Quel horreur!  Couldn't be doing any of my own measuring, no chance, and so I never considered the pattern more attentively.

And then one day at work I realised my radiographer in the office sewed and she was wearing a beautiful grey cardigan...by the end of that shift I had the pattern printed in my hot little hands.  I cut a size XS.  I had to have a friend over for moral support when I made the pattern piece for the bands, but I survived just fine (it's not hard.) 

My first version has been showcased here.  I wanted to get an idea of how the pattern came together, and I knew that long and grey were in its future.  I used the short body, with the wide cuffs, long sleeves and long sleeve cuffs.  No pockets.  I thought it was a bit silly as it's really short and doesn't come around to the front very much, but in truth I started wearing it the minute I made it and I wore it, um, until I made the second one.

Which I know took exactly an hour and 20 minutes to make, because I made it before work on my last shift before vacation, and I was late to work. 


In this version, I used the long body, wide band, long cuff and long sleeve, I think. Plus the pockets, which are totally amazing.  I made it for my birthday, took it to Australia with me, and wore it every day.  This fabric is a blend of merino and silk, I snapped up 3 meters at Designer Textiles in south Auckland - where I went on a fabric field trip in early August.  Because of the silk in the fabric, it drapes really nicely.

Then I had to make a striped one which is exactly the same as the grey one (except in plain merino):


 I was getting a bit rushed so some ironing of the band didn't happen - that really helps to make it lie flat.  But do you see something amazing!?  Do you see that I managed to match my stripes?  Including on the pockets?  I think I must be on a roll as I also got working on a plaid Archer around the same time.