Showing posts with label elastic. Show all posts

Saturday, 27 December 2014

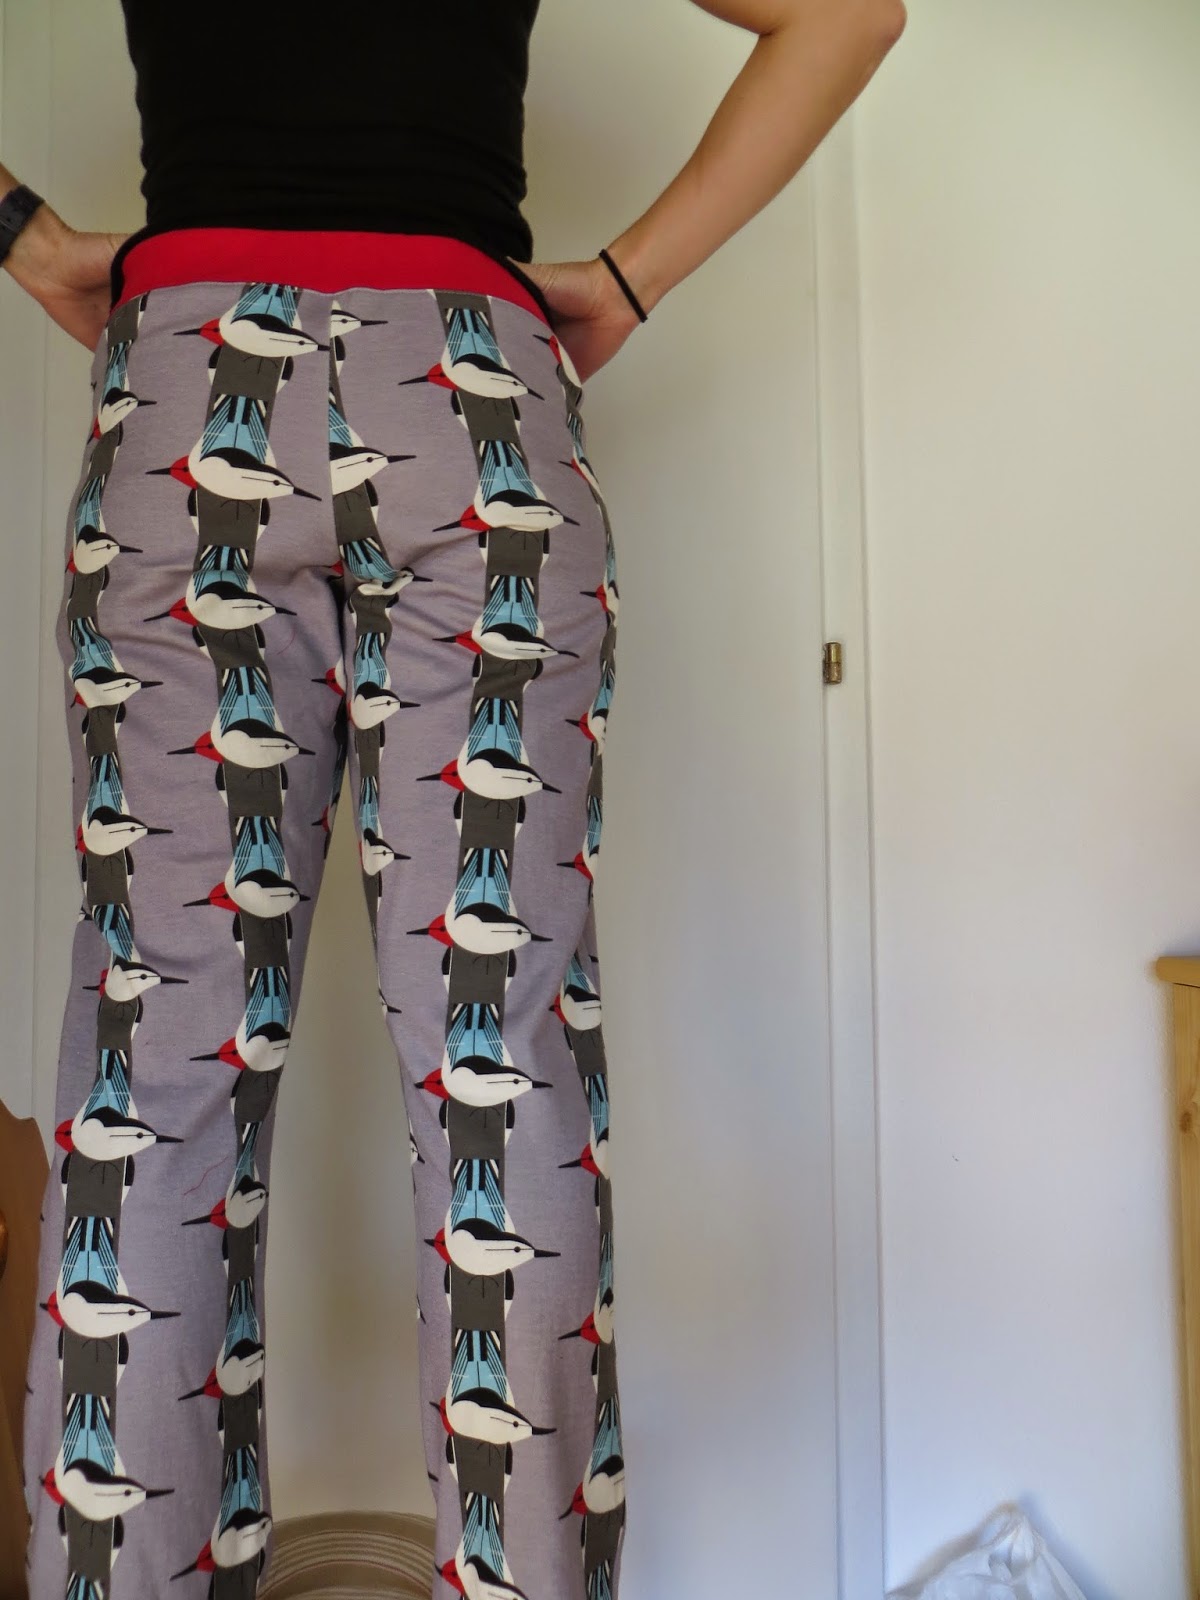
Papercut Anima pants with woodpeckers

I planned this project ages ago.  I modified the pattern:
-XXS
-drew the leg into more of a straight leg (still not enough.)
-omitted pockets and fly.
-cut 1'' off the front waist height by making a 1" wedge at the front center that ended at the seam allowance.

What I forgot was to undo the 3 inches I removed from the pattern last time.  I hastily tried to add it on the bottom (unevenly), but even with the addition of lovely red cuffs, they are a bit short (and the right pants leg, which is my longer leg, is sadly shorter...)  The other thing that I forgot was an embarrassing oversight carried over from July or thereabouts.  I bought a lovely red remnant to use as the waistband...a woven remnant, never realising it would not work.  I applied the waistband using the technique outlined by Kim, and I even sewed the three layers of stitching - it was so pretty!  Then I could not by aaaaaany means get it to stretch enough to attach to the pants.  And I still didn't figure it out!  The next morning I finally realised what I had done wrong, and I bought some red binding to use.  It worked out well because the ersatz waistband worked perfectly as contrast cuffs.


Luckily they turned out acceptable for loungepants.  If there is a next time, I will make them even more wide leg (and of course longer).  But I might make the Tofino woven loungepants instead.  I am kind of bored with the narrow legs on these.

Monday, 7 July 2014

Papercut Anima lounge pants

I made it about 4 weeks in Arizona without sewing.  I planned endlessly.  But I did not sew.  Then I caved in, of course.  I wanted something that would reliably arrive on time and so I settled on the Anima pants since they were a pdf and I knew any knit would work.  I was curious about them.  And Mood even ships to the middle of nowhere in about 48 hours (amazing!  But the hospital hid my package from me for a further four days...)  However when I was buying supplies in Flagstaff I was "not in the mood" to buy the elastic.  I can't harp too much on how stupid of a decision this was.  Everything would have gone smoothly if I had taken the extra 15 seconds to walk that box of elastic over to the checkout counter...

My fabric from Mood is a boring-appearing double faced cotton jersey.  One side is almost terry cloth like (I put that on the outside) and the other layer is ultra soft cotton.  The ultra soft side is prettier but I was going for ultimate lounge-potential.  (As you can see in my pictures, I will not win any style awards if I walk around in public in these.)

I cut a size XS, which is my usual in Papercut.  In this pattern your waist measurement can be modified when you cut the elastic, and I cut it a bit longer than the recommended 27.5 inches because it was so stiff.  I remembered what Sonja had written in her review and I shortened these by about 3 inches (the height of one of those advertising postcards in magazines...I didn't have a measuring tape.)  I am 5'4" and the fabric was too thick for me to desire a bunch of folds at the ankles.  In fact I think an XXS would have been reasonable because they are pretty roomy, and the extra fabric created by the pockets adds a lot of bulk in my thicker fabric.

I sewed these up on a friend's Kenmore sewing machine.  It was amazing.  The machine looked similar to my Janome but with lots more options.  If I had time to read the manual I might have been tempted to try some of the faux-overlocking stitches.  I cut these pants out at lunchtime, and I sewed them before dinner.  Total time was about 2.5 hours.  That was up to the point of installing the elastic, of course.  I was very sad not to get to finish them (I wanted to take exotic pictures on the mesa...) but I had to wait til I got back to Seattle and got some elastic.

I'm not sure if it's the only kind of 2" elastic but the stuff I have always found is disgusting.  It's very rough, hard to stretch, and I would never want it against my skin.  It is better in the Minoru but not very pleasant in a pair of lounge pants.  I have seen softer elastic in other sizes.  Is elastic best sourced online?

Anyway so I finally settled in to do the waistband and it seemed very very wrong to me that the elastic is supposed to be sewn to the edge of the band - when it's flipped that will be a rough edge on the bottom inside of the waistband.  I distrustfully left a 1cm band of fabric at the edge.  When I flipped the elastic over I thought I could tuck that underneath.  I was quickly disabused of this notion.  The work of pulling that monster elastic straight, while keeping my poor 20$ Necchi sewing, was itself too much.  Not to mention that it was no longer topstitching or stitching in the ditch at all.   I left the extra fabric loose and followed the instructions.  (Maybe I should have done this from the beginning?)  Now my waistband was a little narrower and I was topstitching straight on the elastic.  I added the two decorative layers as well.  The instructions say to make sure you dont stitch on the elastic in this step, but for me it didn't matter since I did not want the drawstring or the buttonholes and had skipped them.


In fact, these are rather high waisted on me.  So when I flip over the waistband it is very comfortable and has this nice frill...

These are so ugly on me that I'm not immediately convinced to make more, but in a slightly lighter weight fabric, and with an XXS they might be less bulky and unflattering.  Also that waistband really doesn't match the fabric - it's almost painfully stiff, and the fabric is sooo soft.  It would be a lot of work to take out, but I may consider doing that anyway and putting in a 1.5 inch soft elastic instead, which would also lower the waistband a bit (it's too high for lounge pants.)   Despite the gripes, they are comfortable.  


Tuesday, 5 November 2013

My Sewaholic Minoru - out in nature

Took a long time to cut this one out!  Mental preparation, too.  Even halfway through sewing, I wasn't sure I was ever going to finish!  It felt like a very unmanageable project, and I think without the sewalong I wouldn't have felt ready to undertake it.  Even with the sewalong, it was difficult.  I can't imagine myself making another one...


I cut a size 4, tapering to a size 0 below the waist, and I took out 2 inches at the waist that meant I didn't have to taper much.  I was initially nervous that it would be too small in the shoulders.  Everyone's Minorus have been quite long and baggy so I went down a size for a pretty tight fit since it's a spring jacket for me.  My measurements would have had me cutting a size 6, and my 6 Lonsdale was spot on.  Because of that, when I sewed the sideseam I basted a 1/4" seam allowance, and that was what I used, then tapering at the waist elastic out to 5/8" (because of the side-seam pockets.)  The raglan sleeves fit my shoulders well in the end, and in fact it's quite loose - I could probably have used the normal seam allowance.

I didn't have any real problems sewing my Minoru until I got to the last few steps.  Between the clear instructions, the clear and helpful sewalong, and the many many comments and reviews already online, I felt well-educated before I began - so much that sometimes I knew about problems but without knowing when or where they might happen (mainly that you end up with unfinished seams inside the collar, that can be visible when the hood is out.  Also, I think some people lined both sides of the collar.)  Putting in the zip was surprisingly straightforward.  My pockets were as long as the jacket but I just sewed them into the hem, which holds them in place.  I should have skipped the second line of stitching on the hem, though, it made the pockets just a tiny bit too small.  They are definitely hand pockets, not safe pockets for wallet/keys.  I only made one inside pocket and used a button to hold it together.  When I got to the cuffs I started to have trouble - maybe I started rushing?  It took three tries and multiple different pinning attempts to get the cuffs sewn in using Tasia's machine method...the first one was soooo twisted and I had to redo it.  Then when I sewed in the ditch, I caught my lining on the other side and had to undo the entire thing.  And tucking the hem into the plackets at the bottom was a bit puzzling.  I don't seem to ever do that well and I always have a few loose unsewn edges hanging around.  They aren't obvious here so I don't care much.

Also how has anyone sewn the hem smoothly?  Since it's a circle, like a dress, I had to accept some overlapping and gathering on the inside when I sewed it down.  I couldn't identify any other way to do it, and the sewalong just blithely assumes it will be perfectly smooth.

It was often a challenge to manipulate so much fabric, and in such thick layers.  My sewing machine is on the short end of a table, and the jacket fell of the side of the table a few times, moving the line of stitches over just enough to be visible.
I have to admit, I'm really relieved this jacket is done with!  It took longer to make than I'm used to (also partly because I was busy!)  I like it a lot and I am happy with the changes I made, but it's not a silhouette that tempts me to make lots more.

The good news: spring is just starting so I finished my jacket in time!!  This is the first of my projects for the Fall Essentials sewalong (which in my case is the Spring-Summer essentials sewalong!). 

Friday, 30 August 2013

Kwik Sew 1672 - men's boxer shorts.

P wanted some boxer shorts so I took a break from useless stuff for me and cut him a pair out of scraps from one of my dresses.

The Kwik Sew pattern is nice!  It's color coded on paper thicker than the usual tissue.  It's also nice to have a pattern that is only two pieces : )  The most time I spent fiddling with the fly opening, and I did this over two evenings because I was also trying to finish up a few other projects.  (Working on three things at once has some benefits but it seems like everything gets done at the same time!)  The elastic went in without any trouble.  I especially liked how the instructions had me sew down the elastic at each quadrant, before I sewed along it, since this held it down really nicely.

Overall I think this is my best finished project yet...but it would be hard to mess up.


Wednesday, 7 August 2013

Jalie thermal underwear (and a shopping spree in Wellington!)

Took a little break from dresses in favor of a bit of practicality.  I was hunting for awhile for a men's thermal underwear pattern.  I had gotten some nice black local merino wool and my boyfriend was keen for a pain of longjohns.  Via various forums I found the out-of-print Jalie thermal underwear pattern, available for download on their website for $9USD.

I am so far not in love with pdf patterns.  The Jalie pattern was particularly confusing because it has an unreliable amount of overlap and doesn't outline each piece clearly so you know where to cut.  Luckily my boyfriend was willing to help since he got something out of it : )  He did the cutting and we taped together.  He's a skinny 31 waist and he chose a size U (the pattern covers toddler to big adult), which in retrospect was a touch big, but he says he likes it that way (I also cut off about an inch of the waist to make it sit slightly lower toward his hips.)


It was my first time working with knits!  Jalie recommends first zig zagging the seam, then following it with a straight stitch.  I did that in some places, although it seemed better to do the straight stitch first which held the fabric and then I did a zig zag to better hold the edge.  The instructions were a bit funny for the fly and I had to undo some mistakes there when I sewed the front and the back together, but it was otherwise straightforward construction and my first ever elastic application went well.  I did use a ball point needle, and I'm not sure it's totally necessary but seemed like if that would improve the final product I might as well go for it.

Overall it is a functional result but definitely a quick job - the fly bias tape is a bit funny and I didn't cut the top above the elastic totally straight since I shortened it by guesswork.  I'll admit I still don't own any kind of a ruler except for my measuring tape.  My next attempts at knits will probably be tshirts as another project that will be quite straightforward.

Speaking of which - I went to a conference in Wellington last weekend, just for a day.  Quite a rushed day because of course it was a priority to get to the fabric store!  I had to choose which lectures to miss of the conference, and I was still late getting back.  Global Fabrics has changed its name to The Fabric Store, a bit dull but this *is* New Zealand.  And they were having a sale!  My frantic hour in the shop taught me something about needing to have a plan before you enter the shop!  I ended up with some merino wool in aqua and green, green twill for my upcoming Minoru jacket, some green wool I couldn't resist, just in case, rainbow striped shirting, and some interesting stuff for pants involving lurex threads and silk-cotton blends. 

Of course I'm totally sure I left some incredible things behind but I suppose there will eventually be another trip to Wellington, and I definitely have enough to keep me occupied already! 

Tuesday, 6 August 2013

Vogue: V1344 Rebecca Taylor pattern

I ordered three Lisette patterns and basically worked my way through all of them as a learning exercise.  The only thing left to do is the Passport jacket, and I didn't feel quite ready to do a jacket yet. (It'll be next, after some long underwear for my boyfriend.)

I visited the States in June and randomly ordered some Vogue patterns ahead of time to ship to my parents house, along with some lovely blue raw silk on Etsy.  Not exactly sure what I'll do with that yet, but everything in New Zealand is expensive!  I hadn't discovered Mood fabrics yet...but unfortunately their shipping abroad is extortionate so I can only drool for now.

The first Vogue dress on my list is V1344, and in my mind I had it paired with a to-die-for Liberty silk.  In order to gear up for such a project I decided to use my second Spotlight purchase to make a wearable muslin.  My local fabric shop finally came through as well with some interesting green silk chiffon to use as lining.  In this project for the first time I attempted to line a dress and work with silk so those skills could prepare me for potentially doing an expensive version of this dress.

Hah!  Not sure that's happening, I'm still on the fence.

My first problem was getting used to the Vogue pattern style, which had dotted lines all over the place and seemed really confusing.  I traced the pattern, also a first, since I have no faith in my ability to figure out my size.  I'm not sure how tracing can be considered reliable...It seems like I'm now two degrees away from the original pattern (tracing it, cutting out the tracing). Naturally upon cutting it looked very small - I cut a size 10 because the Lisette patterns scared me with their unpredictable ease.  Going by my measurements I would have cut a 12.  (34, 27, 36)

I was soooooo right about the nastiness of working with this chiffon, not to mention my tracing skills leave a lot to be desired.  But my first complaint was with the Vogue instructions, who put a bunch of shoulder pleats in without explaining how they could possibly match up front and back.  And why put shoulder pleats in the lining?  The result of the lining pleats is that on one side of the neck, the lining is really visible because the pleat at the shoulder pulls it out.  I did each step pretty slowly and meticulously considering my terrible cutting job.  After dealing with the pleats when it came time to sew the lining into the bodice I discovered that my lining really didn't fit at all.  It was about 5 inches short of reaching the armholes.  So I basted big chunks on (it's lining, right, it doesn't matter what it looks like?) so that I could reach the armholes.

It wasn't too bad after that until I got to the mysterious task where Vogue vaguely says to put the elastic into the seam allowance at the waist.  Whaaaaat??  This is a 4 layer seam allowance!  And the elastic is not that small....So I did it, and sewed it shut, tried it on, and then sewed it again on the elastic at all the spots that had frayed open.  That seems like a really dumb way to put in a waist elastic.  If I did this dress again (note again: that is in doubt) I would increase that seam allowance to 1" so there would be room for this step.

In the end it did fit - in fact it was too big...and too late for me to overlap the front more so it totally fails a leaning over test.  If I do this pattern again I would probably cut the size 8, or cut a 10 but with bigger seam allowances (I'm not at the point where I'm ready to tackle too many more subtle changes than that.)


But considering the new patterns I've ordered: Deer and Doe, Sewaholics, Aimecommemarie, and By Hand London...there are a lot of things on my to-do list before I come back to this.  I probably won't use the nice Liberty silk for it either, as it's a fine georgette that won't look good unless it has a dark lining, and probably best in something with smoother lines.