Showing posts with label simplicity. Show all posts

Saturday, 21 March 2020

Simplicity 5683, circa 1973: ruffled sundress

In early February I suddenly needed to prolong summer by making a backless ruffled sundress...and conveniently I had just the pattern!  This wonder was printed in NZ and says it is misses size 12, with a bust of 34".


I haven't sewn any big 4 patterns in ages!  I just kind of hoped this size would fit...forgetting that you are meant to size down from the envelope not size up.  My bust is in the 32-33 range.

I made this dress in the short version, with a ruffle.  There was no ruffle length for the short version so I basically made it as long as I had fabric for.  I also made the ruffle less high because I thought it would overwhelm the short dress at the current length - I did about 2/3 of that length.  I guess this all means I'm over my hatred of gathering. I also learned just how much you need to gather a thing to make it look good - in my opinion the ruffle would be better if I could have made it longer and gather it more.


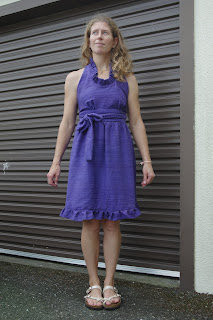
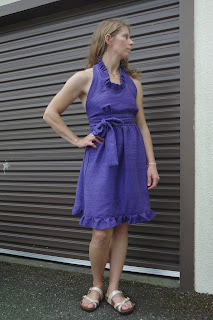
The bodice was self lined after you apply the ruffle, and then there are more gathers under the bust!  The waistband is two layers, and the skirt is a true wrap skirt, with the right side going under the left.  It felt like it took forever but that's just because I had a bunch of couchsurfers so I wasn't sewing all the time.

My fabric is a loom woven raw silk from Nepal that I brought back.  It has a lot of texture because of the handmade nature of the fabric, but overall I took that into account and didn't have trouble gathering it, though it became very dense in the gathers.  It is generally well behaved and pressed well.  I hand washed it for prewashing, which is what I do with all fragile silk.  I tend to machine wash other silks like charmeuse that I think can handle it, as it makes an easier to care for final garment - I generally hand wash those garments but I like the security of knowing they can tolerate a machine wash.

The bodice looked pretty small to start with so I couldn't judge by that - but the final product is just way too big.  There's no one spot - the bodice has too much fabric, and in my pictures I have the waistband wrapped really tightly to keep everything in place.  I just feel overwhelmed by this dress.  Luckily I have a friend who is taller than me and just a bit bigger everywhere and who doesn't feel a need to wear a bra, so she has won a new dress, yay!!

Thursday, 4 July 2019

Simplicity New Look 6429 & Orla Kiely stems


Well here we are, I did promise that I would do this again.  Here's version 1.

After I made version 1, I put in a heap of effort.  I actually shortened the pattern by an unknown amount, between 4-8 inches, at the midsection, redrafting the darts slightly to accommodate the changes.  I cut out this nice Orla Kiely fabric including a yoke that wouldn't be too busy. And then I boxed it all up for 2 years.

It's still a size 10 and it took a day or so to do. I can comment that it's a lot easier to handle single layer quilting cotton dresses now that I have an overlocker. Seams are controlled, there's no question of how to best finish things, and it all looks neat inside!


I'm the same size I was 2 years ago, but not quite in the same way.  (Looking at those old pictures I think they look surprisingly good!) But lest I get too sad about that - I was taking these pictures in my front yard and my elderly neighbors came out while I was wearing this dress, to tell me how good I looked. And yet again I think it looks more ok in pictures than I feel in it.


My end thoughts are that my style has changed too much. This feels just a bit too small everywhere. The poochy fabric-belly that was there before, is still there.  Maybe widening the entire dress would have been wiser than shortening it?  I think the stems are annoying because although my pattern matching was quite good, it's not perfect.  I just can't wear a dress like this, a cute, fitted, quilting cotton type number - and I'm not actually sure I ever really wanted to.  My friend Tessa has agreed to dispose of it, either on her daughter or on some hapless friends with kids. Yay!  

Sunday, 10 September 2017

Simplicity New Look 6429 and Japanese gardens

I cut this pattern out in size 10 mainly because my pattern didn't go smaller. Thank god I did!  It's true that big 4 size patterns aren't always true to the envelope, which puts me a size 12, but lately I'm in the habit of sizing way down because I've been making a lot of knits. That really doesn't turn out well with wovens. 

The fabric is from a little shop I found in Hilo, Hawaii.  I was in love with this shop, which had mainly Japanese prints, and I couldn't resist buying a few.  This dress was part of a dress project I started although I had to give up halfway down the list because I ran out of time before moving...(again.)

This pattern seems to have really good reviews. In order to test it to the max, I went with a version that had sleeves, view A.  It is so hard to fit my shoulders, and the idea of the dress project was to find some patterns that really had hope, that might need multiple muslins/attempts but that will end up being building blocks for the future.

The pattern is straightforward.  In this version, the yoke is interfaced, and the inside of the yoke seam allowance is ironed out of sight before topstitching.  It is easy to have a clean finish, and I could have done entirely french seams, although I didn't because I thought of it as a bit of a muslin.

 I hesitated after putting the yoke on the dress, thinking that the pattern placement was hideous, and overall I had to leave this dress as a UFO while I debated what to do.  At that point I could see that the fit was surprisingly good, and I thought maybe I needed a different fabric yoke.  However, it's hard to match quilting cotton with anything else, so eventually I gave up and decided the pattern placement, while not optimal, wasn't terrible.


My final estimation is that this dress fits me perfectly from the waist up.  And while inspecting it I realised that the bottom of the dress fits great too.  It's the middle 7 cm that I don't need.  So I realised that this in fact is a perfect dress for me to work on - by removing 7 cm from the middle, on a pattern that has no lengthen-shorten lines, and that has a french dart in the middle of the to-be-removed section.


I think this pattern would fit perfectly on someone who is long waisted.  And I am still pretty blown away at how well it fits me above the waist. I think the pictures don't quite show how much the middle is wrinked due to being totally extraneous.

I planned a second version right away and was really hoping to do it too!  But I had to box it up as it got close to moving time.  This pattern is one I'll return to. 

Thursday, 12 January 2017

Upcycled Papercut Anima pants and Simplicity 8228 Madalynne bra

In order to not stand around in just a bra, I figured I'd show these two makes together.

I spend too much time trying to think up things to do with tshirts.  You know the ones I mean - those heavyweight, oversized, shapeless, screen-printed tshirts that we all get too many of for free.  A few of them work to sleep in but they last a long time!  So this pair of Papercut Anima pants was brought about as a trial run to use up some shirts.  Since the pants are sleepwear they are totally allowed to look silly plus I get to wear a bunch of tshirts which I do actually like - I spent six months working with MSF last year - and I've done a bunch of trips with the American Alpine Institute, so both of these shirts have some emotional value to me and I'm happy to make them continuously useful.

The anima pants pattern is my standard one, size XS - I didn't shorten the legs this time, but I have lowered the front waistband by removing a wedge that I tapered out to nothing at the side seam, plus obviously I got rid of the fly and pockets.

In order to use four tshirts for this pattern, I cut each tshirt apart at the sides and across the top, and then I sewed the bottoms together, like this:


Even with this magenta tee, which was a size S ladies cut, I had enough to make an entire pant leg with some room remaining.


I went kind of crazy with the waistband and it was bad, so I had to totally remove something like 5 rows of stitching (I measured my elastic wrong and it was about 5 inches too long...) and then I went for the minimalist waistband with no stitching in it.  The elastic stays in place so I'm content for now.  This version of the anima pants, seeing as it has no pockets, no fly and no string in the waistband - is a pretty minimal version and is easy to make.  It took a few hours including tshirt prep. 


So the bra top!  I bought this as soon as it came out.  After all, lacy bra thingies are so in right now!  I wanted one!  The lace is from merckwaerdigh's etsy store, the cream coloured powermesh is from tailormadeshop.  I used really bad fabric glue to stick the layers together and then the idea of making this bra top faltered.  It was a few months before I came back to it.  There was only one review which mentioned sizing, and the reviewer used her normal bra size rather than following the size chart, so I did that too and cut a 32C.  I marked each pattern piece with the side that should be along the scallops and I found cutting out easy.  Sewing was easy and quick too - just a couple of hours.  I found the instructions to be adequate and not confusing at any point.  However because of my crappy glue, I had to then zigzag all free edges (luckily this is invisible in the lace) because the mesh was flopping around otherwise.

The band is tight enough to be supportive, which itself, in non-stretch lace, is a problem because although I can get this top on, it's nearly impossible to get off.  The back is much lower than the front.  I was debating just removing 2 cm off the spot where the back narrows to see if that helps, although I suppose it's not too important.  Also,  the cups fit mostly ok, but I think I'll take a wedge off the center front piece for my next try.  The lace is also really itchy.

I have a nice kit from tailormadeshop to make another one of these, which I'll do with those two small changes, but I recommend using stretch lace, and not using powermesh on the band, especially if you have wide shoulders or a muscular back like I do. 

Monday, 5 January 2015

Simplicity 7715 Rainjacket (and a bonus Grainline Scout!)


This is one of those creative projects that was so wrong in loads of educational ways...I had the idea of a little hooded rainjacket.  I found this pattern based on my idea (there is this one review of it.)  I knew I would shorten the hem and raise the pockets, but I planned to basically follow the pattern other than that.  However because it's quite loose, I figured I should muslin it, and I did, using a bedsheet.  That wasn't helpful at all.  The real question was whether to line it, and how it would look in coated fabric, and a bedsheet couldn't approximate that. 

I got the idea to make it for a friend as a muslin.  She's smaller than me by about one size, and said she could find a use for a baggy rainjacket.  I got pink Gore-tex-like fabric and wasn't sure what to use as the lining (it ended up being part of another bedsheet.)  When I was browsing blogs ages ago, I came across a post discussing the different types of Gore-tex-like fabric.  I can't find the original post, but the gist was that there is 2-layer and 3-layer.  Two-layer is a layer of nylon on the outside, and a Teflon inner side, which is white and gummy.  Three layer does not have that gummy feel, because the inside has also been treated (or there is a membrane sandwiched between two layers of nylon.)  The 2-layeris what I had, and was reported as being notoriously difficult to work with, because the Teflon sticks to everything and since it is rubber, it also stretches and will lose its shape.  Therefore I can admit I was warned.  


The things that were bad:

1. 70% fail: the fabric.  Sewing coated nylon when it was the pink side (not the Teflon side) up, and when it was against the lining, was not terrible.  Sewing two layers of coated nylon together was terrible.  I made no attempt to avoid all that shirring, because I didn't have the equipment for it, I had no teflon or walking foot.  I found that masking tape didn't help. I occasionally put pins in the seam allowance, which is also a pain because the fabric is rubbery and doesn't accept pins very willingly.

2. 30% fail: the pattern.  It's not a bad pattern, but it's a very oversized, kind of shapeless hooded jacket.  I probably needed to actually shrink the pattern about 6 sizes before it would have matched my hopes.  The finishing touches, which are always the most difficult for me, were done freehand and are particularly bad -- how do you attach the bottom of a separating zip, when the little lower panel of the zip is hard plastic?  My sewing machine needle won't go through it.

The only reason I continued:
I thought despite everything, my friend might still find it hilarious enough to wear.  For a little while, anyway.  The finishing is not very good, especially along the zipper bottom, and so I'm not sure whether the zip will pull loose.  

I lined the body but not the sleeves of the jacket, and folded elastic into the cuffs and hem - I just folded it over and sewed it down.  It's not a very neat job.  The pockets are lined with geometric rayon geometric scraps, which made them easier to sew down to the front of the jacket.  I was considering putting a string into the hood, but I left it out because the hood doesn't seem that deep (I am not sure it's very functional) and my string was too short...

Here, also for my friend, is a bonus Scout.  It's such a relief to make a really simple, easy project!  This is a size 0, and I used store-bought bias binding and french seams.  The only seam I left open is the sleeve attachment, although there is a Grainline tutorial that says you can french seam the armhole the same as the body.  The quilting cotton was easy to work with so I practiced my iron skills by actually using the steam - generally it scares me and I avoid it. 

Monday, 26 August 2013

Lisette 2209- Passport jacket

This is the last of my Lisette patterns!  It seemed like the most daunting project and because of that I left it for last of the batch.  Of course in the end it was pretty straightforward and the fabric was incredible to work with.

For this one I used some lovely green silk-linen that I got at the Global Fabrics while passing through Dunedin.  I was planning to line it with pale blue chiffon but it ends up that I hadn't read the pattern very thoroughly and it doesn't require a lining.  Next decision was whether to use same-fabric facings or to use something else.  I didn't have anything optimal in my stash - plain black or white silk seemed a bit silly and I did end up having enough of the fabric itself so I just stuck with that.  After reading through Tasia's sewalong for the Lonsdale (an upcoming project!), I was super keen to go get some seam tape and make my seams beautiful....but the local shop didn't have any : (  Stupid small towns.

I cut a size 10.  I had cut the previous Lisette designs in an 8 and on this I had initially considered doing a wide-shoulder adjustment but I thought 4" of wearing ease might be enough to take care of that.  I know I'm mixing up design ease and wearing ease but the pattern is cut in enough pieces to make me hesitate before changing the wrong ones.  (And the various types of ease are a subtlety I'm only now starting to understand, I'm not sure if they matter in practice.)  I also hesitated because the front is cut in two pieces and I wasn't sure where to add in the shoulder width.

A lot of cute variations online made me consider more than one button and after trying it on before I put the facings in, I saw how totally shapeless the back was and went for three buttons.  The third button down is the key one in holding the jacket together so it's not too boxy (er, and so I can lift my arms...)

The ruffle went on without a hitch.  I ran out of thread near the end and used bright blue on the facings though...not sure if that looks stylish or tacky.  I had to give in and buy more so that I could sew the hem.  Hand sewing practice notwithstanding, I don't have enough faith in my abilities to slip stitch an entire hem.

The final word is that I truly have to work on putting in more effort into fitting my garments.  This is a project I put a lot of time into and it's really cute, but the shoulders are just too narrow.  I have only recently noted that my dresses and tops are all either tank tops, or are stretch knits.  There is a reason for that!  I actually don't fit into standard size shoulder width tops!  This is always obvious for me when I buy things in stores, but when I'm fitting patterns for myself, somehow I imagine I will fit just fine...by the end of the first day I noticed that the back seams were pulling apart just a little bit.


Also, my pictures are very unflattering.  I probably need to figure out the self timer because I'm too self conscious when others are taking pictures of me and I clearly haven't got much sense of what angles I need to actually show off the good work I've done. 

This jacket would definitely be awesome if it did have a lining.  I'm quite sad not to get to use seam bindings - etsy came through so some are on their way but I ended up just using shears on all the seams, and I will eventually seam bind the bottom. I will get some wear out of it, but the shoulder limitation means it's uncomfortable to bicycle in and that's my primary mode of transportation.  Seeing how one day damaged it makes me hesitate to put it through my usual rough wearing.  Also, silk linen is nice and shiny in certain light but it wrinkles a lot!  This would be really cute in corduroy.  And this fabric might make a nice Scout!  Hah!

So, are handmade garments inherently more fragile?
How do you decide what fitting modifications to make?  I know that making a muslin is the obvious answer but it seems like I don't figure out a lot of things until I wear the dress/shirt/jacket and see what happens.

Sunday, 4 August 2013

Lisette 1878- Diplomat dress, take 2

I worked my way through the cutesy fabrics and now I'm finally on to some cheaper stuff that I got on a whirlwind first visit to Spotlight (=Jo-Ann Fabrics).  I had immediately envisioned a long sleeve version of my first dress in a cozy, sleepwear-like plaid flannel.

I'm also trying to slow down a little.  The first wild projects careening through my head are taken care of and I thought before I move on to the next ones, I need to actually start doing something well.  I have a host of Liberty fabrics in mind for upcoming attempts and I don't want to mess them up! (Heh - although that said Ebay pulled a trick on me and some fabric I ordered went to my parents house in the States!  So much for doing that dress for awhile...)

So on this dress I wanted to focus on matching up the plaid (arrrrgh no one told me that flannel sticks to itself, and shifts around, and never matches!)  and also on making a wide-shoulder adjustment.  I stuck to the same size 8 even though it was small because this fabric has more give than the muslin, and with the wider shoulders it will fit much better since the shoulder area was the main problem.  This time I also wanted to do the facing correctly.

Other than the plaid really not matching up that well (I tried!), this went smoothly.  It's definitely easier to do a project the second time around - I had a lot more confidence and there were no surprises.  With the shoulder adjustment - I added 2 inches across using the Colette online tutorial - it still pulls slightly in the front chest, but the back chest feels better.  If I hadn't done this I think the long sleeves would have been uncomfortable.  

For some reason I also placed the zipper in too low, so until I get around to sewing in the hook and eye, it gapes a bit.  Since it's winter that doesn't matter for now, I'm always wearing a cardigan over it. (But it's quite obvious in the pictures.)

I do like this dress now that I'm better at making it, but I don't think it's anything special - not enough to do again.  I've read a few posts by those incredible sewing bloggers creating multiple variations on each dress theme, but I haven't found a pattern I like that much yet.  I'm looking forward to getting on the bandwagon and trying out some of the popular things I've seen up lately!

It's taking awhile to get coordinated enough to photograph my projects - trying to get quicker at it but I've chosen to keep everything chronologically accurate even if I'm behind a bit on posting.


Wednesday, 24 July 2013

Lisette 2209- Passport dress

During my online shopping spree, one good friend of mine accepted my offer to make her a dress.  She picked the Passport dress out of my Lisette offerings.  So I got fabric to make two of them.  I made them at the same time.

Most of this construction was straightforward.  I cut a size 10 this time going by the finished dress size, and as before I gave myself a little extra room by hemming the side seams together very narrowly.  For my friend Sarah I didn't have to do this as she is slightly smaller than I am.  I used the dress for me as a muslin preparing the skills, and then copied them on her dress.

The pleats at the waist gave me pause because I think I might have done them the wrong way.  Is that possible?  The waist seems to billow out a bit.  Other than that, the dress is cute.  Unfortunately here I think my choice of fabric was terrible...after we had chosen fabric I searched online and found that this dress has more popularity than some of the others I've done, but no one else used the two-fabric scheme.  Before we bought fabric, I didn't know to hunt for the dress online and see what other sewers were doing.  However, Sarah's dress turned out well and I'm pleased with it. I did something funny at the armhole seams because it was the first time I made my own bias tape. It looks ok, just odd since there's no matching tape around the neck.  Another great thing about this dress is that the facings are held in place by the armholes so although they are still present, they don't flop.

 Sorry about that one being sideways...


I did realise that I have no idea how to do invisible zippers.  My zippers were terrible, especially where they cross the midline, since I couldn't quite get my seams to match up.  This seems to be a skill I need to practice!  

Yet again, my dress is a bit of a fail - not something I'm too keen to wear to work so it's being passed on.  I might consider doing this dress again in a single fabric but not any time soon.  It's quite comfortable...the lesson on this one is the subtle one about picking the right stuff to match the design, I guess. 

Tuesday, 23 July 2013

Lisette 2059 - Continental dress

I was excited about the dress in Lisette 2059, even though the shirt was a disappointment.  After my initial successes I went on an online spending spree at www.stitchbird.co.nz, as one of the only online fabric stores in New Zealand.  For this dress I had some interesting green linen-cotton stuff.  I was figuring that it would be super comfortable.

The dress has a super easy construction once the gathers at the neck are done.  I had a lot of trouble getting my stitching to hide on those gathers, but I guess you are supposed to remove the gather stitches once the gathers are held in place, and I didn't do that.

I also really like using the self fabric as a bias tape.  It created a nice neckline - I so far totally hate facing!  It flaps around!  Argh!  I haven't quite figured out what to do about that and I am hoping soon I will only make lined dresses and never have floppy facing again.

The belt took me about 3 hours though because it would absolutely not slide through itself. Three hours with a pair of pliers!

Once I had stitched this dress together I lost a lot of enthusiasm.  It was so baggy...truly the neckline coming together improved this, but I had already gotten over it in my mind and offered this dress to a cousin who has a more generous figure than I do.  This dress would have been more appealing if I had some more shape at the waist (not to mention boobs to speak of!), but the belt is the only defining element.


I also noticed my habit so far - that each pattern seems to teach me some skills but I am so far not confident about the results.  I am still asking friends if they want dresses so that I don't keep a closet of the ones I'm not satisfied with.  My excitement about each new project has spurred me on, but I definitely don't have the drive to work on each project until I like it and would wear it.  I am not sure if this comes with time!