When I discovered this top on Kylie and the Machine's Instagram I was in love, both with the top and with the new pattern company Elbe Textiles.
BUT it took awhile to get my act together to sew it. I was moving and travelling for awhile. That made this simple project seem like a huge deal.
I looked over the instructions and didn't follow them at all. I used a scrap of leftover silk noil and size XS. I sewed front and back together - I had to cut the back in two pieces - and then added my bindings. This reminded me at that point of the Emmeline top by the Little Tailoress. I think she has since rebranded and come out with other patterns but the concept was the same - a very simple top - though in the case of the Emmeline it had terrible instructions and bad drafting on versions a and b.
Seems like I might revisit that top now as the Botany showed me how you could get a good finish on these kimono sleeves - by leaving the side seams open, finishing the sleeve with binding, and then sewing the side seam, you get a clean finish on all edges. I was totally unable to figure this out myself but despite the messy finish, I loved my version of the Emmeline, view C, which I lengthened with the hem of the Polly top. (here)


Here's my first Botany! I love it, it goes over a tank top for some style or alone for some air. It's the perfect fabric. Do note that I'm 5'4" and can never repeat often enough - I have NO torso. My ribs practically hit my hips. So if you don't want this to be very cropped you might want to lengthen it.


I climbed to the top of a mountain for these pictures! It was very cold and windy...
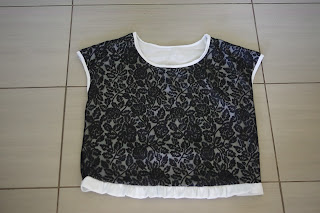
So I decided to do a second one in stretch silk but I didn't have enough fabric to double the see-through front, giving me the excuse to use this ugly piece of lace I picked up and want to be rid of. Of course having two layers both front and back meant this took a bit more attention, and this time I did leave the side seams to apply the bias tape flat, though I did the neckline last instead of also doing it flat. I added on the ruffle to see what I thought of it. I promised this top to one of my nurses right away as I thought I'd hate the lace. I do really like the ruffle though, and I think I might make more of these once I see what fabrics my stash can provide.


I have a new tripod! I'm rather more inspired when I'm outdoors, apparently.
BUT it took awhile to get my act together to sew it. I was moving and travelling for awhile. That made this simple project seem like a huge deal.
I looked over the instructions and didn't follow them at all. I used a scrap of leftover silk noil and size XS. I sewed front and back together - I had to cut the back in two pieces - and then added my bindings. This reminded me at that point of the Emmeline top by the Little Tailoress. I think she has since rebranded and come out with other patterns but the concept was the same - a very simple top - though in the case of the Emmeline it had terrible instructions and bad drafting on versions a and b.
Seems like I might revisit that top now as the Botany showed me how you could get a good finish on these kimono sleeves - by leaving the side seams open, finishing the sleeve with binding, and then sewing the side seam, you get a clean finish on all edges. I was totally unable to figure this out myself but despite the messy finish, I loved my version of the Emmeline, view C, which I lengthened with the hem of the Polly top. (here)


Here's my first Botany! I love it, it goes over a tank top for some style or alone for some air. It's the perfect fabric. Do note that I'm 5'4" and can never repeat often enough - I have NO torso. My ribs practically hit my hips. So if you don't want this to be very cropped you might want to lengthen it.


I climbed to the top of a mountain for these pictures! It was very cold and windy...
So I decided to do a second one in stretch silk but I didn't have enough fabric to double the see-through front, giving me the excuse to use this ugly piece of lace I picked up and want to be rid of. Of course having two layers both front and back meant this took a bit more attention, and this time I did leave the side seams to apply the bias tape flat, though I did the neckline last instead of also doing it flat. I added on the ruffle to see what I thought of it. I promised this top to one of my nurses right away as I thought I'd hate the lace. I do really like the ruffle though, and I think I might make more of these once I see what fabrics my stash can provide.


I have a new tripod! I'm rather more inspired when I'm outdoors, apparently.


