Showing posts with label stretchy fabrics. Show all posts

Friday, 26 October 2018

Halfmoon Atelier Anegada

I've had this pattern for awhile -it's one that I didn't get to test because I was living in Nepal at the time - once I got it I had to wait for just the right fabric.  Which came while I was in Switzerland recently!  I picked up this very stretchy, sparkly rainbow from the sale bin, and definitely didn't have enough to make the cardigan I was envisioning.  As I was tetris-ing pattern pieces I realised the drape would make this a perfect Anegada, and the stripes meant I could get some fantastic diagonal bindings.

I do recommend, no matter how much you think you know everything about making tshirts...to not only read the instructions but to understand them.  Oops.  I read through what to do on the front neckline tucks, but didn't understand at all.  I made some halfhearted pintucks, the sewing machine gobbled up all the fabric, and in the end I ripped everything out except two tucks on the sides that I couldn't undo without damaging my light fabric.  The binding is long enough that the excess didn't even gather and I would just skip doing those tucks in the future.

It felt weird to be cutting huge bindings on the bias!  But so worth it.  The rest of this top went together without a hitch on my amazing new overlocker and I wore it the next day (and many since.)


Size: 3, consistent with everything for me by Halfmoon Atelier.
Sleeves: I removed 1" before adding the binding, because they were too long otherwise
Length: I removed just under 2" at the lengthen lines: the amount from the line itself to the edge of that piece of paper on the pdf pattern.  If I wanted this to hang at my waist without pooling I could remove another 2 inches!  

I recommend drapey fabrics to get the best out of this pattern.  Because I didn't tuck, my front probably drapes a bit more than it's supposed to.  I really like using stripes on the bias!  I think it gives the pattern something really unique.  Also I was pleased to see it goes well with these shapeless green pants of mine - I don't really like tucking things in and was struggling to find good matches with them.


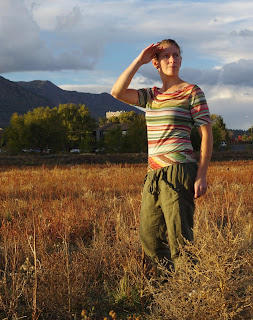
I rushed out of my house to get sunset photos on the mesa with huge thunderclouds in the background!  It was a weird spot to take pictures and I'm really looking forward to owning my first tripod instead of making rock structures to put my camera on.


Sunday, 30 April 2017

Deer & Doe Chataigne Shorts in stretch & flowers

Whenever I'm in The Fabric Store I lose track of my original set of plans and get a new set.  But after my last move I'm trying to be fluid with my projects and also move slower...less fast fashion!  Nonetheless while I was there I fell in love with some liberty cord that had flowers on it.  And I decided I needed Chataigne shorts. 

But this isn't liberty cord, you cry!  Yeah...in the leftovers bin I found a piece of this amazing stretchy sateen - I was totally eyeing it online last year but never bought any.  I thought I'd use it for the pockets on my Hampshire pants.  But once I got home I decided it would be even better to make practice Chataigne shorts from a stretchy fabric, especially when I realised I had enough original fabric for the Hampshire pants to do the pockets in the same stuff.  I'm totally milking the end of summer for all it's worth in my year of always-winter...

I have made this pattern before - in fact I think I bought it because I liked the waist detailing and I wanted to make pants.  What I learnt from that experience was that drafting a well fitted, shapely pant leg is not just a matter of extending lines.  Here is my Chataigne pants experiment, which I gave to a friend in Switzerland.  I didn't love the bagginess, the legs twisted a bit, and the hemp fabric didn't match my hopes but she loved it all.

The size 38 had also been way too big.  So I took a big leap and traced the 34 out of my pattern pieces.  Also I still had to get an invisible zip foot.  And as you see I didn't have enough fabric for the pocket facing or the waist facings so I had to get a scrap from elsewhere for that.  At the moment my stash is all future projects, no scraps yet so I didn't have anything lying around that I could use.

I actually french seamed the crotch on these and did some extra top stitching, mainly with the interest of everything lying smoothly.  The crotch seam idea is from my Hampshire trousers which will be up on my blog sort of soon...

I had a big hiccup when I was putting the front yoke in, naturally I didn't take it too seriously at first, sewed half of it, got the center V off center, and it was a big hairy mess.  The result does have a tiny crimp right in the middle but it's basically invisible so I left things at that.

I hand sewed the waistband down which was not really necessary but meant I could do it in the car.  I was literally finishing these at the last minute because I was only given a few hours notice to move out of my temporary housing, but I was so so keen to wear them!


Since then I've been nomadic waiting for May when I take possession of my new space...so things have stalled a bit.  I have about 12 projects to do and itchy fingers, mainly because of how I somehow didn't pack any tshirts.  (wtf?)

After wearing these I am so so so pleased with them.  I'm going to make some teal blue leggings to go with them for winter.  But I do think I'll size back up to the 36 for the non-stretchy version because the fit is so perfect I just can't imagine it being ok without stretch.  Or?  smaller seam allowance?    I might start to use this waistband to measure my size because I don't think I have ever had one that fit so well!


Sunday, 23 October 2016

Myopic Mountain Morris (by Grainline patterns)

Grainline Morris, of course.  And the fabric looks to me like the view from my tent on a sunny morning in the mountains, before I've put in my contacts. 

I cut this in a size 4 back in Ukraine.  I considered making various fit changes but I thought I should first test it out in a muslin kind of way.  A wearable muslin, but the fabric I wanted to use actually had no stretch - I remembered it wrong, so I put the pattern aside. 

The fabric here is from emmaonesock.  It's a lightweight stretch cotton.  This was definitely a wearable muslin.  I just get such bad fit from Grainline patterns in the shoulder, and so I didn't anticipate it to fit very well, but I needed to do it and see it to believe it.  I'm also not in love with open front things.  The Morris looks awesome on other people and that made me want to test it out - another reason is that I thought (initially) it would be a good place to make modifications if I needed to, but actually the collar is kind of confounding and so made me hesitate.

The collar reminds me a lot of the Marfy free jacket pattern...another one I muslined and then left behind as too confusing to fit to my shoulder/upper back axis.


Anyway I guess I got mixed up on step 15 because my bottom ends didn't match up, and when I went to do the stitching of the facings to the jacket, I had to go by the bottom of the facing, since the bottom of the jacket was longer.  So that changed the shape of the bottom by about 1cm.  Otherwise it went smoothly.  It actually fits, dare I say? ...fine.  But I don't like it because I can't close it in the front.  And I was thinking of making a second one but the fact that I was sooo lukewarm about it actually was enough to change my mind, I think I'll make some Safran pants instead...

Tuesday, 10 June 2014

Papercut Peter and the Wolf Pants, salvage operation

I was sewing these at the eleventh hour before I left New Zealand.  Literally - I sewed until the minute I had to pack up the sewing machine and take it away.  I got all the way to the waistband and at that point there was nowhere to go, they were so huge.  I had really expected a lot out of these pants, and while I knew I am not advanced enough to manage the amazing fit of Lauren's spotted pair, I had even made a muslin!

It was time to take a long break, so I did.   A looong break.  And finally I felt ready to just do whatever had to be done to make them fit and get rid of the butt wrinkles from hell.


-Removed about 3 inches from the front crotch, tapering out at the sides.  This wasn't done quite evenly and one leg is a tiny looser than the other.  But whatever.
-Removed about 1 cm from the upper sideseams, tapering to nothing above the pockets since I didn't want to change them at all.

Those two changes made these pants fit.  Then I put on the waistband and I stretched it out a lot as I sewed.  The fabric has a lot of stretch, and this way the waistband ended up nice and snug - I had removed the zip for the fitting process and just basted the sides, and I called it a success when I had to put the zipper back in!

I still don't consider these the ultimate Peter & the Wolf pants.  They are particularly unflattering due to the pockets visually widening the hips - I think this might be minimised in a finer fabric.  Not to mention the butt, I'm not even sure how to conquer the butt-fitting problems.  But they are wearable and cozy, so I will not be sending them to the secondhand heap quite yet.

Final summary:

Papercut Patterns Peter & the Wolf pants
Fabric: Marc Jacobs Herringbone wool from Mood
Size: XS
me: always an XS in Papercut
Changes: lengthened the legs slightly so they would be full length pants. 

Tuesday, 7 January 2014

Papercut Peter & the Wolf, take 2 & unfinished...


After my muslin version of these pants, I knew that they would fit in this incredible stretchy Marc Jacobs wool.  Very unseasonal, until I land in Seattle in two months...So, I knew they would fit but I didn't realise at all just how much more stretchy the wool is compared to that totally zero stretch hemp/tencel.  In the hemp pants, the bagginess at the butt was a positive thing because it made it possible to fit in the pants.  In these, hm. 

I left these at full length (hits perfectly at my ankle as a full length pant.) and cut an XS.  Construction was good, although it's the first time I've worked with such a loose weave.  Not easy to get stitches out of!  I didn't quite get my seams lined up for the zip....but then I noticed that I could get the pants on without the zip.  Oops.  Then I realised I had exactly 6 hours until I needed to pack up my sewing machine to go.  There went my concentration.

So lovely people, is there any way to fix this problem that you see below at this stage of sewing???  Otherwise I could call these my lounge sweatpants...I did manage to fit another scrap of this fabric into my luggage but I'm not sure it's enough to cut another leg (for example.)


Without the waistband, a problem is found


The front isn't too too terrible


With waistband - so much room that I could pull them on without the zip!

HELLLPP!  I'm DROWNING!

Thursday, 2 January 2014

Unexpected V-neck Sewaholic Renfrew


I was planning to do a patchwork Vogue top, view 3 of Vogue 8755 (and in fact on the model it doesn't look that long til you see it covers her butt and she's probably six feet tall) but when I pulled the pieces out of the envelope they looked suspiciously dresslength.  As I am in a total moving-induced panic, this was too much to handle.  The patchwork wool scraps got instantly relegated to a different project, leaving me a luscious pile of gray heathered merino...so I decided to make a long-sleeved Renfrew.

I used my v-neck pieces as I was too lazy to fix the lengths from my last round neck version, I'm afraid I've been cutting and folding my pattern pieces rather than copying them, because I ran out of tracing paper!  I cut and sewed this in a single-day frenzy and then put the finishing touches on it the following morning, prior to leaving for a 3-day tramp in the rainforest.  But...I hadn't tried it on and I couldn't just leave it, so I took it along and it became my most awesome rainforest top layer (except when it was raining.)  I was alone otherwise I'd have some action photos for you.

Fit was perfect, top is lovely, I just wished that I had cut all my threads before I left!

If I still had my Vogue 8755 I would totally use the rest of this incredible merino to make lounge pants.  Moving is hard!  I have to let go of projects, empty my scrap-stash...and the final things I'm working on are starting to make me stress with the feeling that I have to finish everything NOW!  Luckily I have a friend who's passing on allll my scraps and leftovers to a just-starting sewist friend of hers who can't afford fabrics and such, so I feel like everything is going to a great cause. 

Friday, 20 December 2013

stretch silk Lady Skater

This is a living example of how different fabrics change a pattern.  This particular fabric is a (not-very) stretchy silk twill, I think.  It has certain shifty silk characteristics, but with weights on, it was pretty easy to cut out without distortion.  And it's easier to sew than the merino I used for my first skater dress!  I did kind of grimace at just how tight I had to pull the neck binding, but it doesn't show.


The topstitching along the binding edges was unusually awesome and straight!


I have to thank my coworker Jennifer, who is getting quite enthusiastic about taking blog photos (although she insisted on some greenery instead of all urban chic...)  I adore this dress!  Even if maybe it's a bit short for work...

I used the same size as the merino skater - a size 3.  In this much tighter knit, it's a perfect fit (although as always a wide shoulder adjustment would have been awesome).  I noticed after washing my first skater that the skirt weight pulls the dress much longer - this lighter-weight silk doesn't do that.  I managed to squeeze cap sleeves onto my tiny piece of fabric by cutting the skirt 3 inches shorter.  (Maybe a touch too short!)  Using the bad*ss instructions meant I was finishing my seams as an afterthought, but I did finish most of them with a zigzag stitch.  Also, I didn't have the trouble this time getting the clear elastic sewn on.

I have known for awhile that I should start to shorten my bodices, and this dress would also benefit from about 1/2" out of the bodice...and a swayback alteration...I am still so against such an ugly name that I haven't learnt how to do the alteration yet.  What swayback??  I don't have a swayback!!  (except that apparently I do, ugh.)

I waited a long time to make this dress!  I really didn't want to mess up my incredibly beautiful stretch silk, and I'm super happy with the result!  The only thing I notice with the skaters is that I always have so much stuff at the waist seam that it sticks out - the layers of fabric plus the clear elastic don't all settle down flat.  I know it's a fact of the pattern but I still find it annoying because I never ever ever wear belts.  

Tuesday, 3 December 2013

Sewaholic Thurlow Jeans

It just happened that my first Thurlows would be jeans.  The awesome dark Theory jean fabric (with some stretch) was on sale during my visit to the States...and I'm actually quite glad because I think that I'm much more exacting with jeans compared to other pants.  My Vogue pants, for instance, are a miracle because I can wear them.  The idea of getting them to fit precisely was so far beyond me when I made them! 

Jeans aren't like that!  They have to fit just-so.  Quite awhile ago I read up on making trousers, measured my crotch depth and length, and measured the crotch depth and length of all my favourite trousers.  Interestingly, the variation was less than an inch!  I also tried to spy ahead of time what sort of changes I should expect to make.  I read some of Katherine Fasanella's diatribes about camel toe and I can even admit to spying on butts in the city identifying flat-butt-jeans (made that way because it uses less fabric).

With all that behind me, when I cut out my Thurlows I felt (rather mistakenly...) like I already knew something, and added in all these changes.  I deepened the J of the crotch for what I diagnosed as a low-slung butt (no perky cheeks for me, sadly) by going from the size 4 line down to 0, then from there I extended the crotch depth by continuing out to the size 8 line, and then smoothed that back to a size 4 about 3 inches down.  Haha, so see what happens next...were my changes good or stupid??  It was almost torture to go through the sewing piece by piece!


Those butt wrinkles are nothing compared to what I started with.


WTF that stupid fly is going to fly away it's so far to the right!  ARG!!!


I prepped by reading lladybird's sewalong two or three times, so that I had a better feel for what each piece would be doing, and it was a very very helpful crutch along the way.  As a few have mentioned, the explanations in the instructions are sparse.  About 12 steps are listed in each numbered "step" and if you haven't done trousers before it can be rather puzzling.  With the sewalong providing pictures along the way it was easy not to get confused. Tasia never tells you whether the lining fabric should be face up or down!  Nobody really gives advice on finishing stuff - like when/how do you actually sew the back butt/waistband together without crazy mismatching?  Should I just know this?

I had heard that the Thurlows run big, but in the end...my changes were so very irrelevant.  Big was not quite the word.  Once I had sewn everything together and got my mind around the architecture of a crotch seam, I started taking in fabric.  I took in about 2 inches at the inseam extending to about 5 inches below the knee.  Then I took in as much as I could from the bottom of the zip to the end of the butt along the crotch seam.  Then I took 1 cm off each side seam (I wanted to keep my pockets!) starting just below the pocket and extending that to 2 cm below the knees.  After all this I still took about 2 more inches out of the final centre-butt tab.  I almost overdid it once I got the waistband on - tried to taper the waistband and got a weird poofy bit.  In order to straighten that I had to take another small chunk out of the middle butt...and in the end it's crazy!  They fit!!  Oh yeah - this is why you do a muslin...I should have cut a straight size 0 and gone from there.  If my fabric had zero stretch a size 2 might have been good.  I would have a really hard time putting all my changes to paper though.

The main thing that drives me crazy is that the fly is on the wrong side, so when I look down the jeans look lopsided with the right hand fly.  Also the 4-way butt intersection where the waistband meets is still puffy due to my last minute ridiculous tapering idea.  I couldn't fix it quite enough, apparently.  But they are comfortable to wear, so I will chalk them up as a success.  I think a non-stretch, non-jean version of Thurlows would get a very different result!