Showing posts with label silk cotton. Show all posts

Friday, 11 October 2019

Two layer silk Grainline Willow

This was one of the super precious projects that I thought up in my final month or so in Arizona, the first time I was in Arizona, when I was still pretending I'd have time to sew prior to moving.  I cut it out and then have carried it with me and it made the trip mainly by dint of being few pieces and being really small flat pieces.

The outer fabric is silk-cotton from Ramieandlinen on etsy.  I used it here for the lining of a Stylearc jacket, and it was terrible lining fabric because it's basically sheer and far too lightweight for such an application.  So the second layer is plain white silk, which I did gelatin prior to cutting out.  Comparing the two layers, the gelatin seems to have done well as the silk layer isn't too grossly different shaped than the top layer.

I used the same size (4) as on my first successful Willow, with the same extra cm added to the centre back.

The method for attaching was the burrito method -
Sew shoulders
attach the neck seams, understitch and cut
burrito and sew the armholes
pull through shoulders
sew side seams continuously

I then thought I would hand sew the bottom because the key feature I'd thought up for this was to do a shy amount of embroidery over it along the hem lines.  I reckoned this would hide the seams which you can see through the fabric, it would keep the neck and sleeves more stable, and it would make the hem more interesting.  I thought it would wrinkle if I did a machine hem.


Because of all this thinking, of course nothing got done, so here we are two years later.  I gave it all a good iron, picked out some thread and set a long stitch length.  I'll embroider some other project, some other day!


Also you can see how my Dawn Jeans are wearing in - not quite a perfect fit but totally wearable and they definitely impress everyone.  This is a totally me-made outfit!  My sandals are from the Shoe Camaraderie workshop last April. 

Sunday, 12 April 2015

Vogue 1247 Top

During a cutting binge last week I suddenly put this fabric together with this pattern.  I have been planning to make the skirt, but the shirt gets surprising reviews (initially I wasn't interested at all...foreshadowing?)

The fabric is one of my favourites.  It is a light silk-cotton that I spotted in Wellington at The Fabric Store, but didn't buy it since I was about to move.  I was very sad about that and thought about it.  Aaaand!  One year later at the Fabric Store in LA I found it!  I only got a meter, another problem of mine...I managed to squeeze the pattern onto it by cutting a size 6.

Vogue size 6: I have never made a Vogue size 6 in my life and I suspect I never will again.  This top is so baggy that I thought I'd have enough room in it even in a size or two smaller than usual.  For reference, I generally fit into a Vogue 10 and occasionally into an 8.

I was hoping that by being exacting with the french seams, that things would magically fit together.  They didn't - from the very first piece.  When I sewed the first center front and side together, I was really puzzled why there was about 3 extra cm at the top of the side piece.  The answer is that there shouldn't be...and that got things slightly offset from the beginning.  I didn't find it exactly difficult to sew, but I think that once you have done one step slightly off, it's impossible to recover because there isn't a lot of adjustment room elsewhere.

That bust dart?  It's like, outside my shoulder.


But that's ok!  Because in the end, the top is COMPLETELY HIDEOUS. There is no fixing this problem.  I look like a pregnant linebacker.  Why do the bust darts end 3 inches out from the bust?  I can find nothing flattering about this top.  I had to force myself to hem it, since it was clearly a lost cause.  The silk-cotton is a good fabric for the pattern, so I don't think its lack of drape is to blame.  I can't imagine the shirt looking better if it were *bigger*.  Overall I am mystified how it suits other people so well!  

Wednesday, 12 November 2014

Named patterns Kielo dress

I had this project in the back of my head for the past few weeks.  A lot of my stuff is in the black hole of The Courier that will Never Arrive, so I have had a shortened list to work with this month.  I had the Kielo pattern, and I had a very specific idea of what I wanted: a nearly transparent light cotton...I considered using light jersey but a knit just didn't match the picture in my head.  I considered this a muslin project to see if this weird dress fit my style, and to see what the fit of Named patterns is like.

First complaint: I think Indie patterns should put on a seam allowance.  We pay more money for these patterns, and it pisses me off to have to make my own seam allowances and trace the pattern off overlapping sheets.  I buy other people's patterns in order to NOT figure out how to make my own!

While I was trying to remember if any of my fabrics matched my specifications, and debating buying something, I happened to dig through my current little stash and realized this lovely eggshell blue cotton-silk voile by Rag & Bone was exactly the right thing AND the project it's for really needs a piece about 8 cm square.  So I cut that one piece out and set it aside, and got to work.  The fabric was beautiful to work with, although it's so delicate that my pins left holes.  It ironed well and the cheap Singer didn't have any issues with it (although my stitching tension isn't great -the machine never seems to have good tension.)


I cut a size 38 going by my bust measurement, since that seemed the most important.  Although my other measurements were closer to a 36 I figured it wasn't too relevant to this shape dress.

Also, obviously, I hacked it off at knee length.  No tulip business or slits for me, I want to at least be able to walk, if not ride my bike in this baby. On me the tulip shape is always unflattering!

Because of the fine fabric and simple design, I decided to french seam everything.  This caused some confusion upon installation of the belt, and finishing the sleeve.  One side was the trial side, and the second side was invariably better.

This was a very easy project, as others have mentioned.  I expected that finishing the neck and sleeves would be really grueling but with careful ironing everything came out smooth.  I recall the last time I did this - on my silk Saiph shift, and wonder what changed...have I learnt something?!  This dress came out very flattering, and is probably one of my favourite projects to date, although my nude slip is in the black hole and it's snowing, so I am not sure when I'll wear it.  (Sorry for showing in my photos just how see-thru it is!)  I somehow feel very ancient Grecian with the straps wrapping around me!

My only gripe is in the chest area.  I feel like my chest is somehow shorter above and below the widest part of the bust...as though either the dart isn't quite right, or like my boobs should be higher or lower to fit the space.  Where they actually sit is the narrowest part of the chest instead of the widest.  It leads to some bagginess which doesn't detract from the dress, but later trials showed that wearing a bralette or a tshirt bra that is relatively minimising does fix this problem.

Sorry I look like these pictures are my jailbird photos, life is a work in progress, etc. (Someday I'll smile for the camera.)

Friday, 14 February 2014

silk-cotton Papercut Sigma

I spent all winter making summer dresses.  Hm, deja vu?  My excuse is that when I cut this out it was summer!  Stupid northern hemisphere.

This wasn't my first project to jump into this past week.  However, Necchi and velvet didn't get along so I moved onto this.  My mother finally dragged the Singer/not a Singer out of the closet and after some initial noise that sounded like a lawn mower, it is working pretty smoothly.  I don't know whether to blame the Necchi or my materials for my agony over the latest project, but more on that later.


Yeah...those are my awesome backward pockets...

This sewed up really quickly!  I was sooo excited for it and it's cute and of course will make a delightful spring or summer dress (arggg!  I'm NOT happy about winter!  It snowed today!  It never snows in Seattle!)  However I had some issues.  The first was about the pockets.  The instructions have you put some interfacing on the front of the skirt and attach the front pockets.  They then blithely tell you to attach the back of the skirt.  Um...what about the rest of the pockets?  Since this method was new to me and seemed really fiddly and stupid, I did the second pocket in a more intuitive way (I hear Lizzy saying now that intuition always wins over instructions!) which was to apply the front and the back pockets to their respective skirt pieces, and then sew one single seam from the top of the pocket to the bottom of the skirt.  The only thing that I totally missed in my irritation was regarding the floppy pocket tops, which have to be sewn into the waist seam...um, the front part of the waist seam...so yeah, I have two backward facing pockets.  And I'm not moving them!!


I also feel like the skirt poofs out a lot, it ends up reminding me of the Elisalex skirt.  Other people's don't look that way.  I am not sure if the version without gathers is the same, or if I did something to make it particularly puffy.  I only hemmed it about 1/2".  It feels a little silly but everyone else has said it looks good so I'm not sure.  Overall this dress is easy to wear and comfortable but it does seem a bit loose.  Next time I also might shorten the upper bust darts slightly. 

The silk-cotton was a joy to work with.  The sewing machine got quieter as I worked (oiling itself?) and after my struggles on the previous project it was quite a relief to be doing something trouble free.

Details:

Papercut Patterns Sigma from the Constellation collection.
Size XS, no alterations, view 2
Fabric: silk-cotton blend from global fabrics in Wellington.
outcome: I'll do it again, with some changes

Thursday, 2 January 2014

Sewaholic Cambie

I cut this project ahead of time, but started it just upon returning from my Christmas holiday.  With one week left to go before I move, I was feeling pretty stressed and wanted Cambie to go really well, not cause trouble, and to look awesome at the end.  I have a beautiful second Cambie waiting...if if if this pattern didn't cause trouble.

The fabric is a silk-cotton jacquard that I got from ramie and linen on etsy.  They are a wonderful resource and I have bought many other fabrics there (notably my incredible to-die-for stretch silk.)  The outside has an incredible shimmer to it, and with the lining this is a really warm dress...too warm for summer...


I cut a size 4.  I didn't make any alterations to the pattern, and quickly realised I should have gone down to a size 0 at the hips.  I don't like how much the hips stick out.  For the lining I used Japanese cotton batiste for the bodice and black bemberg for the skirt.  That way it will be a good winter dress.

As has been my issue lately, I have no clue how to finish my seams.  I zigzagged the pockets and left everything else.  Eventually the skirt seams all got attacked by my pinking shears, but I suspect this is not a mature way to end things.  Probably it's another topic I'll have to tackle in a few month's time, but I do see that my sewing machine has some interesting stitches I could probably use to finish my seams.

But overall, this went exactly as I hoped!  I could have shortened the skirt by about 4 more inches, and I did go the lazy way out and just hemmed the skirt by machine.  I really don't like the hips sticking out so much, but by keeping this version of the dress a bit long it does balance out.  And the way the lining goes in, as everybody has mentioned so many times, is magical.  Utterly magical.  I'm in love with how beautifully this dress is finished and I want to do everything like this forever.  And my waist and neckline just about match up perfectly!

This dress fits exactly right, except for that 1 inch bodice shortening that I have not yet implemented.  Another fix for the next version...which won't be coming up soon, sadly. 

Thursday, 19 December 2013

My tragic Elisalex is a work in progress

By Hand London and I have some size issues.
My two Anna dresses sadly didn't fit very well - my first size 6 was too small, and the 8 was way too big (but fits my friend Ellie perfectly!  It was fated!)  My third Anna, which I did after the Elisalex, was a size 6 and was also slightly too big.
My Polly top was a size 6 with an inch shaved off the shoulder height.  And it's rather baggy but in an ok way.
When I looked at the final measurements chart for the Elisalex, the 8 seemed pretty reasonable if I accounted for BHL not leaving any ease.

Oops.  Such a wrong call.


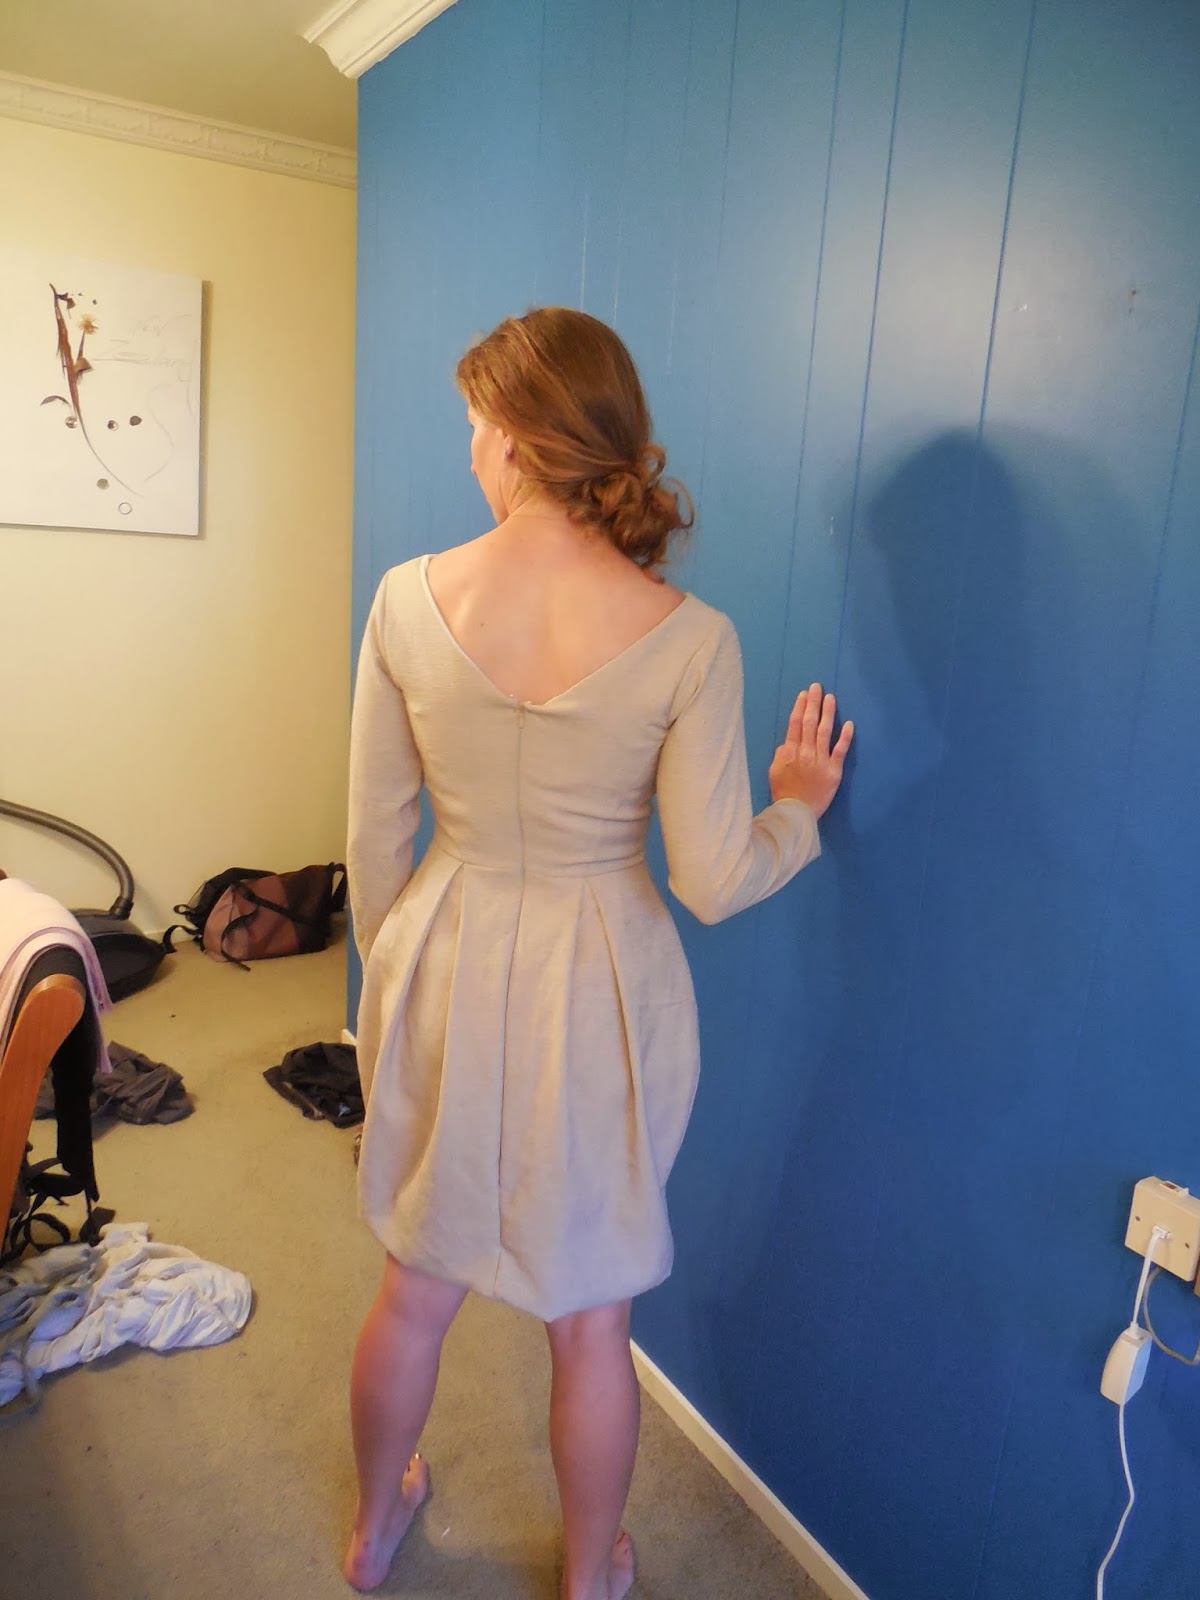
Back to the beginning - my fabric is a linen-silk with lurex threads.  It doesn't have that much body, and in fact wasn't my original choice for this dress.  But I love this fabric and I love the idea of a cream coloured shiny Elisalex, I thought I would prefer the tulip skirt with less out-ness, so I went with it even though it's definitely not long sleeve weather. 

I cut off 10 inches from the bottom to start with and sewed it up without other pattern changes.  Once it was together I had two issues - major hugeness, and not being sure whether I needed to give myself more booby room.  I just can't tell if the princess seams are too tight!  I cut one inch out of each side of the centre back.  That fixed the overall too-bigness (and was possibly too much).  Then I started to shave off the princess seams and now I think they are better but they are lumpy.  At this point I still have no clue what to do with them.  The chest needs work. 

I have pinned the hem up about 6 inches.  (On top of the 10 inches I cut off initially!!  Do not forget to measure the length of your Elisalex!)

I would consider this a work in progress - I'm tempted to take off just a bit of the side skirts so it's not so tulipy.  I need help understanding how to make the princess seams fit my chest.  Probably I should have done an FBA.  I am doing what we do when things go wrong...taking it home for my mother to look at...since I'm moving I am in a crazy busy state of trying to get all my remaining projects at least cut out so I don't have to travel with extra fabric!  23 kg luggage limits are the bane of my existence!

On the bright side, my zipper looks awesome.  It's the first invisible zip I've done that looks invisible!  Hurrah!