Friday 19 March 2021

Pomona pants by Anna Allen (and by me!)

 I decided that despite last year's intensive work on the Free Range Slacks, and a recent foray into the Elizabeth Suzann Clyde pants, I really did need these in my life.  Because who can resist beautiful drafting and the excellent butt fit?  

I made a size 4, which has consistently been my size in Anna Allen patterns.  Based on previous experience, I shortened the rise by 1". I shortened the legs 1" as well.  I made all my adjustments on both patterns then determined I didn't currently own any fabric with enough yardage...except one.  So my first pair is this oatmeal white rayon linen blend from Otara, the cheap fabric neighborhood in Auckland.  This fabric has proven to be an excellent match to the pattern! 

My only beef - I had to make the narrow leg version due to said fabric restrictions, and it doesn't have markings for front pockets so I had to sew them on last, by eyeing where they belong.  I've since transferred those marks onto the pattern but it's on the wide leg version, why not on the tapered? 

Other than that these were a joy to make AND they took about 2 hours including both pattern modifications, fishing through my stash, and documenting the process as I went for a friend, AND even a fortifying coffee break.  Unfortunately I had only crappy elastic and it has already started to roll up.  I wore these right away, and I wore them to Auckland (where I bought more elastic but was foiled by covid and didn't get to do any fabric shopping) and then I sneakily took this fancy photo shoot in the morning before I left Auckland, just as they locked down.  


So then I decided to experiment. I used the tapered leg version, size 0, and a stretch satin fabric in this very pretty and very busy flower sort of print.  It was equally fast to make, and the final answer here is NO. It loses all the drape without becoming fitted enough to look good.  The pattern is also way too busy! 


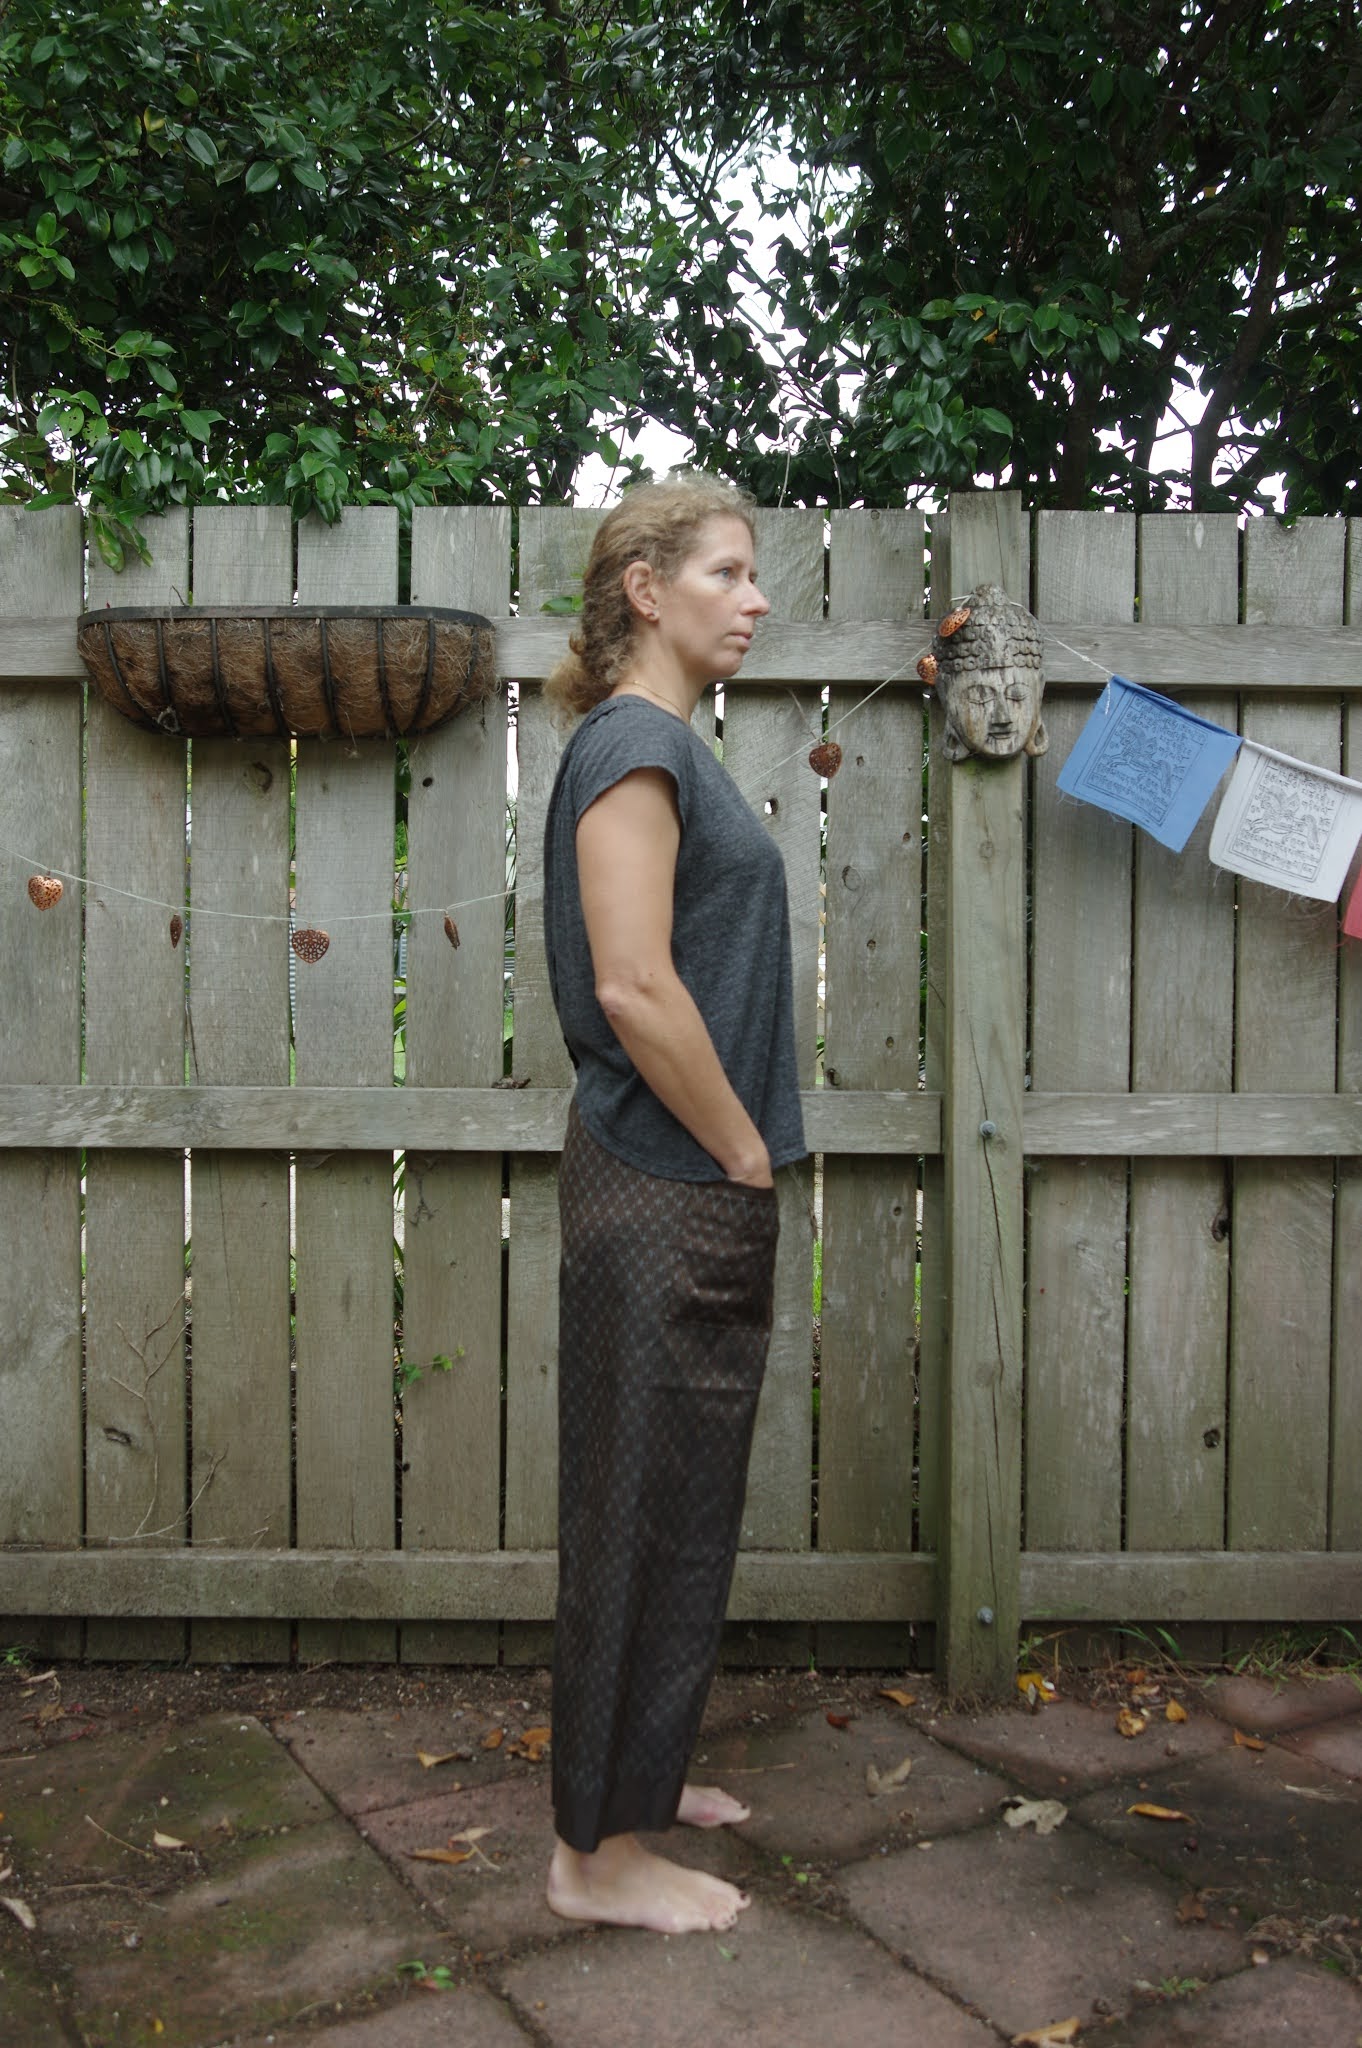
I was going to buy some good practice fabric for the wide leg version.  But because I missed my chance in Auckland, I was limited to online shops and it seemed like I would have to spent $150 to get enough fabric...so I decided to just go for it and cut into some of the silks I've been hoarding.  It's a goal this year to actually make things out of my precious hoard.  I have about 5 of these silks from Thailand.  They are challenging to match to a project because they are very structured silks, and loomed, so they are narrow.  I don't wear many fancy dresses and I can't seem to find any jacket patterns I like...so here we are! 

I cut on the cross grain to use the loomed edge for my hems, and removed about 3" off the hem out of necessity due to my fabric width.  I used the other edge for the pockets to add some detail.  The silk is very easy to sew, so there's not much to add there.  Now the question is whether these structured pants will get used!  They are very pretty and I'm super pleased with the fit.  I do see that the butt fit is different in these compared to the tapered leg pants, and I wonder whether it's a difference in my fabric or if the pattern pieces are subtly different.  I think both look good, and once I have confirmation that the wide leg has a place in my wardrobe I will probably make more.  I still want to try some heavier weight ones when I find the right fabric!


Finally I got onto my tapered plans, made of some greenish yellow linen ("Celery") from The Fabric Store. I was able to get these out of 2m of the fabric. This is the first time I used the pattern piece with the pockets drawn on the front so I was a little worried that maybe I had transferred the markings from the first pair of pants wrong, but they seem to be ok.


It is very funny that although these linen tapered pants are great, the first version made of cheap stash rayon-linen absolutely hit the spot for this pattern - with a bit more weight and a lot of drape.  I'll probably buy more of that fabric now that I've seen it in action. 

I texted a friend, worried that I'll never make anything except Pomona pants from now on...


Thursday 18 March 2021

The Great Ruffle-off, a pattern review

 I'm not even sure how I discovered sew pony - I think it was a random instagram post about something else. But I was taken by the lovely ruffled tops.  I am still wary of gathering so though I know you can just pop a ruffle anywhere, I need some hand holding.  My friend Tessa also felt like ruffles this week and made the Kyoto top.  So all of a sudden I had three patterns to try out and I wanted to do it all *right now.*  So I did!  

Here's the comparison. 

Kyoto, by Papercut patterns

Previously had some dubious review due to the shape of the sleeve cap.  This has been changed, and now is rounded (it used to come to a sharp point.)  I cut a size 2 because I was using heavy sweatshirt material, and Tessa had told me she didn't size down and was happy.  Size 2, btw, seems to be a new system for Papercut, who have previously done an XS to XL kind of thing that offered a limited number of sizes at both extremes. The fabric is heavy sweatshirting from the Fabric Box in Auckland.  It has a high poly content and very little stretch, which makes me rate it rather low, but it is nice and fuzzy. 

I had zero expectations for this top.  Because there were previous fit problems I anticipated a crap fit and a dumb looking ruffle.  Instead, I produced a top which is adorable as fuck.  And I put it on right away and it is still adorable.   


I wanted to make a woven version right away!! I wore my sweatshirt version for the rest of the day.  Sadly my woven fabric of choice was too small a scrap so I have the idea on hold while I think about things.  

Sorella, by Sew Pony 

This pattern had two variations. One is a simple dolman tee, with the ruffle to finish the sleeves.  I cut a size 6 though my measurements put me in 8, because I noticed there is a lot of ease.  This has a nice shape despite being a single pattern piece for both front and back.  It does have drag lines at the shoulder to armpit, which I believe is a feature of dolman sleeves when you try to size down.


The other option doesn't really fit in my ruffle-off, but I'll keep it here anyway.  I had problems with this because the pattern calls for rib bands.  It is possible that the pattern *specifically* calls for rib bands. I have a problem with that.  I had more problems with it while trying to put my band onto my top (it wouldn't go.)  I made another band 30% wider.  


Problems: 

"Shorten pattern if you are under 160 cm.  Lengthen if you are over 170 cm."  Um, really?  So you drafted for everyone in a 10 cm range?  Not helpful.

One pattern piece for front and back is lazy when you pay money for a pattern. 

It was unclear whether the pieced option matches the unpieced option.  Like, can I piece the front and use the plain back?  Are they all mix and match?  (Yes, which I know because I put the pieces on top of each other.)

The pieced variant comes to a sharp end where 3 pieces are supposed to meet up.  I consider this lazy drafting.  There should be seam allowances added, that mean it comes to a kind of lopped off mountain shape, not a sharp point.  As it is you get quite a bulky spot there.

Issie, by Sew Pony 

Similarly to the Sorella, there are a number of potential options and variations, and it takes some head scratching to figure out what goes with what.  This pattern diagram doesn't show the back of the patterns so it also wasn't clear to me whether the front ruffle variation (vertical) is meant to continue on the back.  (No, I think.) 

I made the epaulets top first for a friend. 


 The bonus here is that my friend will love it and I could be pretty relaxed about a top that I knew wouldn't fit me well. It's very long.  (I used the size 6 again.)  VERY long.  The neck band is fine no matter what fabric you use, but for the cuffs I now had a great deal of suspicion and cut them all longer than the pattern by a good 30%.  Now, it's possible I don't even like epaulet ruffles.  They are pretty stupid looking on an adult piece of clothing.  But I got SO ANNOYED by the shitty drafting of the sleeve that before I knew it I was fixing the thing and committing to another version, which I then accidentally did in silk-merino and so now I'm stuck with an epaulet sleeved top.  At least it's one that fits me EXCEEDINGLY WELL.  

Basically, the sleeve is cut on the fold, which means the front and back are the same.  I ask you, is your front and back the same?  There's a lot of excess fabric in the front armpit, a loose upper sleeve, and a weird fit hiding under the epaulet.  I used the sleeve from the InstincTee by Sasha Secondo Piano, which is a free pattern and is drafted extremely well.  It created a HUGE change.  Whoa.  I narrowed the entire sleeve a bit too. 


On my second version I randomly shortened the sleeves, and then equally randomly made long cuffs.  I shortened the hem about 2" prior to adding the hem band.  So the epaulet ruffles still seem dumb but I have a certain affection for this top now after all that drama.  Also now I can go on to make the final version with ruffles up the front!  For this version to avoid total twee-ness I ordered rib so that I wouldn't have a ruffled AND flowered top unbroken by any relief.  That would be too much for me. 


I felt like this was pretty twee.  But of course, having already redrafted the sleevecap and the shoulder fit, having gotten ultra special rib from Miss Maude, and using unusually thrilling flowered fabric, I now sort of adore this ridiculous top. 
 

Final thoughts: 

The Kyoto totally surprised me.  I expected nothing and ended up really pleased with what is a simple pattern with a lot of potential variation. 

Sew Pony: I wasn't impressed by the drafting.  There are a lot of pattern companies which produce cute knit patterns that are not technically excellent, and I think some of those patterns can still be total winners and I would make them over and over again.  Here I felt like the designer was lazy, which made it hard to get a good outcome.  It doesn't take much to give a binding for both rib and normal fabrics - and most home sewists won't use rib because it's hard to get. Small things - like making clear what height you are drafting for - add to the quality and usability of a pattern. 

No matter how bad a pattern is, with some work, you can make it amazing.  It's so easy to keep buying more patterns!  But now I have a real affection for the Issie top because I made so many and put so much effort into getting the fit I wanted, and I have an affection for the version I really expected to find over the top...maybe because it is over the top, but also because I put in the most effort to make it come together.   I think I'll make more Kyoto tops as I'm keen to do it with lighter fabric, a long sleeved, and a woven version (probably not all at once!) and I'll probably use my Issie pattern to make some normal tshirts without any ruffles.

I am really happy that I spent a few days ruffling like mad.  I got over some of my fear of adding ruffles to everything indiscriminately!

Tuesday 16 March 2021

Jalie 2679 jacket review

I set myself up for a lot of stress with this project, also starting a theme of wanting to make a complex thing right before going away, which I repeated about twice more.  So I sewed this over about 3 days and they were rife with stress to finish on time, while still creating a finished object that I could wear hiking and that would take pretty hard use.  For that reason I was constantly irritated. 

Fabric is Schoeller softshell, which is a stretchy, thin, single thickness softshell with a bit of water repellent capability.  It does not fray. I got it from Seattle Fabrics (I wish I could teleport myself there more regularly...)  I had two more pieces, one of which has since turned into Calyer pants.  

Size R going to S at the hips, though the difference was mere millimetres. I would have liked it to be easier to widen the pattern pieces at the hips or grade up, though my fabric is pretty stretchy I don't love it hanging up on my hips and bagging out in the lower back.

The pocket instructions don't give you the chance to make a very neat finish.  I ended up changing them - basically I prepped the rectangular hole, stuck the zipper to it, and then sewed it down.  As things went on, I wondered why there is no hem band - which would make the pattern easier to adjust, and would create a nice finish.  I worried that the sleeves needed bands at the end.  The instructions wanted you to hand sew down the inner collar.  Not a chance!!  

So I created more stress out of a pattern that really does come together pretty nicely.  I think heavier weight fabrics are better for it.  It's a bit narrow in my hips, which I expected, but has a good fit elsewhere, and the narrow hips are fine to wear hiking, though again I'd have loved to be able to widen it.  My zips are secure, though I really would have liked the zip to go all the way to the hem to make it more secure.  It's sewn in really well but that extra space seems like a mistake.  


It's a lightweight softshell jacket and I'm happy with the results.  It was of course too light for the cold weather on my trip but I wore it some of the time anyway, on principle! I'm not sure there's anything about this pattern that I liked enough to make it again.  Maybe in sweatshirt fabric, with colorblocking, at some point.  Like most Jalie patterns I feel like it was a straightforward, reasonable pattern, nothing flashy, not extra special, but that gets the job done. 


Monday 1 March 2021

Papercut patterns Mito cami review

 Lately I covet everything made by a brand called R13 and I've been putting in some effort to recreate their stuff (or track it down secondhand.)  I would have overlooked the Mito in the past due to its lack of coverage but now I want to recreate this dress: 


I figured I could easily hack the Mito into this. I read a few blogs and sized down with misgivings to an XXS. My bust is 32 and I have a lot of back, but I didn't want it to droop open to my belly button.  I also decided for some reason that pink and blue bra sliders were not the thing, I would have to just figure out the right strap length and sew the right length. This complicated matters a lot because I ended up changing the order and trying on the top many times with it held together full of pins, in order to adjust the strap length.  

My fabric is silk velvet and I lined it with a very stable silk remnant, which was great, as it helped me keep my main pieces in shape.  I didn't have trouble lining up any of the pieces. The drafting seemed fine.  The instructions were fine.  The fit...hm. 

Worse with pins in, but it's really hard to get over my head.  I suffer from clothes claustrophobia, if my arms get caught in it I am really unhappy and to create the amount of coverage I did, the straps are short and the claustrophobia is real.  


This was an experiment and I don't really like it.  To go on and copy my dream I would have to do some major modifications of the bra cups and how they come around to the back.  I would probably add an inch to each side seam.  I doubt I'd make this again as it is. Though I think it looks ok, I would prefer a really oversized look and in that case you lose all the coverage! This type of top (looking at you ogden cami) also really swamp me somehow.

 I am, however, impressed with how much coverage it does provide -- if you're willing to keep the straps short, you can actually wear a bra with it.