Thursday, 9 April 2015

Tilly Delphine skirt

So I am on a skirt binge.  (You didn't notice yet, it's happening behind the scenes.)
This is skirt number 2.

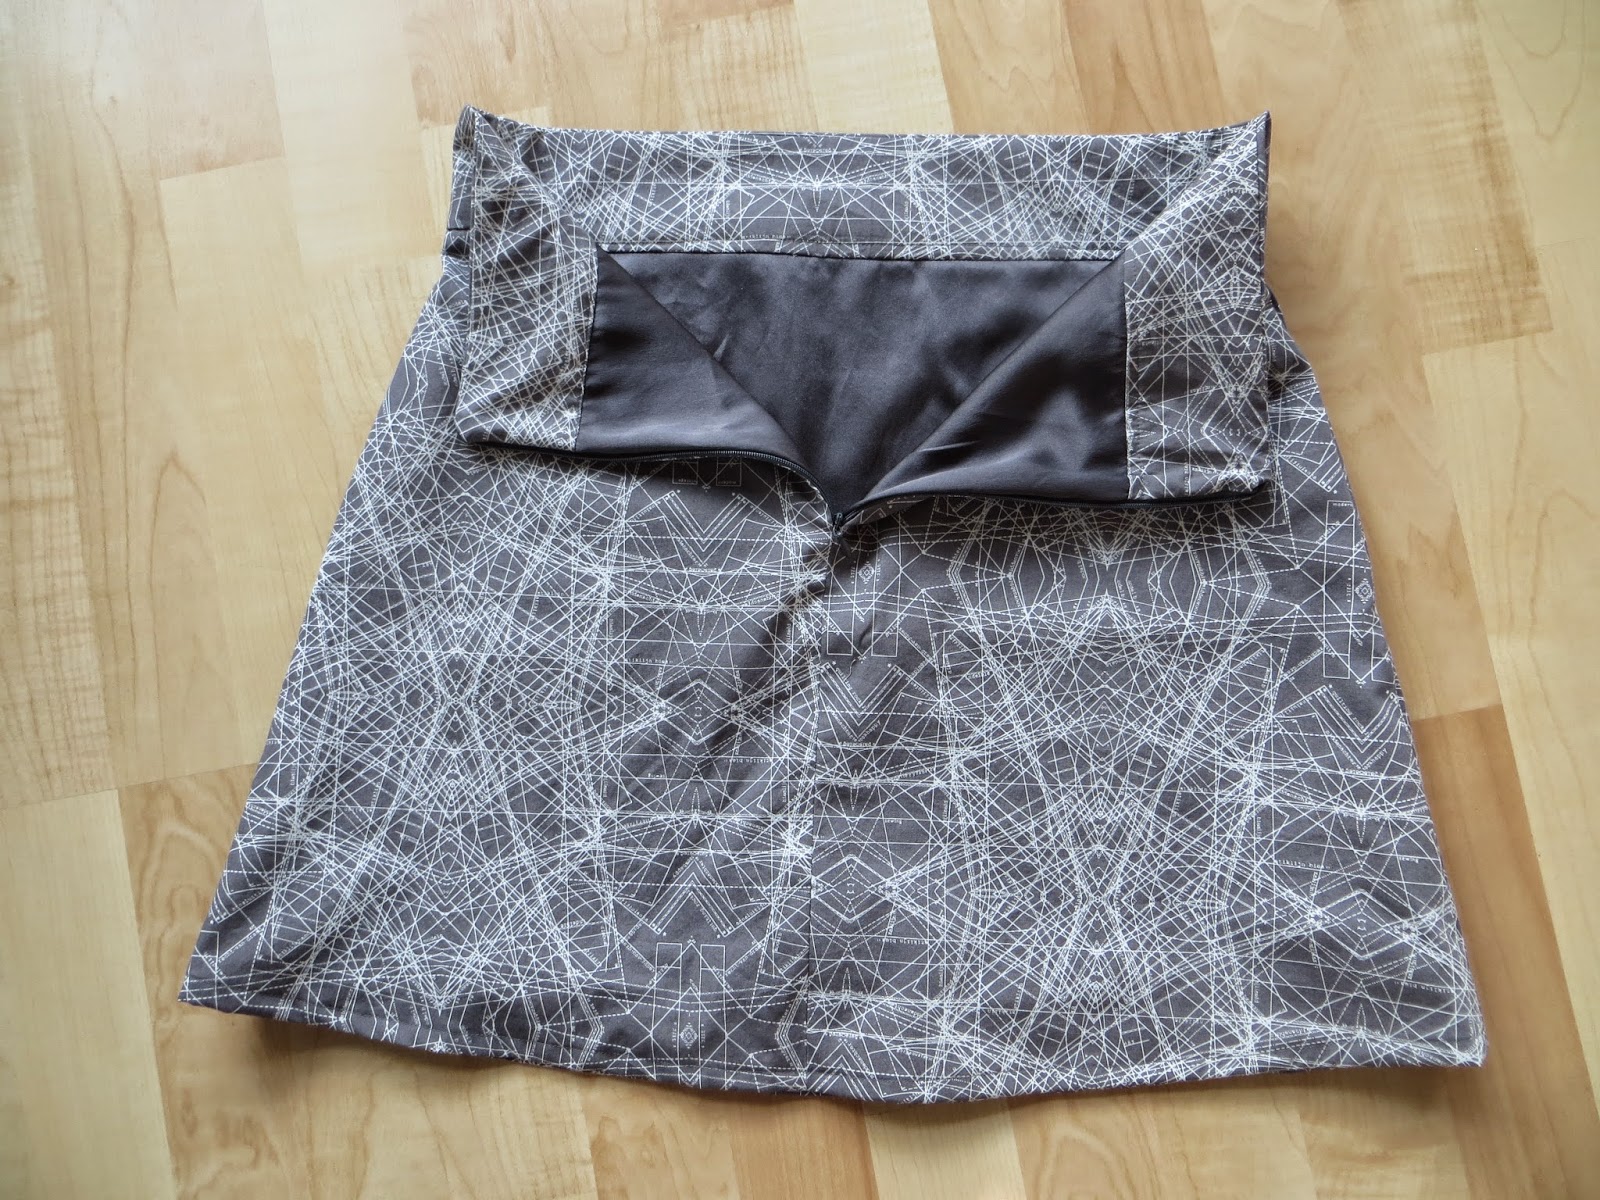
The fabric is an Art Gallery print that I love.  Unfortunately the etsy seller was less than generous, sending me 40'' width fabric.  It was nearly impossible to cut the skirt out, and I had to shorten it extra.  I think 3'' total (which is fine).  No chance for pattern matching of any kind.  Of all my charmeuse collection I finally settled on grey to line this.  Maybe I should have gone with red?

Size: 3, based on the waist of the measured pieces and where I wanted it to sit on my waist.  I went less by the size chart and more by the actual waistband pattern piece.

I followed Tilly's online tutorial to line the skirt, as it's a bit different than how I lined the Burda skirt.  You essentially make two skirts and then slide the lining into the main, and sew them together.  Genius!  I had to save the hemming for last since I wasn't sure what my actual final length was.  (Each piece was cut a different length due to fabric shortage!)


The funny edge on the pattern pieces creates this stark angle


Funny edge on the bottom pieces, difficult to line up as well, necessary for shape??


You can see here that it hits at my actual waist, which I find very unflattering.


My issues with this skirt:
1. The waistband, ugh, I mean, if I had made a size bigger, it would sit lower, and might be better.  If the waistband were half as wide it would be bigger.  If the waistband were curved it might look better.  But as it is, this skirt, out of 2, is in place number 2 behind the horses.  I suspect when I wear it in real life it will ride up and I will be tugging it down forever.

2. What's up with the 5/8 inch angled seam allowances?  They were difficult to sew, and they mean that the skirt has a funny bend at that spot.  I feel like this is bad drafting, or like, overdrafting somehow - it gives the impression of being well-thought out, while actually being worse for the final result.  But I don't know enough about this stuff - is that necessary for the A-line shape of the shirt?

Anyway an easy project and I do like it.  It will need to be worn for me to determine how much, though.  One option would be to make it without the waistband.  Still a few skirts to go before I pick a grand prize winner...

Thursday, 26 March 2015

Merchant & Mills Camber Set

Ah, who doesn't fall in love browsing Merchant & Mills website?
Had to give this a try.  Not too many reviews online though.  Now that I browse them again after the fact, I suspect I could have approached this pattern with something resembling a...MUSLIN!!  It is cut super narrow in the shoulders.

Size 10: based on my bust measurement.  I was annoyed that there are no final measurements available.
Fabric: double gauze by Kokka, found in Berlin.  Great to sew, ungreat to unpick.  Disintegrates like mad when it's not staystitched.
Length: hacked off about 6'' from the pattern length.  (I cut at the final tick mark.)

Opinion: No trouble with the burrito neck instructions except at one spot right at the middle, where you really need to sew only up to a certain point on the center shoulder.  Hence the unpicking.  If you do it wrong, the front doesn't line up with the back at the shoulder quite right. I ironed a lot to get things to behave and I was fairly satisfied overall.

Here at the intersection of the arm and the body is this persistent sleeve fit problem of mine.  I don't know how to fix it.  Some suggestion is that I need to actually bring the armscye closer to my body, but my range of motion is already terrible in this dress.


sorry I didn't get a better back picture.  It does hang straight.


Final opinion: Hm.  Shapeless sack.  If I took a direct 2'' chunk out of the middle of the front, the dress fits better.  Also, the shoulders.  Terrible shoulders.  They have a stupid pouf behind my shoulder, they restrict my movement, they look too narrow...I'm wishing for a fairy godmother to appear and tell me what I need to DO to fix the shoulder, but this is what I suspect would help:

-1'' shoulder widening
-and I think this is time for the forward shoulder manipulation.  By moving that high point of the shoulder forward, I would regain movement and would have height where I need it.  Although I believe you can also just remove that excess fabric.  It is my least favourite feature of shoulders...gathering! puffiness! uck.

Plus:
-I would take that 2'' straight out of the front.  Lower the front neckline to compensate, it is quite high.

I am dissuaded from doing this because of the two piece back!  There is a chance I will come back to it as I am determined to eventually find the perfect shift dress pattern.
The photos don't look as bad as I feel, but this one is still probably looking for a new home.


Saturday, 21 March 2015

Deer and Doe Sureau

Impatient for the Cinnamone to come out but it has been delayed until fall.  Instead, I combed the Deer and Doe website wondering what else I could make. I love my Belladones and I suspect that Deer and Doe drafts for exactly my body shape.

The Sureau really didn't initially stick on my radar, and only recently I realised that it has *fake buttons!*  Score!  No button placket after all! They always gape on me, another reason I don't own any button up shirts.  The idea of the Sureau grew on me.  The black bird fabric from Atelier Brunette has been hoarded since last summer and it was time for it to become something that I had a low chance of messing up on.

I cut a 38, which I used for the Belladones as well.  I found the instructions straightforward and the process simple.  Even the gathering went along without a hitch.  I had been debating making various shoulder and sleeve changes, but based on how well I suspected this would fit, plus a quick measure of the shoulder width, I was convinced to make no changes at all.  I sewed the top 2'' of the zipper side seam ahead of time, and although that isn't usual for an invisible zip, it worked super well and meant my waist seam needed no help lining up.  The facing is well attached at the sleeves, and doesn't flap around.  I finished the innards with a zig zag.  I would have loved to like, bias bind them or something, but the cotton is quite light, almost voile, and that seemed like overkill.  I did one crazy thing though.  The seam allowances of the front placket, once it's sewn in, overlapped. I hand sewed one over the other for a clean finish, and then I hand sewed the flappy front facing down to that.  The front facing really needs to be held down because at that one key spot - the center front - there are something like 5 layers of fabric.


Black really doesn't photograph well!


Sorry, gratuitous photo of my hair which I have just cut off.

In the mirror it almost looks like the back is too wide, but I can't see any obvious wrinkles.


Pros: Easy.  I really like it.  I think the black gives it a touch of serious to undo the girly factor of the front gathers.  I even left it the normal length.

Cons: This feels to me like a dress that looks homemade.  Also, should I be a DD cup to fill the gathers??  They look kind of empty and I'm not sure it's just me.  When I look in the mirror the back side sticks out way a lot because it's gathered...but in the photos it looks ok.

Final word: I love it anyway.  But I'm not going to make four more. 

Thursday, 19 March 2015

Waffle Dropje in flannel and fleece

After making my friend a Dropje vest I was envious, but I had a sea of ideas involving quilting or interlining, and I couldn't come up with something that sounded manageable.

Finally I realised that what I so coveted was the fleecy vest interior!  I felt overwhelmed at trying to quilt something, and I wanted the details of the vest to stand on their own.  The tweed that I was thinking of for the outside just didn't seem right.  So I decided to use the soft flannel (initially the lining) as the exterior instead, and picked up some thick black fleece in Chur for an absurd 30 franks per meter.  Sewing with fleece had some unexpected perks...like cleaning my flat top to bottom three times to collect the Black-Plague of fleece particles that escaped and stuck to every surface...

I decided to make a size 36, instead of 38 according to the size chart, because the 34 fit me ok (taking into consideration that it was very stretchy fabric).  I shortened the 36 about 2 inches and used the belt waistband piece from the 34 which was slightly shorter.  To line it I: made two copies (excluding interior pockets) and then sewed the hood together, followed by the zipper, and this time I did sew the armholes together as well instead of using a facing.  The hem facing covers up the lining and I top stitched that down.  Unfortunately I got very excited during the process and so I didn't understitch the hood.  I also naturally sewed the first armhole wrong and got a möbius strip that I had to undo.


As I mentioned with the first version of this vest, the instructions are truly a joy!  

End result: I still feel like the shoulders are too narrow cut, and the front is baggy in a way that doesn't please me.  To avoid the front bagginess I would have needed thinner materials and to cut a smaller size again.  The vest is cozy as desired and leaves me with good range of motion.


Sunday, 1 March 2015

Burda 8237 miniskirt

 This is such an easy skirt pattern that anyone could presumably draft it themselves (but we don't want to!)  It has two back darts and an inside waist facing.  I cut the lining exactly like the main skirt, then basted the lining and the facing together.  I applied them to the skirt as one, and then folded the bottom facing edge in and sewed that down.  It makes it look almost like it has a waistband.  I finished the zip by sewing the lining to the zip tape in the seam allowance and for once my zip sits nicely at the bottom. Must be...my new sewing machine!  Maybe I will talk more about that some other time.

When I assessed my theoretical size on the chart (12) and measured the pattern piece (waist 30! 3 inches of ease, crazy people.) I decided to cut that size anyway so that the skirt would hang just above my hips, and it does.  It is perfect.  The back waistband is curved and the front waistband is flat, so for me that evades the whole swayback issue.  I did not change the length at all, although by wearing it lower it's de facto a touch longer.  I'm 165 cm so keep in mind that this is a MINIskirt for sure on people with longer legs. 

I finally have my sewing groove back after being sick and making boring projects from last year.  I have absolutely no need for a skirt with racing horses on it.  I love it!!  I also am wildly in love with Steel & Cotton, the fabric company.  I'm not sure how I've gotten brainwashed to be in love with fabric companies, but I also stalk Art Gallery fabrics, and I am so so so sad that I can't access any of their pretty fabrics in person.  I have finally started very slowly buying a few things on etsy.  It's frustrating to do without seeing it, but even with extortionate shipping to Switzerland (really, does it cost $20 to ship 2 meters of fabric??), it's cheaper than trying to source here.  (a meter of Art Gallery knit was selling for 35 franks in the shop.)

But anyway, I got these horses in 1000 Stoffe in Berlin.  The shop was small but amazing and I had a delightful chat with the girl who works there.  I fell in love with this fabric immediately and knew it was fated to be this skirt.

The lining is silk charmeuse.  Live a little...it makes my skirt feel expensive.  It's from the garment district in LA, when I cleverly bought about 5 meters of totally useless colours that I now have lying around.


Wednesday, 25 February 2015

By Hand London Anna, version 4

With version 4 I think I'm finally tired of working on Anna.  This version was supposed to be the summary of everything I learnt: V-neck is better, size 6/10 is better, lined is better, and short is better.  Plus pockets!

Fabric: silk-cotton blend from emmaonesock, lined with Bemberg.
Zip: too short, more on that later.
Technique: Did everything for each bodice, then sewed the neck and sleeves together.  Understitched, and the pulled it through, and sewed the sides shut.  I added the skirts after that, then the zip using the Cambie method of applying it to the outside, then sewing the lining to the zip tape in between the layers.

Honestly, it was a straightforward make...

The caveats:
-The lining changes the way the sleeves and neck drape.
-Because of the lining, I forgot to take that v-chunk out of the middle back, and so it slides off my (broad) shoulders in an unflattering way. I look like a pear!
-I didn't make any attempt at pattern matching and I'm disappointed in the results. 

I have made this so many times but I was never able to assess whether I just simply *liked the style.*  I do like the pleats in the bodice, but I think a big part of my trouble fitting the dress is that I hate how tight it is on the upper abdomen in order to create this effect.  I guess that's an area I don't like to have emphasised.  My first Anna was the most creative, and in some ways still my favourite even though I couldn't breathe in it.  (I gave it away, and sort of wish I hadn't. Who cares about breathing?)  The third Anna, my first v-neck, was the one that fit the best but I gave it away when I moved because I was too lazy to cut the skirt off.  The length was too much for me.  (Hm, sort of wish I kept that too, sigh.)

Sorry for photo overload, I tried to get some with hands in pockets and some without, but I look like a zombie despite my best efforts. 


As for the zip: I just happened to choose the shorter instead of the longer zip.  It goes about 2 inches past the waist seam.  Because of it I can barely get into the dress, it gets hung up on my shoulders.  I'm still trying to debate whether to fix it or give it away.

This project has made me think about the comparative joys of sewing things I planned a year ago (when I could have worn this dress) versus now (when I am unlikely to keep things I don't need due to space constraints.)  The projects planned awhile ago don't have much sense now, and as a result I don't put the same effort into them.  I tend to assign a pattern to a fabric and then write it in a list, where it becomes fixed - lately I've been attempting to undo the list and reflect on whether I actually want the item that might result - and take things off the list if the answer is no.

Saturday, 21 February 2015

Marlborough Bra by Orange Lingerie

I'm on the lingerie bandwagon.  I don't wear normal clothes at work (ugh, white scrubs!) and it's a bit depressing to give away nearly everything I sew lately.  My sewing projects have been things I thought up ages ago, or things I'm making for other people.  I'm finally at the crossroads when I'm starting to plan new interesting things that are more relevant, and the underlayers are a nice part of that!

I read Demystifying Bra Fitting & Construction and bought a few kits to make this less confusing.  I referred to nearly every one of Anne's posts.  She is so detailed and helpful.  Seeing her bras improve over the past few months has made them feel achievable.

I did as required by the book, and made my own bridge - the center piece between the cups.  I wonder if I overdid it and made it too small.  I wasn't sure what size to go by.  My usual bras are 32C, occasionally 32D.  Instructions say to measure the difference between your high bust and your bust and go by the difference.  My high bust is about 2 inches bigger than my bust.  Nobody says what to do in this case.  It's due to muscles, I guess, but it seems mystifying that no patterns ever mention it.  I decided to do a 32C and see what would happen.  I used a makebra kit, because Anne recommended them and recommended the foam.  I hate foam bras but I thought it was still helpful since I had no clue which fabric was best where. I was also amazed how well the foam compresses when you sew the seam allowances down.  (It didn't make me like the foam.)  

It comes together very fast.  I used wires from spitzenparadies webshop. I got two of their bra kits as well. I bought one set of every underwire that had similar measurements to my current bra wires.  I ended up with a huge variety, many of which clearly are wrong.  Presumably once you find the right wire you can get a bunch of the same size.


Stitching the seam allowances down made a big difference in the appearance of the cups

You can see on the left seam how nicely the foam compresses


This bra was completely a muslin because I couldn't assess whether the size was right.  You really can't tell until you put the wires in and that's the last step.  It fits!  Next step is to make one that I will wear and see how it feels.  I'm not going to use foam, that's for sure.  I'm curious how different it will be.