Thursday, 9 July 2020

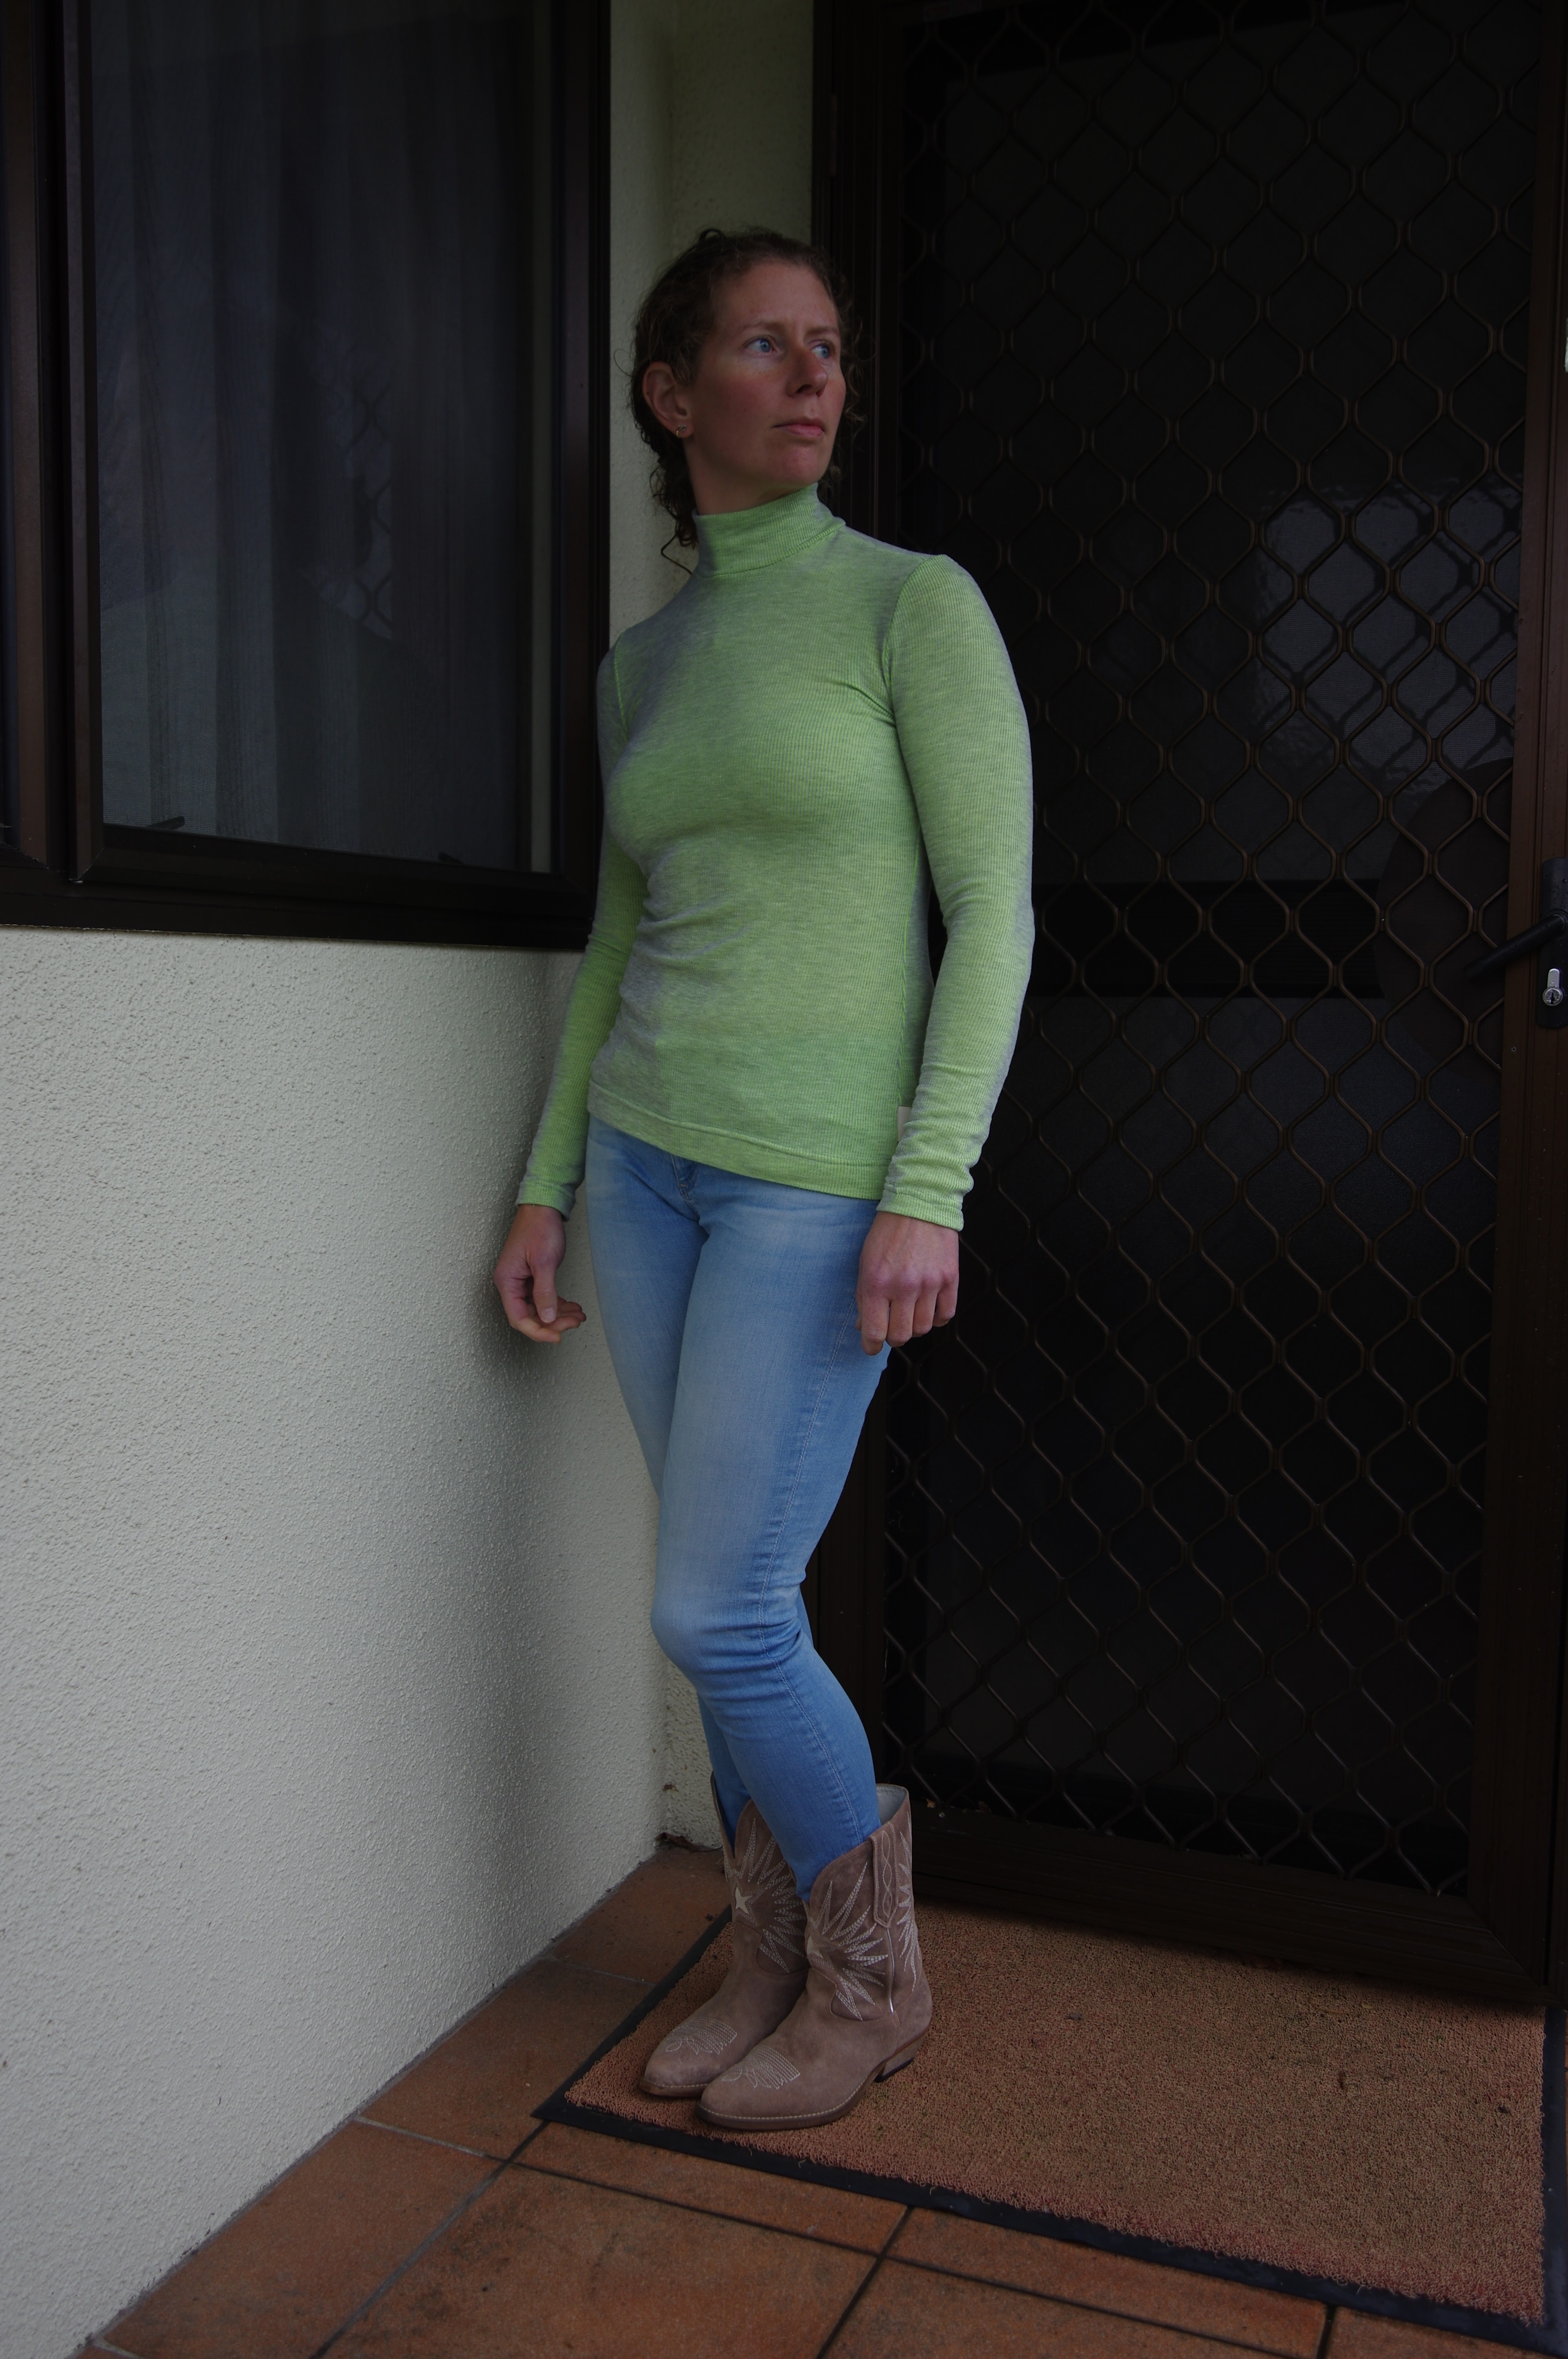
Nikko top by True Bias

I have known about the True Bias Nikko top/dress without wanting to make it for a long time.  Winter did it to me, I wanted a high neck!!! 

This simple appearing pattern actually has a different draft for the top and the dress.  It ends up being a HUGE pattern and I'm really glad for A0.  People comment that the dress is looser in comparison with the top.

I started out making size 2 in the sleeveless top.  That matches my measurements except at the hip where it's narrower than I am.  I noted from a few blogs that it is pretty fitted but I was curious just how fitted.  The answer: very.  I won't make size 2 again, but this will be a fine baselayer.  I didn't really like the way the armholes were done so I just put on normal bindings and they were good.  However, I was hunting for a better solution. 


Moved onto the sleeveless size 4.  I liked normal bindings ok but I didn't feel like they were great, but to avoid the issue altogether I made this in two layers of what I thought was see through merino.  The two layers make it a formidable weight though and when I wore it on the south island despite freezing temps I was really warm.  Unfortunately, two layers ends up gaping at the front armscye after a few hours of wear.  It needs something on the armhole to really help maintain shape.  I gave up thinking about this and moved on to....


...a sleeved size 4. This fabric is greenish on one side and grey green rib on the other.  I liked the green but ended up with grey out because I thought it almost created a holographic effect I couldn't resist.  This rib, however, is not stretchy as real rib knits are.  This is a super fitted top!  I finally, after literally 5 months of procrastination, plugged in the brand new coverstitch machine and did the hems on this properly.  Sort of properly.  Learning curve in action.


The Nikko instructions do note you should use a *very* stretchy knit.  My size 2, oatmeal coloured fabric is the stretchiest I used and the fit is almost the same as the size 4 in merino.  I think overall the 4 fits better.  

I lost momentum at this point and didn't make the dress.  I think that as long as it really does have more ease, and I'm using very stretchy knits, the size 4 dress is ok but I would debate cutting the back a size 6 from the waist to hips.  Since it's very cold outside this dress has no appeal at all and I will save the plans for spring.  I have some fabric I'm keen to use so I do think I'll come back to it - also after making another relatively narrow skirted dress I am teasing with the idea.  The weird logic of life means I am making all these dresses in the middle of winter and I guess by midsummer I will know if I like them. 

Tuesday, 7 July 2020

Another Deer & Doe Nenuphar + Balinese vintage handwoven fabric

This is a length of fabric purchased in Bali a few years ago.  I knew immediately that I wanted to do something pretty special with it.  This type of fabric is narrow, woven on hand looms, and the piece I chose is quite old.  The shopowner was loathe to sell it, in fact, and did point out the holes.  It was sold to me as a tube hand sewn together, with indeed a number of holes and worn areas.  The quality of the fabric was obviously much better than some of the newer pieces.  I believe that these weaving skills are being lost as they were village traditions which are not being passed on to new generations.  

The challenges I considered: 
-the holes, obviously
-better not be an item that will be damaged or need to be washed too frequently
-not a lot of yardage 

I chose the Nenuphar pretty early on, but wanted to do a muslin first (which is here).  The fit of the muslin was perfect so I didn't need to make any pattern adjustments.  

The other caveat is that I decided to fully underline it to support the fabric.  AND I wanted the collar in a matching fabric.  I decided that the ruffle at the bottom should also be a matching fabric.  My first attempt to get matching fabrics totally failed and it was another year before I had success, as I kept forgetting to take my scrap with me to match. 

The underlining is lightweight cotton-silk, and the supporting fabric is heavier but also a cotton-silk.  The back ruffle is doubled, though I was meaning for the top layer to be higher, I didn't realise how high the hem would go and I had to hand sew the hem so I wouldn't accidentally also eat the second layer of ruffle. So it's hard to tell there are two!

I also hand sewed the collar down.  I'm thankful to Alabama Chanin for making this into a normal seeming process instead of an exception.  It's also really nice to have the control that hand sewing gives - invisible stitches, plus everything is exactly where you want it! 


I'm really pleased with the final product. The two layers give it a surprising amount of heft.  I couldn't quite pattern match both pockets so I tried to just go with the theme on the second pocket and it's nearly as invisible as the first. For larger holes, I stitched over them together with the underlining for support.  I feel like I achieved my goal at respecting the origins of this amazing fabric, while creating a wearable garment. 

Monday, 6 July 2020

So sew easy In a twist dress hack


During me made May I saw a hack of this dress on Instagram, @katrynarae. She blogs at Boots and Cats. Here is her post about this dress.  

I was immediately in love and wanted to copy it straightaway.  I didn't realise that it would require a lot of different moving parts...I read her blog post a few times and mainly got the point that I would put together the tshirt part of Plantain with this dress. Seemed easy enough.  I neglected to think about how she had a lot of trouble doing all this!

The pattern for the dress is here: https://so-sew-easy.com/twist-front-dress-pattern/

I would never have considered this pattern.  I don't like it.  The tank top cut and the length don't appeal, and the website makes me suspect you're getting a low quality product because it's full of ads.  I did have to pay money to get this pattern.  

I was not at all impressed with the pattern.  Considering that I did pay money for it, I expect a PDF to be relatively painless to put together.  A painless pdf has a marked line at the border of the pattern, showing you were each piece ends and where the overlap is.  A painful pdf has no such lines.  This pdf didn't provide any edges so I had to literally tetris edges together, cutting at the edge of the marked lines to approximate pages.  It took about 2 hours instead of 15 minutes.  I would not recommend this pattern. I now see there are knot front tutorials and I think it would be more educational and less painful to do it yourself.  

I cut a size 2 based on the size chart but sized up to a 3 on the back piece only below the waist.  This was good and matched my plantain size ok.  (I use size 36 in Deer & Doe most of the time.)  

I did possibly overthink things.  The dress had a 1/4" SA and the plantain had a 5/8" SA so I took off the tshirt SA before I overlapped them. (I'm not sure it mattered since I was using the plantain above the waist in its entirety.) I matched them at the underarm, then using only the plantain above that, as well as the shape of the plantain until it matched the dress which was halfway to the waist.  

This year I am trying harder to use fabrics I've hoarded, so out came these lemons which are precious to me.  

The instructions were ok. I think I have already stated how much I passionately hate instructions which consist of colour photographs so I don't need to dwell.  I find the knot part unsatisfying because it leaves a lot of edges raw.  There's a triangle to the right of the knot which, when I wear it, makes me feel like I have a belly pooch.  Overall the dress is really interesting, it's longer than I usually wear, fits perfectly well, and looks good.  I also went ahead and used my new and terrifying coverseamer on the sleeves and hems so although they are not perfect, they are STRETCHY!!


Droopy triangle visible on the left here


The result: might take a full summer of wear to get a verdict but I'm glad I made this and I will probably never do it again.  Not everything deserves a muslin.  Also I was reminded how awesome the Plantain is and how I should do frankendresses more often. 

Sunday, 5 July 2020

Elizabeth Suzann Florence pants

As she is winding down her business Elizabeth Suzann has decided to make the patterns of her products available for free. (Fuck Capitalism!) This is with the help of @minimalistmachinist, @mombasics and @thestoryclubpdx. You can get the patterns via a link on the @minimalistmachinist instagram page.  An accompanying request is to make a donation to an indigenous rights or black rights group. 

The patterns are being made into pdfs and at present are available as 36" wide which you can print as A4 tiles by selecting the "poster" option to print.  I sent them to my printer who turned them sideways on A0 pages.  I know this is all a work in progress and may change, I think A0 will be available too.

Elizabeth Suzann's website is still up with the models wearing all the clothes, so that's how I selected my sizes for everything.

I started with the Florence pants because who can resist this amazing advertisement:

Also I had the perfect fabric: a slightly textured tencel rayon from Miss Maude.  It's available in other colourways here

I cut a size S short.  It fit neatly on 1.5 metre of fabric. The pattern is easy to understand without instructions. Seam allowances are the outer line for each size and the inner line is the sewing line.  My printer used colour to print, and that makes a HUGE difference as they were identifiable by colour.  It might be hard to differentiate all the lines on grey scale. 

I measured the hem: 2.5" so a 1/2" fold up then a 2" hem.
The waistband accommodates a 2" elastic.
I just finished the waistband before folding it over, sewed it down with a back gap and inserted the elastic. 

A very easy sew. 

Results:


Above my navel though I have so much crotch room I could hitch them to my ribs...


The fit is not as gathered as the model.  Thus I could have sized up to an M for more drapiness.  The crotch is excessively low. I forgot to get a picture with my legs actually in a walking stance, but there are about 3" hanging down in my crotch - fine in the summer for lounging and oddly fetching in my pictures, but a pain when trying to do anything.  I had fixed this before starting on the Free Range Slacks, and in fact the patterns feel very similar in terms of fit.  So I would probably remove about 2" from the rise if I repeat this pattern.  If I hitch the pants up to my ribs the problem is somewhat improved though I suppose I probably need a more curvy crotch curve as well, I don't really have much instinct on that yet. 

Also you know these ARE the short pattern.  But I am apparently shorter even than that.  To get the effect on the model I need to raise them another 2 inches, I think. (Might help to adjust the crotch as they would sit higher.)

These were exciting to make!  I have no idea why getting a pattern from a designer is so exciting, but it is.  Hope my notes help lots more people make swishy and awesome pants.

Tuesday, 9 June 2020

Ginger jeans - midrise - review

How many years have I been planning to make these jeans?
Rhetorical question.
We finally got here. I had the pattern for ages but didn't want to cut it up while I was uncertain about the fit and the high waist, so when the mid-waist version came out I bought the PDF.  I made this mid-waist version, which on me is high waisted.

I debated sizes for a long while.
6 on the chart, 4 if you only go by the waist.
Recommendation is to size down.

I had a play with my corduroy.  It's very stretchy.  So I made the size 2.  I'm not even sure how this made logical sense.  The waist size of the 2 is 25, which is about an inch smaller than my waist, but the hips are 34 and mine are 37.  Spoiler: it worked.  I did a cheater wide calf by just widening the calf pattern on the back piece as I cut, ending up at the hem with the normal width.  I didn't do a knock knee/valgus knee adjustment, which I think I could do in jeans and never bother with.

Corduroy was splendid.  I didn't have to do any visible topstitching and that was my goal.  Before COVID I could have snuck these in as work pants (I'm an ER doctor) but now we have to launder our scrubs at work.  Darn! 

I was irritated by the instructions.  There is one error in the pattern, and I know it's been mentioned - it shows the wrong side up of one of the fly pieces I think.  My irritation is that the words in the instructions were not chosen well and were unclear.  In order to understand this fly method I HAD to use the sewalong.  When you use it, you have all the info and it's clearer.  I thought that a print pattern should have everything you need in the pattern, it shouldn't be a requirement to use a sewalong to get a basic understanding of what the pattern wants you to do. 

I really didn't like these fly instructions.  However, I think in the end the fly looks great on the outside.  I don't love the inside quite as much.  I need to do this type of fly more and see if I start to like it as I get used to it. 


Unlike most people I absolutely *hate* the pocket stay.  I didn't expect that.  My corduroy is possibly more stretchy than jeans fabric and the pocket stay is quilting cotton, so the front of my pants have wrinkles horizontally due to how the fabric wants to stretch and can't. I think the pocket stay totally takes away from the comfort and fit of stretchy pants.  To each their own!  I know lladybird switched hers to normal pockets so I'm hoping I'll be able to figure out how to do that easily enough.  I definitely will switch on my next version.  Those pocket stays made it hard to sew the front, because of how the very stretchy outer wanted to stretch, and the inner couldn't.  So I had to be really cautious as I sewed that I didn't end up with wrinkles. 

I didn't have enough corduroy to use it as the waistband lining and my inner waistband is really really stretchy.  Like, I should have used heavier interfacing.  I don't even remember if I interfaced it.  I should have.  The waistband feels loose and a little floppy to me instead of feeling stable.  Ironically it's a tiny bit too big!  I didn't take it in at all, it's not too bad.


In the end, after some usual buttonhole catastrophe torture, I have a pair of pants that fit amazingly well and I love them.  I think there's a weird extra-fabric thing going on in the front and I'm hopeful it's due to that pocket stay imbalance.  My next pair will be jean fabric and I suspect they will be tighter, so it'll be interesting to compare. 

I thus agree with everyone: Ginger jeans are great. Use the sewalong. And size down. If you are using really stretchy fabric size down even more.