Friday, 22 November 2013

Sewaholic Alma

This was a pending project for quite awhile.  I finally figured I should stop dithering as it was a very very quick piece to make.  I wasn't interested in any details - just wanted a nice shell top.  It came together in about 2 hours, although that's because I didn't have to put in the zip (more on that in a second.)
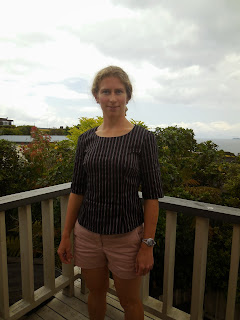


My fabric was a cotton with lycra - quite a bit of stretch, that I got as a remainder.
I didn't do any belt or neckline decoration.
In fact, now that I've figured out how to properly understitch, my facings stayed in place pretty well.  However I would totally be keen to do this in a lighter weight fabric with some self bias tape.

I cut a size 4 and didn't taper at the hips.  I thought a bit of flare would be quite nice on this piece.  I shortened it by 1 inch at the waist, and added 1 inch width at the shoulders.  I think I'm getting the hang of the basic changes that suit me.  As a reference, I'm short (5'4") and square, about 34 1/2, 27, 37 and with abnormally wide shoulders.  This top isn't form fitting.  I'd probably use the same size for a material without stretch, but in a stretch fabric I could take out some at the seams (but then I'd need that zip.)

The construction was simple and I just pinked the seams, so it was very quick.  As it got time to put in the zip, I discovered something unexpected - I did a Taracat!!  She is renowned for never needing zips, but because of my wide shoulders and weird in-dress claustrophobia (I have been stuck in things!  Seriously!)  I never expected it to happen to me.  That was extra delightful and probably took an hour off construction.  I am still putting off learning how to use my new invisible zip foot.

The shaped hem is a particularly nice design feature.  I'm extra happy for my Polly top now, because the instructions for the Polly are very detailed regarding these shaped hems.  They have you make a line of stitching (I used 1/4" here) and then trim all the curves after you iron that up at the stitch line.  It's simple then to just fold it over one more time, making a perfect curving hem.  Otherwise I think I would have made a mess of it. 

Tuesday, 19 November 2013

Vogue 8784 - the wrap dress everyone is "about to do"

So I usually try to get some idea ahead of time about my projects by looking online.  With this one I was stymied, because everyone seems to have written in their blogs, as of December 2012, that they were *about* to do this dress!  Any minute now!  But only about 4 finished reviews, and only one or two with detailed information.

Since I was planning to use a Liberty lawn, I didn't want to mess it up!  Also it takes huge amounts of fabric.  My lining was supposed to be bemberg, which I got from MacCulloch & Wallace.  But it has a funny feel to it.  Anyway I didn't have any other white lining so I still used it.  I don't know those tests to do to figure out what a fabric is, but my Bemberg from Mood drapes like silk, whereas this stuff had a funny wrinkle to it.  When I look at it against the light it has lines in it like a waterproof nylon lining would.  Shrug. 

Before hemming, close up view

After hemming.  Sorry, tights not so flattering.  And I'm not even going to start wondering if my hem is straight.


Overall I think this pattern proves I have graduated from beginner's school.  It' s a Very Easy Vogue, and it felt easy!  I still made dumb mistakes but they were more from lack of attention, rather than lack of knowledge.  And it's the most beautifully finished dress ever since I actually did hand slipstitch the lining together at the waist.  Of course the hem was annoying since my lining was partly cut on the bias and sagged in some spots, making it longer than the dress...I had to debate for days to figure out how to deal with this.  I ended up hemming the dress, then opening the side seams a bit, cutting about 4 inches off the lining and hemming it again.  Also I had forgotten to finish the skirt seams since it was lined - the lining is free of the skirt so I should have done all the finishing prior to attaching them.  Lately it seems like the finishing steps take me longer than the sewing-together steps of most of my projects!  But those finishing steps are the ones that give an item its longevity -finishing seams and making sure no loose bits are hanging out.  (I still often have lots of those!)

The size 10 fits well enough, but I am pretty sure a size 8 would have also fit fine.  Once I am wearing the dress I feel like I'm strangling my waist trying to get the neckline tighter.  This is actually a great wrap dress for larger busted girls because it has excellent frontal overlap and it has pleats (a la BHL Anna!) so there is lots of booby room (even too much for me, and some weird fact of bra physics calls me a 32D). I didn't make any changes to the pattern.   I think it's relieved some of my panic about using Liberty fabrics, too!  I would definitely make this again, maybe updating it a bit by cutting it 3 inches shorter and using the size 8.

Friday, 15 November 2013

Papercut Patterns Constellation Collection!

If you haven't heard of Papercut patterns, now is the time to discover them.  Katie designs unique and quirky patterns and the pattern instructions are fun and straightforward.  Also, with lladybird Lauren running the website, it's been invigorated with new activity and a sew-along.  I have so far made the Undercover Hood twice and have three more lying on the floor (mostly for other people!).  I also have about three other Papercut patterns in my queue...

But there is a new collection, and it is fabulous!!  If you haven't spied anything from the Constellation Collection, go look!  They are on sale now, but I believe the sale ends today. 

My particular favourites of the moment are:

The Saiph Tunic.
Could this be colorblocked in green and blue silk?  Hm...I'm thinking a sleeveless version for summer.

and the Sigma Dress.
I'm already imagining a silk version with this scary expensive Roberto Cavalli silk that I got.  Or a Liberty print!  But for a trial run, hm...must sort my scraps.

I'm off to daydream!  I really have too many projects lined up and only about 2 months left in New Zealand to get them done, but I couldn't resist ordering these straightaway.  It protects the environment, right?  I'm only having them shipped in New Zealand instead of to a far-off country!!

Wednesday, 13 November 2013

Colette Sorbetto

This is a quick and easy make.  It's a 2 piece pattern and the most time consuming part is applying bias binding.  I cut a size 4, which seems to be my size in the other Colette patterns I have seen, and it fit well.  And I did french seams on the sides to have a clean finish!


I made this in one evening out of a very flowery Liberty fabric.  I'm not totally sold on this fabric...but I do like the shirt.  As part of my Fall/Spring essentials sewalong, it fits the bill - I can see it as a go-to when I want something light to wear.

  I got to play photo shoot in Napier while a friend was visiting me.  (We went biking along the ocean.)  It's nice to have friends around to take the pictures...


Monday, 11 November 2013

V-neck Sewaholic Renfrew

To start out, I widened the shoulders 1 inch.  I cut 1 inch off the final length (I had taken 2 inches off the previous Renfrew and kept trying to yank it down a bit, so....)


The v-neck was a bit challenging but super fun!  Hah!  Everything is fun after the Minoru : )  I was pretty pleased how my v turned out, it's about 1 mm off centre and it is mostly obvious when I look down.  Also my sewing machine isn't too fond of the very very stretchy knit and it seemed like I had to pull the fabric through the machine, and lengthen my stitch length a lot so it didn't snaggle up in the feed dogs.  I was using the ball point needle and I did wonder if I should give that stretch needle a try.

This fabric was much looser than the blue cotton.  Because of that I think all my changes were unnecessary...I really should have left the length a bit shorter.  The wide vneck totally compensated for my shoulders.  If I do this again I will probably leave off the sleeve and bottom bindings for a more normal tshirt look.  But it's still fabulous!  I made my own tshirts : )

Tuesday, 5 November 2013

My Sewaholic Minoru - out in nature

Took a long time to cut this one out!  Mental preparation, too.  Even halfway through sewing, I wasn't sure I was ever going to finish!  It felt like a very unmanageable project, and I think without the sewalong I wouldn't have felt ready to undertake it.  Even with the sewalong, it was difficult.  I can't imagine myself making another one...


I cut a size 4, tapering to a size 0 below the waist, and I took out 2 inches at the waist that meant I didn't have to taper much.  I was initially nervous that it would be too small in the shoulders.  Everyone's Minorus have been quite long and baggy so I went down a size for a pretty tight fit since it's a spring jacket for me.  My measurements would have had me cutting a size 6, and my 6 Lonsdale was spot on.  Because of that, when I sewed the sideseam I basted a 1/4" seam allowance, and that was what I used, then tapering at the waist elastic out to 5/8" (because of the side-seam pockets.)  The raglan sleeves fit my shoulders well in the end, and in fact it's quite loose - I could probably have used the normal seam allowance.

I didn't have any real problems sewing my Minoru until I got to the last few steps.  Between the clear instructions, the clear and helpful sewalong, and the many many comments and reviews already online, I felt well-educated before I began - so much that sometimes I knew about problems but without knowing when or where they might happen (mainly that you end up with unfinished seams inside the collar, that can be visible when the hood is out.  Also, I think some people lined both sides of the collar.)  Putting in the zip was surprisingly straightforward.  My pockets were as long as the jacket but I just sewed them into the hem, which holds them in place.  I should have skipped the second line of stitching on the hem, though, it made the pockets just a tiny bit too small.  They are definitely hand pockets, not safe pockets for wallet/keys.  I only made one inside pocket and used a button to hold it together.  When I got to the cuffs I started to have trouble - maybe I started rushing?  It took three tries and multiple different pinning attempts to get the cuffs sewn in using Tasia's machine method...the first one was soooo twisted and I had to redo it.  Then when I sewed in the ditch, I caught my lining on the other side and had to undo the entire thing.  And tucking the hem into the plackets at the bottom was a bit puzzling.  I don't seem to ever do that well and I always have a few loose unsewn edges hanging around.  They aren't obvious here so I don't care much.

Also how has anyone sewn the hem smoothly?  Since it's a circle, like a dress, I had to accept some overlapping and gathering on the inside when I sewed it down.  I couldn't identify any other way to do it, and the sewalong just blithely assumes it will be perfectly smooth.

It was often a challenge to manipulate so much fabric, and in such thick layers.  My sewing machine is on the short end of a table, and the jacket fell of the side of the table a few times, moving the line of stitches over just enough to be visible.
I have to admit, I'm really relieved this jacket is done with!  It took longer to make than I'm used to (also partly because I was busy!)  I like it a lot and I am happy with the changes I made, but it's not a silhouette that tempts me to make lots more.

The good news: spring is just starting so I finished my jacket in time!!  This is the first of my projects for the Fall Essentials sewalong (which in my case is the Spring-Summer essentials sewalong!). 

Wednesday, 30 October 2013

Fall Essentials Sewalong!

It has taken me awhile to completely make sense of the cool and sort-of group sewing activities out there.  Who starts them?  Who passes along the word?  It also took me ages to figure out how to get the buttons on my blog!  Not to mention joining Flickr and pinterest.  Have I really been that out of touch with technology??

So now that I'm discovering this great new world, I decided it was high time to join the Fall Essentials sewalong, as well as the wrap dress sewalong put on by Miss Dibs.  My fall basics are actually my spring/summer basics and they will be stressed to the hilt since I'm travelling for all of January in hot climes.  So this is a chance to make basics that I want to travel with, and that will travel well...and not things that hit the op-shop the minute I leave town.  (As have some of my previous not-so-success dresses.)  Not to mention it's a chance to use lots of local merino wool!

-Another Renfrew tshirt.
-Thurlow jeans
-Minoru spring jacket
-Colette Sorbetto tank top (actually, WHY has it taken me so long to get around to this?  I am reminded by how AWESOME everyone else's look!)
-Papercut Coppelia
-Skater dress in merino wool

The first few weeks of November are quite busy for me, but I've already got a couple of these projects well underway so I'm hoping to make it by the end of the month!

Not to mention my two wrap dresses - the Colette Crepe, and Vogue 8784, which seems to be the Vogue dress everyone wanted to make when it came out...and then no-one made! 

Here's to fall (or spring!) sewing together!