Friday, 16 January 2015

Stylearc Sharon Sweat Top

This was a freebie pattern that came when I ordered my Lorie jacket.  It was well timed, because I had been eyeing Stylearc zip-front knit jackets for awhile.

The fabric is merino sweatshirt fabric - I haven't seen anything like it very often.  It's like cotton sweatshirting with the fleecy inside and flat outside, except it's merino!  I got it at The Fabric Store, which I visited in LA.  It was a labor of love because I was in the States to deal with the Black Hole of my luggage and this was bulky stuff to lug back to Europe.  So I was totally fantasising all the way home about this jacket.

It came together slowly partly because I really wanted to do a good job, but also because I was dogged by lack of equipment.  It took awhile to get the main zip and bindings, and I hadn't brought a fabric swatch with me.  Then I had to get the pocket zips...then I ran out of thread...the instructions were crap, as expected, but unexpected too: the instructions refer you to an "in-seam zipper tutorial" which I could not find on the Stylearc website.  I browsed various other sites but couldn't get a straightforward demonstration of putting an inseam zipper into a knit pocket.  I figured it out but I didn't put any interfacing in, which I later regretted.


My friend Joana did the photoshoot in Bern (Urban chic?)  It gives a better sense of the colour, I think, as my camera was doing funny things at home that day.


I got a size 8 as before in Stylearc.  I measured the back length and the shoulder breadth (it's about 14.5") and shortened the sweatshirt by about 2", trying to do it at the same height on the princess seamed side pieces.  The breadth seemed the same as a sweatshirt I have, so I didn't widen it.  Because I hadn't brought a swatch with me, I got heather grey bindings.  I was working on the blue Undercover Sweatshirt at the same time and suddenly decided this would look nicer with self bindings, so I used the Undercover Hood sleeve binding (but the Stylearc pattern's bindings for the bottom and neck.)  I have only recently realised how much stretchier ribbing is, and that might have been nice to have, but I do like everything being the same colour.

Final thoughts:
-zips in the pockets are not beneficial and just weigh the jacket down.  This is partly because I have all riri zips (it's hard to find anything else!) and they are heavy metal.  Plastic zips might be less bothersome. 
-topstitching makes everything look much more professional and it holds the seams down on the inside.
-why is there a facing?  I didn't use it.
-...but if you don't use a facing, how do you finish the inside zipper edge neatly?  (I used two layers of topstitching and zigzagged.)

Despite shortening this sweatshirt, and it does fit fine, and I love it about 92% as much as I hoped, it is still very shapeless.  I know two projects is early to make global judgments, but so far Stylearc seems to be Queen of Shapeless.  I am about to order three more Stylearc patterns...we shall see how they go. 

Tuesday, 6 January 2015

Papercut Undercover not-a-Hoody

This is another basic project.  I learned some neat things though - this was a hoodless version of the Papercut Undercover Hood. It's an XS with no modifications.  I forgot to pinch 1" out of the center front as I had done on the hood versions, and that makes it more baggy and a bit more batwing.  Luckily it's a lounging sweatshirt for a friend and she is curvier than I am so I think it will still work just fine.


My main experiment was with bindings.  I didn't realise until I made this sweatshirt how much stretchier and softer ribbing is compared to using self bindings.  Because I have made this sweatshirt a lot and always done self cuffs, I never had an equal comparison.  The ribbing is honestly so much softer and stretchier, and will make me reconsider using self binding on future projects.  However, I wasn't prepared for that and so I think I could have cut the neck binding a lot shorter.  I cut it about 3" shorter than the neck hole.  I used the pattern piece for the bottom binding and just cut it a bit shorter as well, and I used the pattern piece from the Style Arc Sharon sweatshirt because I was planning to use these cuffs on that sweatshirt and had already cut them out, so this is a shorter arm cuff than the pattern usually has.

I noticed while doing the Style Arc Sharon (blog post soon but it deserves nicer photos so I'm waiting for a camera operator...) how much topstitching added to the appearance of a sweatshirt, so I did lots of topstitching here to make it look nicer.  Added benefit - it holds the seam allowance down on the inside.  I'm still sewing everything with my cheap Singer, which means I straight stitch and then zig zag the seam allowance.  

I wouldn't consider this the perfect raglan sweatshirt quite yet but I will likely tweak a few more versions when tempting knits fall into my hands.  (Ginger has made a nice one.)

Monday, 5 January 2015

Simplicity 7715 Rainjacket (and a bonus Grainline Scout!)


This is one of those creative projects that was so wrong in loads of educational ways...I had the idea of a little hooded rainjacket.  I found this pattern based on my idea (there is this one review of it.)  I knew I would shorten the hem and raise the pockets, but I planned to basically follow the pattern other than that.  However because it's quite loose, I figured I should muslin it, and I did, using a bedsheet.  That wasn't helpful at all.  The real question was whether to line it, and how it would look in coated fabric, and a bedsheet couldn't approximate that. 

I got the idea to make it for a friend as a muslin.  She's smaller than me by about one size, and said she could find a use for a baggy rainjacket.  I got pink Gore-tex-like fabric and wasn't sure what to use as the lining (it ended up being part of another bedsheet.)  When I was browsing blogs ages ago, I came across a post discussing the different types of Gore-tex-like fabric.  I can't find the original post, but the gist was that there is 2-layer and 3-layer.  Two-layer is a layer of nylon on the outside, and a Teflon inner side, which is white and gummy.  Three layer does not have that gummy feel, because the inside has also been treated (or there is a membrane sandwiched between two layers of nylon.)  The 2-layeris what I had, and was reported as being notoriously difficult to work with, because the Teflon sticks to everything and since it is rubber, it also stretches and will lose its shape.  Therefore I can admit I was warned.  


The things that were bad:

1. 70% fail: the fabric.  Sewing coated nylon when it was the pink side (not the Teflon side) up, and when it was against the lining, was not terrible.  Sewing two layers of coated nylon together was terrible.  I made no attempt to avoid all that shirring, because I didn't have the equipment for it, I had no teflon or walking foot.  I found that masking tape didn't help. I occasionally put pins in the seam allowance, which is also a pain because the fabric is rubbery and doesn't accept pins very willingly.

2. 30% fail: the pattern.  It's not a bad pattern, but it's a very oversized, kind of shapeless hooded jacket.  I probably needed to actually shrink the pattern about 6 sizes before it would have matched my hopes.  The finishing touches, which are always the most difficult for me, were done freehand and are particularly bad -- how do you attach the bottom of a separating zip, when the little lower panel of the zip is hard plastic?  My sewing machine needle won't go through it.

The only reason I continued:
I thought despite everything, my friend might still find it hilarious enough to wear.  For a little while, anyway.  The finishing is not very good, especially along the zipper bottom, and so I'm not sure whether the zip will pull loose.  

I lined the body but not the sleeves of the jacket, and folded elastic into the cuffs and hem - I just folded it over and sewed it down.  It's not a very neat job.  The pockets are lined with geometric rayon geometric scraps, which made them easier to sew down to the front of the jacket.  I was considering putting a string into the hood, but I left it out because the hood doesn't seem that deep (I am not sure it's very functional) and my string was too short...

Here, also for my friend, is a bonus Scout.  It's such a relief to make a really simple, easy project!  This is a size 0, and I used store-bought bias binding and french seams.  The only seam I left open is the sleeve attachment, although there is a Grainline tutorial that says you can french seam the armhole the same as the body.  The quilting cotton was easy to work with so I practiced my iron skills by actually using the steam - generally it scares me and I avoid it. 

Sunday, 28 December 2014

Named patterns Ama Cowl Neck Frock

This fabric was a present.  In fact - the first sewing present I've ever gotten, which made it special.  It is a lightweight woven rayon, and was the end of the roll so when I finally got around to cutting it I noticed it was not all on grain.   I wanted to keep the fabric design intact so I hit on the idea of making a maxi dress.  I searched for some options and found a very basic old McCall's pattern, and the Named Ama Cowl neck, which had just come out and had no reviews.  I really liked the racerback of the Ama dress so I settled on that pattern.  I had a number of concerns - whether the armpits would be as loose as they look in the model, and whether the elastic waistband was strictly necessary.


Some Named patterns have seam allowances, and some don't.  I haven't completely figured out which - maybe PDFs don't.  But the need to put seam allowances on my pattern actually delayed the project dramatically, and I left Seattle in September without it done.  I finally started sewing it before a vacation in the States, hoping to wear it in San Diego, but I didn't quite get it done in time (and it rained, so really there wouldn't have been a great chance to wear it!)

I made the Kielo on purpose before this in order to get a feel for Named sizing.  I found it true to my measurements when I cut a 38 for both patterns.  The fabric was a shifty pain.  If I had wanted the stripes to line up perfectly, I needed to cut it on one layer, which I did not do.  It lined up ok, except for one piece - the back!  The pattern places it on the opposite side fold to the front, which means that although I had it lined up perfectly, it was upside down.  I did not have enough fabric to cut another one, and as the main stripe crosses to the front, I decided I didn't care too much. (I can't see it!)

This was easy to put together, however Named has the disadvantage that they try to do some creative things, and they have really terrible translations of the instructions.  The most troublesome step was inserting the shoulder straps into the hexagon and sewing them in the correct orientation, without bits falling out.  I had to do that six times.  I advise heavy pinning and checking of work, or basting, prior to finalising this step, as it also determines the tension and the way the entire dress hangs based on the angle you use when inserting these straps. Next, I didn't understand -at all- what was being said about sewing the lining to the top.  I think you are supposed to sew it inside out and bag the lining.  Instead, I just finished the bottom of the lining and sewed it down, then sewed the elastic tunnel above it.  I did consider without the elastic but I determined that it actually breaks up the design nicely and adds more shape to the dress.

I only made knee high slits as I can't be bothered to make a skirt to go along with this dress.  I cut off about 6'' when I cut out the skirt as I recall Named makes very long patterns. That was exactly right (I am 5'4''.)

I am actually happy with this dress!  I think the challenge is finding a fabric fine and drapey enough - I lined the top with cotton voile, and I don't like how the cowl sits.  I considered sewing it into a pleat, but I just tucked it inside itself instead.  The fit is amazing for wide shoulders, and I am seriously considering making a tank top version for summer.  The dress is also really comfortable, despite the elastic waist. 

Saturday, 27 December 2014

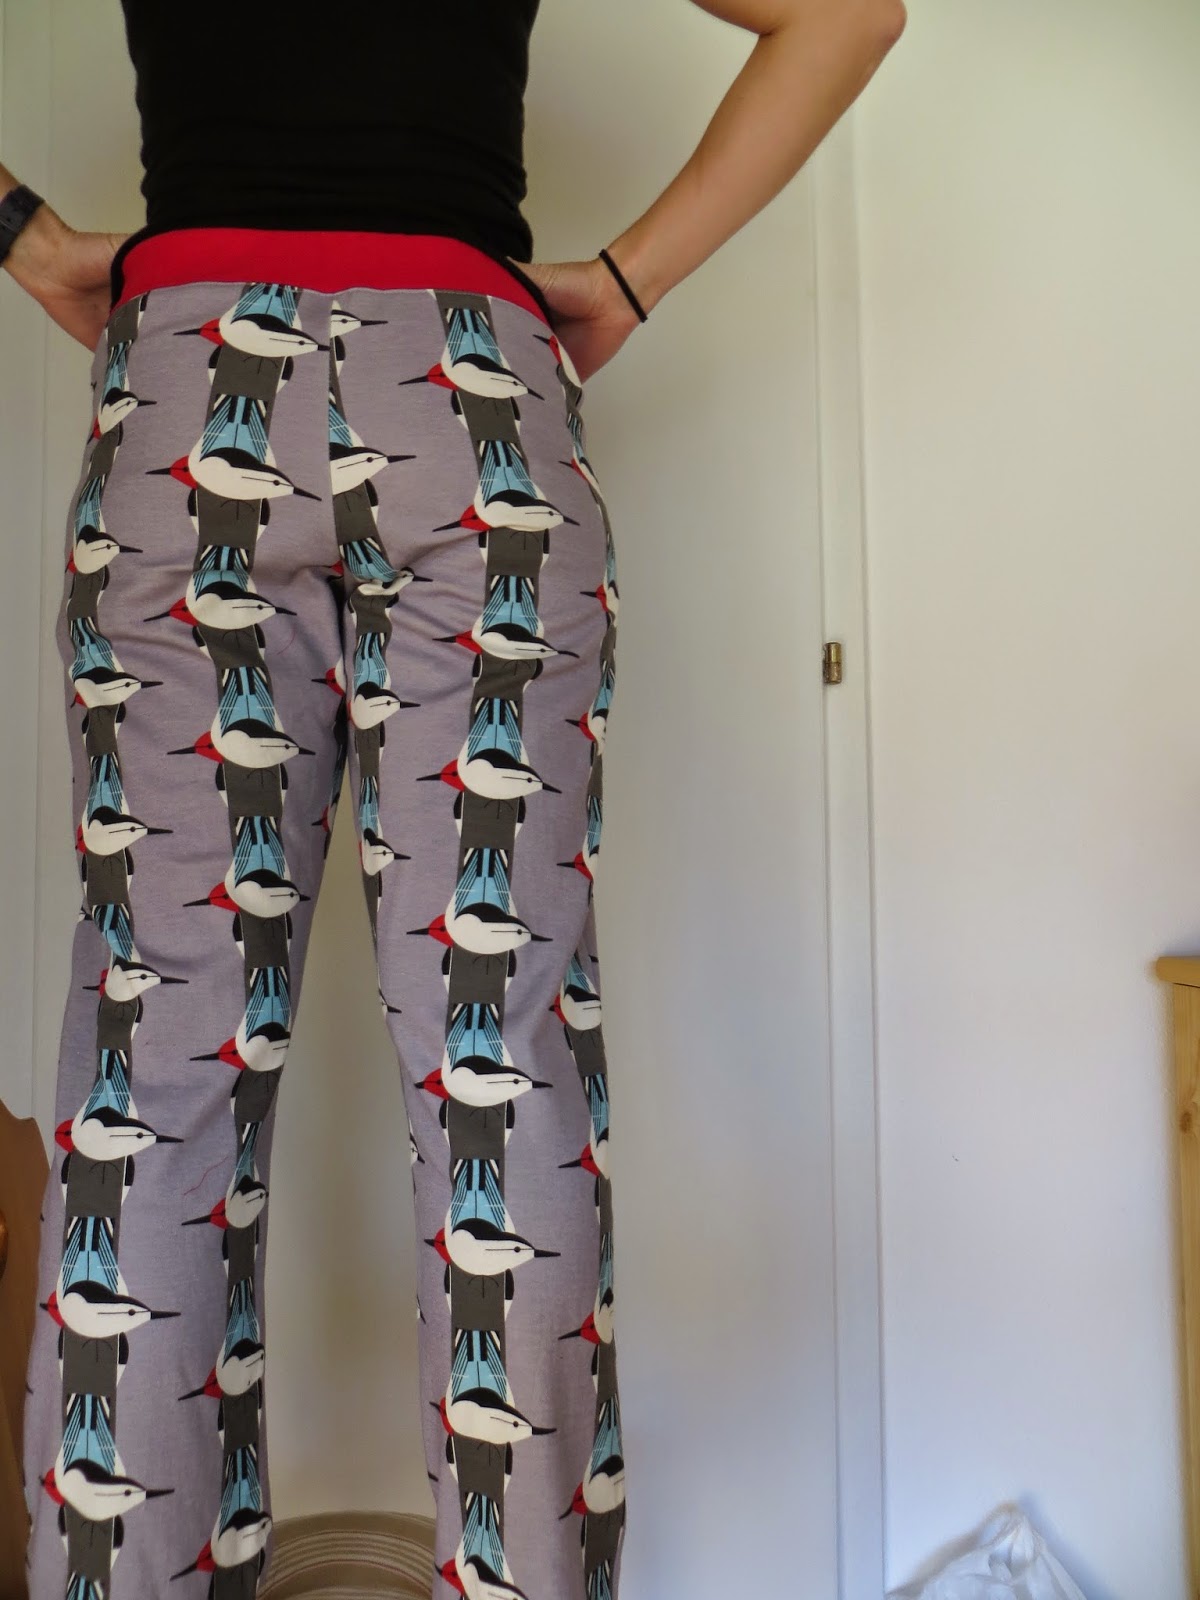
Papercut Anima pants with woodpeckers

I planned this project ages ago.  I modified the pattern:
-XXS
-drew the leg into more of a straight leg (still not enough.)
-omitted pockets and fly.
-cut 1'' off the front waist height by making a 1" wedge at the front center that ended at the seam allowance.

What I forgot was to undo the 3 inches I removed from the pattern last time.  I hastily tried to add it on the bottom (unevenly), but even with the addition of lovely red cuffs, they are a bit short (and the right pants leg, which is my longer leg, is sadly shorter...)  The other thing that I forgot was an embarrassing oversight carried over from July or thereabouts.  I bought a lovely red remnant to use as the waistband...a woven remnant, never realising it would not work.  I applied the waistband using the technique outlined by Kim, and I even sewed the three layers of stitching - it was so pretty!  Then I could not by aaaaaany means get it to stretch enough to attach to the pants.  And I still didn't figure it out!  The next morning I finally realised what I had done wrong, and I bought some red binding to use.  It worked out well because the ersatz waistband worked perfectly as contrast cuffs.


Luckily they turned out acceptable for loungepants.  If there is a next time, I will make them even more wide leg (and of course longer).  But I might make the Tofino woven loungepants instead.  I am kind of bored with the narrow legs on these.

Thursday, 25 December 2014

Victory Chloe

This pattern got on my list while I was in Arizona and I was planning to make it in some rayon that I got from Anna Ka Bazaar.  However, when I left the States it hadn't happened yet and the fabric didn't make it.  I bought this yellow polyester in Germany with mixed feelings - it was cheap, and pretty, and spotted...but...polyester.  Ugh.  This is the first time I have ever sewn with polyester!  I lined it with cotton to balance out the yuck factor, but I am not sure whether that tilted the scales against me from the beginning.

I recalled that the size 4 Anouk had been just a touch small in the shoulders, and opted for the tank version of this dress.  With that same thought, when I chose the size to cut out, I went by the first set of measurements which pushed me toward a 6, instead of the finished measurements.  This was a huge error, and I'm kind of ashamed of it.  I recently discovered GOMI and feel like I'm one of those bloggers the older, serious sewists are complaining about (even though I have only 14 followers, and half of you are my best friends, and I love you all) because I am composing cheap fashion, and I am sure that I don't iron anything enough.

So, more about Chloe.  Construction is not challenging, including the fake welt pockets.  The instructions have you put the pieces together with the zip first, but I wanted to try the Cambie method so I put the zip in last.  With the Cambie method you really have to get the zipper against the seam allowance and then trim the extra seam allowance away, but I was pretty satisfied with how it came out.  I got lazy and just folded and sewed the armholes instead of using a facing, because at that point I knew the dress didn't fit and it was a challenge to finish it.


These pictures remind me that I need to start doing a swayback alteration.  I think I'm finally ready to take that step!  For some reason, although I have known for a long time that I need to do it, the swayback alteration has felt too difficult to actually attempt. 

Also, it's been awhile, somehow, since I've put in a non-invisible zipper.  It ends up that although I don't have trouble with the zip, I can't ever (and have never) escape the bubble at the bottom of the zip.  How to fix?

As you can see, the dress does not fit at all.  And I will admit that I am not going to try to size it down to fit (unfortunately I don't have any friends bigger than me that I can pass it on to!)  This has turned out disappointing as I was so very excited about Chloe, and in the end let down enough that it will be a long time until I try one again, but Chloe does have some features that make it interesting to try again - it has pockets!  And the panels provide some interesting opportunity to mix and match contrasting fabrics (I think many have done this.)  It's fully lined, which is now almost one of my criteria before making anything.   I am starting to push my summery projects (shock!) towards the spring, and I am slowly losing the need to sew every single pattern that my eye falls on.  Hopefully this means something crazy like a maturation of my sewing, but it's too early to tell.


Wednesday, 17 December 2014

Deer and Doe Plantain dress

I promise this is my last Plantain to show you!
I have all this cotton stretch fabric from the 1euro/kg bin in Milano.  I am sure it's mostly cotton and have no idea what else, maybe some creepy polyester and a decent amount of stretch.  It has decent recovery and is the same on both sides.  I thought a cozy Plantain dress would be just the thing.  I drew the curved line out for about 20 cm to lengthen the shirt into a dress, and didn't make any other pattern alterations.  It's a size 38, as before.


There's not a lot to say about such a simple modification.  It took about 2 hours to sew, if not less.  It's a bit more shapeless than I expected, but a good lounge dress, which was the main goal.  I still have a lot of dresses to sew from my New Zealand (!) backlog, and it's demoralising to sew things I can't wear.  I'm struggling with that lately, since I have a work uniform now, and a 1 minute commute to work.  The only time I need clothing is for lounging, or doing sports.  My tendency to make lists of sewing projects and have all the fabric ready ahead of time is a liability right now, as I feel obligated to complete the list even when the projects are kind of obsolete ideas.

How to keep sewing totally fresh and present?  How to avoid being overwhelmed by AMAZING new patterns and fabrics the minute I discover them?  I am still constantly tempted by new dresses.