Monday, 16 July 2018

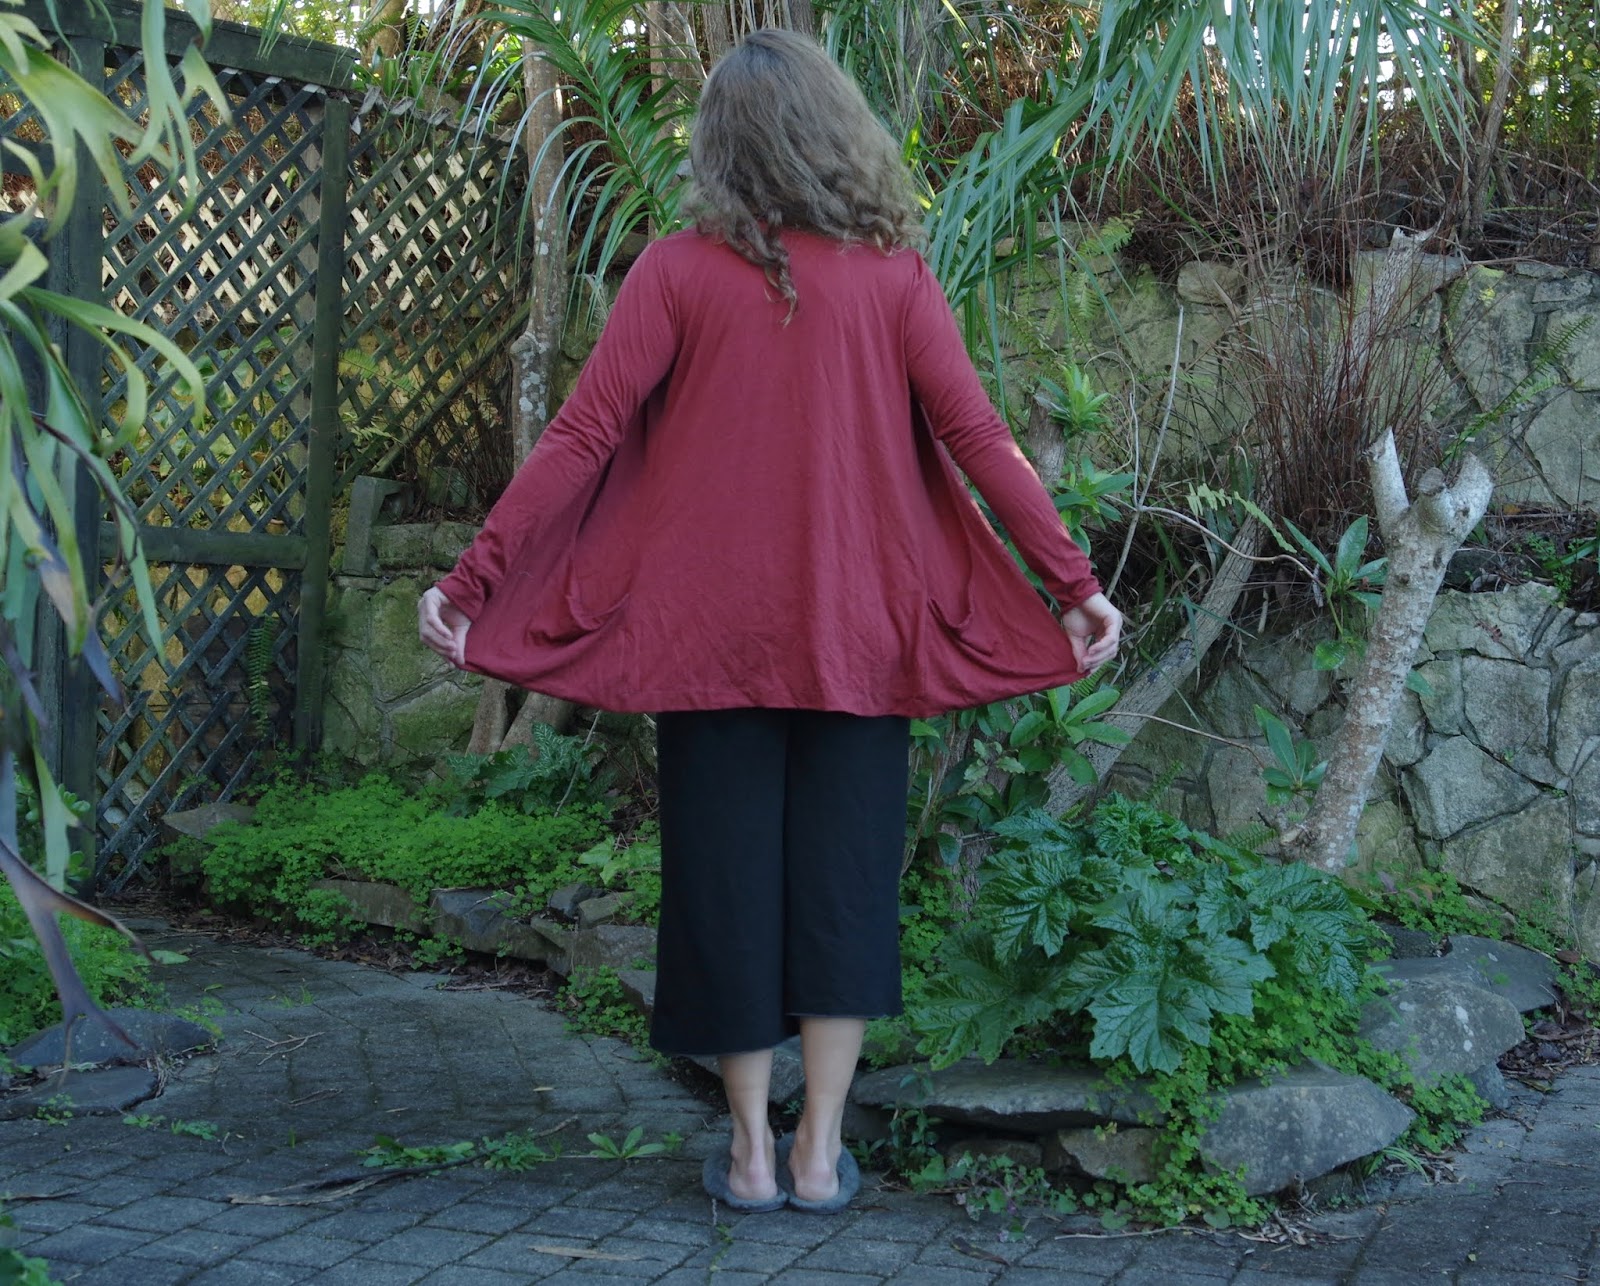
Jalie 3248 - Drop pocket Cardigan

This pattern was totally a spontaneous make.  My sewing friend Tessa has just Discovered Jalie, as one does.  So I have Rediscovered Jalie!  I was browsing something and this pattern totally caught my eye because of the crazy pocket action.  I bought it pretty much that minute, printed it within the day at the print shop, and started sewing with a piece of fabric that I had been planning to use for a tshirt.

This was a much better idea than yet another merino tshirt!  The fabric is from Merino Heaven - my name for a cluster of shops in Otara in south Auckland.  Merino in this little cul-de-sac goes for about 8 dollars/meter, making it worth the helldrive to Auckland.

I cut a size R based on my measurements.  I am happy with this size. I am a bust 32 and waist 27, but with wide shoulders and a muscular back and upper arms.

I read through a few reviews, but there are a LOT of reviews, and most of them are the annoying type that just say they love the pattern and it's so cool and they want to make 5 more.  So I didn't read too many and I didn't think too far ahead and I didn't consider shortening the pattern.

The instructions are sufficient but not wordy.  Construction is ingenious.  I do not recommend sewing this on a normal machine, as I did.  I think too many of the seams need to stretch well, and of course I used a straight stitch.  I have indeed discovered the uses of a zig zag but I still don't always feel like it's as strong.  Since in the front you functionally have 4 layers of fabric, a lot of weight hangs on your stitching.

I lost the very first piece - the neck binding, and made another one from whatever was handy, and now I really like the contrast.

This took two separate sewing episodes, but mainly because on night shift I sometimes sew when I should be sleeping and I was smart enough to stop before I made any mistakes.  I wore it to work right after finishing it.

What people didn't bother to mention in those reviews: this cardigan covers your back very fully.  It does have slim fitted sleeves that will go well over a tank top but not a tshirt.  And the front goes to about the nipple line.  You could certainly pull the front more closely together, but that's not how it hangs - it's made to hang open and the pockets are quite far away from center.  My instinct is that it should be lots shorter so that I can easily access and put things in the pockets.  However I see that the line of the cardigan looks good long.  If I made it again I'd be tempted to shorten it.  As it is, I wouldn't put heavy things in the pockets because they seem far away, like the entire cardi half would then pull away from my body and things would fall out of the pockets.  But they are spacious.


Everyone else really likes it on me.  I have been on the fence about it.  But I do like the look and I think it will go with a lot of my wardrobe.  

Monday, 9 July 2018

Halfmoon Atelier Summer Jumpsuit Tofo

I was a pattern tester for this pattern, which is the most intricate that Meghann Halfmoon has put out so far.  Here is the pattern - there's a discount on until 9 July.

It was a really fun surprise to make up the jumpsuit.  Initially I was suspicious because things without straps don't generally fit me.  Unlike everyone else my high bust is larger than my full bust, but it's because of my back muscles.  Everything usually just falls down.

The jumpsuit does have straps, which go on with buttons and can be adjusted in length or crossed in the back.  I didn't put the straps on because I didn't have access to a buttonholer at the right moment!  The top has a yoke front which comes up quite high, gathers below the yoke and a bloused shape.  The back has a facing with 2" elastic in it, which creates the pull that holds the bodice on and is really secure due to the high front.  The pockets are generous and there is a tie belt with belt loops which I suppose is all optional if you wanted to skip that part.

I cut a size 3 which has been consistent for me across all of Halfmoon Atelier patterns.  I think that if you are long waisted you might want to lengthen the drop in the crotch, because it fit me perfectly.  On basically all RTW the crotch is way too low for me.  The bodice fit really well and bloused nicely, so yet again if you have a long torso you might want to lengthen it.  The bodice is pretty adjustable, in the sense that you can wear it higher or lower as you desire but I preferred to have the yoke up high to give me a feeling of security.

The fabric is rayon which was perfect - drapey but well behaved.


yay i match the balcony!

This was a really exciting pattern to see come together!  Since the temperatures here have dropped I might not be wearing it until spring but it's the first strapless item I think I've ever considered wearing out of the house, and the instructions were meticulous.  The aesthetic is unique and fun and I'm already thinking of making a top using this pattern.  

Wednesday, 4 July 2018

Halfmoon Atelier basic bikini Well's Bay, pattern testing & results

It's finally here!  The Well's Bikini pattern is out.  You can get a discount if you buy it in the next week.

I'm not sure how other people go about pattern testing.  I find it somewhat stressful because you are sewing with a deadline, and also very educational because it pushes me to make one item multiple times and focus on how to make it well.  I love the aesthetic behind Halfmoon Atelier and getting the chance to watch it develop and see behind the scenes.  I was really pleased when I realised that I had enough access to sewing machines to be able to test this bikini - and since I'm surfing I really tested these bikinis a lot!  They've been worn weekly for months now and are still holding up.

My first version is a size 3, which matches my measurements (33-27-37), with a size 4 front bodice.  Anyone with a chest larger than a B cup should probably size up just the front bodice piece.  I found the bottoms to fit perfectly with no adjustments, and they are my favourites of all the bikini bottoms I've sewn.  The clean finish is puzzling the first time around - I think a little video might be made to help out with that - but it's really worth it.  In terms of sewing the bottom without a serger, it works out fine using a zig zag, except on the waistband piece.  Just using one waistband piece and folding it over is better because then there isn't a horizontal seam at the waist which can pull.  I luckily had access to a serger and so I tested this on various seams, first straight stitching and then serging the edges for support.  The seam of the two waistbands for the reversible version is a weak point if you can't serge it.


The top is super minimal.  It's important to pay attention to the length of the shoulder straps to ensure they suit you as they are not adjustable once you sew them in.  Other than that it's a pretty easy make!  I surfed in this right away and found it comfortable under a wetsuit.  My general requirements of swimwear is that it's minimal, doesn't have underwires or things that stick out, and looks ok under clothes.  Other people probably have different requirements...I do not (often) swim, and I very seldom sit on beaches or lounge about in my togs.  This top would probably hold up for swimming but I haven't tested it in rough surf.

For my second one I went ahead with some changes.  I made it halter neck, and I added elastic just above the bottom SA of the flowered side only for the front bodice.  An option to add elastic has now been provided and it does increase the security of the top - you can now add elastic both above and below the bust, but I only put it in the bottom of the suit under the bust.  (I made a third version with the elastic but it looks JUST LIKE THE FIRST ONE so I won't bore you.)  I was not planning to ever reverse it so I also just used the one waistband instead of two, so I could sew the entire bottom on a normal sewing machine.


 I don't like the halter neck version as well.  I find that it compresses my chest a lot more and somehow has less boob room.  The pull from the halter doesn't balance the back tie quite as nicely.  I also discovered that the single foldover waistband ended up lower, possibly because I overlocked the double waistband and therefore used less than a 5/8" seam allowance. 

Fabric:  I did indeed have enough confidence to go right ahead with this Liberty of London swimsuit fabric, from The Fabric Store.  It's great.  The honeycomb coloured lining that I got to use with it is very tacky and malleable and generally crap to sew, but feels good on.  The black lining is stuff I've bought online and have had for awhile and is extremely solid, slippery and dense.  I expected the black/dark suit to be tighter, but it's not - the material of the pink suit really sticks to me nicely. In fact I don't love my changes.  I don't think I would make the halter neck again.

This pattern was made to be minimal and not require special supplies.  That's why you can use strips of the fabric itself instead of elastic, and the back ties.  But since I surf all winter, including at times when I can't feel my hands afterwards, I plan to use swimsuit clips for this suit in future to make it easier to untie.

All versions of the suit that I tested were active tester versions, and some very small changes have been made since then including increasing the coverage of the bum a bit, and lengthening the shoulder straps.  I had such a fun time testing this suit and I'm pretty happy with my new collection.  I've been wearing them 3-4 days a week while surfing since I started pattern testing in March, and can just say that it is really better to use an overlocker, but if you don't have one, then use a strong zig-zag.  Stitches that I couldn't support with an overlocker have definitely pulled and snapped with time.

The bottom comes with the option to make knickers as well and I'm sure I'll do that eventually, because I really love the fit.

Monday, 2 July 2018

still knitting: Patterned legwarmers in Outlaw Vanitas

I had my eye on this pattern ages ago when I was living in Flagstaff and bought the yarn there.  Weirdly the instructions for the cast on convinced me that I didn't know how to do it, and that held me back for a solid year before I discovered the cast on she meant is the normal one I always do. 

It is a free pattern on Ravelry. (here)
I finally started knitting them over Christmas.  But the yarn was too pretty and I didn't think it suited them so I frogged. (You can see that one over on Ravelry if you are curious.)

Only after a bit did I realise my endless stash of Outlaw Vanitas DK was here to save the day.  It suited them perfectly.  The first legwarmer took a long time and I kept losing grasp of the pattern.  Because it's full of holes anyway you really can't tell if they are in the right place, and that realisation was what kept me going.  I knew I'd love them even if they weren't perfect, and that's a good motivation.


I knitted them one set of repeats shorter than the pattern recommended as I figured that was about how I wanted them. 

The second legwarmer went really fast! 
I used the needles recommended by the pattern and was happy with the results; the whole matter took about 1.25 skeins of the endless yarn. 

I have recently decided to knit more.  Partly because my lifestyle is likely to be increasingly unstable for awhile and I can't take sewing with me, but also because I have a new Life Goal which is to make the Rose Cardigan.  Naturally, I have built up a 10 project queue of the Things to Learn before I am ready to tackle the cardi.  Yes I know I could just dive in and go for it but I feel like my knitting tolerance is low and my frustration builds really easily when things don't work out.  I've tried really hard in the past year to build up my skills in slow steps so I'll keep doing that.

Wednesday, 27 June 2018

Sew Liberated Arenite Pants in washed silk

I was inspired yet again by instagram.  I saw these posted by@threadbeargarments
and immediately learned how to save posts just so I could savor that perfect picture.  These turned into number 4 on my trouser tour of autumn.

Love: the droopy pockets but the way they still leave a hip line.  And the huge amount of fabric around the hips!  They looked so comfortable, and yet because of the line of the ankle and the pocket, they still show shape.  How inventive!  

I bought the fabric specifically for them at The Fabric Store in Auckland.  We discussed various options but the assumption was that in a pair of pants with a lot of volume, this lightweight washed silk would be great because it wouldn't make the pants too heavy, and it wouldn't be see-through when gathered around the waist.  It was very expensive and a bit painful to buy 4 meters of fabric since I totally generally assume I can make everything out of 2 meters.

Well, in this case I could have.  I had just about 2 meters of fabric left over.  I'm sure I can find something to do with sand coloured washed silk but I was disturbed that the pattern could be so off regarding fabric requirements.

I made a size 4 by my measurements. 

Of all 4 trousers that I have made: Calyer, Esther, Persephone and Arenite, these had the least exacting instructions.  Of course, it's still pretty exacting to have to flat fell front seams...so they took a day of work.  Because of the flat felling, I would prioritise using a fabric that will behave and won't go off grain too much while you cut and sew.  Unless of course you decide not to do the flat fells.  Other that that they were a relatively fast sew.  Until the end.


Bad instructions regarding the cuffs.  I was using the 2" elastic version for the waistband and the cuffs.  I got the waistband on ok without big surprises.  But the cuffs are supposed to be loose, yet the designer says she measured her elastic at 8".  So when I measured 12" in order to have a loose cuff, I estimated down a bit assuming I must be wrong.  The problem is that the cuff needs to be so loose that it doesn't catch anywhere on your calf.  These pants are also really short!  I mean, I'm 5'4" and the pants pull. So the cuffs now are too tight and they catch on the back of my calves, which pulls the entire pants downwards.  The fabric, which was not nearly as billowy and as *much* as I anticipated, feels very fragile compared to the pull from these 2" elastic cuffs.

I thought about this some more - if you wear these low on your hips you wouldn't have that problem.  That's for people with skinny legs.  I dislike a low crotch so my tendency was for the waistband to fall over my belly button.   


The pockets: are fine, but are not nearly as big and deep as I thought they would be.  Things don't fall out though.

Also a bit of bad timing - the sewing machine I am using does not have a removable bottom.  So sewing those cuffs at all was total torture because I couldn't get them on the machine as a round object and just sew along.  I was indeed ready to give up but I soldiered on.

In the end I'm disappointed in the Arenite pattern.  I like the pants themselves but I expected something with a lot more fabric in the general crotch and hip area.  They actually don't gather so very much.  Clearly I could size up and see if that gave me the anticipated volume.  But in my size, I would have preferred a much heavier fabric so the pants would feel more substantial - silk twill or rayon, not washed silk.  When wearing the pants I am pretty happy with them, except from the pull from the ankles.  Sometime far in the future I might redo the cuffs.  I recommend thinking about your lower calf measurement rather than your ankle measurement when you cut the elastic for the cuff, because that's where you get movement in the pants - as the cuff can shift to give you room for things like bending over...


Monday, 25 June 2018

Persephone pants by Anna Allen patterns

I hopped on this bandwagon right after I discovered the pattern via Sophie (@adaspragg) on Instagram.  I had no idea if I would find it totally too crazy or really fun.  I also explored the phenomenon that is Kamm pants because I was out of that loop too.

I made a size 4, which fit my measurements exactly: 27-37.  I have seen since then that many people are sizing down to truly get the snug hip fit, and I could do that, but I do also really like how comfortable they are as is.  I don't have much room in the hips, but the high waist and loose fit below the butt mean there is so much space to move and bend - really the sad bit is just that they are a little too long to bicycle in (I tried.  Snapped threads.  No holes, luckily.)

The fabric is a somewhat lightweight, but stiff linen blend with a bunch of lurex in it, creating delightful iridescence when I move.  It is probably too light for this pattern and does leave me with terrible panty lines.  I have worn the pants a bunch and found them so comfortable that I will probably make another pair and choose a heavier fabric the second time around.  The problem with using a fabric that feels, in my head, like wild crazy rainbow iridescence is that these feel to me a bit like disco pants.  I don't think they are quite so out there, style-wise, as I feel they are.  But I feel like I'm really pushing the edge of fashion when I wear them, which makes me think my next pair need to be really toned down.  


Um, except that I have one meter of Hermes green cotton velvet.  It's a wide meter.  The pieces fit...so...I might have to do that next.


The instructions are impeccable.  The button fly creates a beautiful amazing clean finish with none of the ragged uncertainty that arises at the bottom of a zip fly.  (or is that just me?)  I LOVE the button fly.  I followed every bit of the instructions including the totally ridiculous belt loops because wtf belt loops?  I hate belts.

After washing:


It took one sewing day, meaning a full day with coffee breaks.  They fit perfectly, as I said.  Except.  They are too high.  I mean, they are in close relationship with my ribs.  After wearing them, the fabric has accordioned down the top about 2 inches to try to all sit at my waist.  (Yes I know I could iron them but I'm never going to.)  I find the pockets are flat against my hips which makes them functionally pretty useless.  I don't really want pocket contents bruising my hipbones.  So on the next (velvet!) version I plan to take 1" out of the top part of the waist and not put in the pockets.  Or belt loops.  I thought of using the crotch lengthen shorten line but I want to take away the height nearer the waist - I'm still thinking this through, so we shall see what happens!