Tuesday, 28 August 2018

Sandal making with Shoe Camaraderie

I did this course in April but for some reason took ages to get nice photos.  Literally the minute my sandals had cured, the warm weather went away and never came back.

Lisa runs the workshops out of Brisbane but has them in various cities.  When I signed up for the course I was struggling to make any long term plans and booking this one month in advance was the riskiest move I could think of!  Here is her website.

The class size is pretty small and Lisa requested that we make measurements of our feet and choose a style ahead of time. We had flexibility to change out minds, and I did - opting for multiple straps instead of a single slide. 

We started by gluing the pigskin to the underpiece of the foot. 
Then we built our straps which takes ages and lots of trying on. 
Once I had my straps half done, the sandal wouldn't fit onto the plastic shoe model anymore so I had to just hold them.


I hadn't meant to make the easiest sandals in the class, but my three straps were really straightforward so I had lots of time sitting around while the other class members went through the long process of getting the leather bits trimmed and glued in place. 

Then we glued on the bottoms - Lisa cut the edges so we wouldn't mess up. 
After that, we applied a nice supportive rand, which makes it look very professional.


Finally the heels!

Because of all the trying on, of course the pigskin lining of my shoes was already a bit dirty...


I like these sandals. It is cool to have something you made yourself. The shoemaking process, it ends up, is really straightforward, not unlike sewing.  It mainly just includes different supplies and different tools.

But they aren't broken in yet so I don't know if they will become comfortable as the leather stretches. I also think that technically, the pigskin sole should have been larger - these were prepared ahead of time by Lisa according to our foot measurements.  They were exactly the size of my feet.  Well, my foot is wider above its base and so I think about 2-3 mm extra room is necessary for comfort - as it is, my actual foot and step is onto the edges of the sandal because they are cut so precisely to the line of the bottom of my foot.  They have not been comfortable to wear.

It would be interesting to do a course elsewhere and see how someone else's teaching and supplies compare. 

Also - my class was the last one where we used leather bottoms for the sandals - Lisa was planning to go to rubber soles after this.  So I had the soles rubbered by my local shoe guy. 

Friday, 10 August 2018

Colette Mabel miniskirt x 2 and a bonus tank top comparison

I went to work one nightshift, and in the middle of the shift realised the thing missing in my life was a miniskirt.  The Mabel Colette miniskirt.  Because, like everyone before me, though I know I could draft my own or muddle my way through, the interests of a well fitting miniskirt in 1 hour flat trumped any interest I had in the self-drafting learning process.

So two days later I had two miniskirts!


First of all I took that pattern home and decided to sew the size S, based on my hips.  I shortened the version B by a few inches - making it 19" long.  The version A is supposed to be 17" long.  I removed the kick pleat.  This is a lovely purple stretchy merino with a funny texture that almost looks felted, which I have had around for a long time and really adore.  I'm happy to finally be using it.  The skirt turned out way too big though, hanging on my hips pretty loosely.  I also used a zig zag that was pretty loose and so my stitches came undone rapidly.


Version two is view A, size XS, and in a funny merino that is smooth faced with a terry like interior that is scratchy.  It is a blend with some poly and retains its shape well.  It is the perfect miniskirt, and I'm hoping the scratchiness will go away with time.  Despite that I have worn it a lot!  I've worn the other one too even though it was big, but I plan to take off the waistband and take it in when I can get to the overlocker.


The pictures of Skirt 2 are with a bonus Deer & Doe Givre tank top.  It's a size 36 at the bust sloping to a 38, and other than needing a little scoop out of the armscye it fits great.  I was comparing it to the Patterns for Pirates Essential tank, though I know they have quite different shapes I was curious how they would compare.

The P4P top is a size XS.  I shortened it by 2 inches but kept the shape of the hem.  I made these two tops too fast, and so the hems are not done very well.  That bothers me a lot.  The shape of this tank top is otherwise really nice and I like the racerback.  Probably it's good to have both some racerback tops and some plain tops in my wardrobe.  I also find the Mission Maxi tanktop to be a perennial favourite (that's what the jungle plant top is, above). 


Thursday, 9 August 2018

A Review: True Bias Hudson Pants

My sewing friend Tessa went crazy over Hudson pants.  I tried to talk her into making Anima pants since I am basically a specialist in them (see here, here and here) but something about the Hudsons had stuck in her brain.  So of course like the lemming I am, I decided that I had to do a comparison test and see why Hudsons have gained a cult following.

Size 4.  (I'm 5'4" and 27-37)
Fabric is Charley Harper organic cotton from Ugh Spotlight, and the bands are a merino wool ribbing blend by Helmut Lang which I bought at The Fabric Store last year, snagging the last 30 cm piece.  That's why I went with such a dull main colour - I wanted something to go with these bands, and the organic cotton is so soft and snuggly.

Well, making the pants is nothing special.
I skipped the drawstring.


Overall, I found the fit very different from the Anima pants.


The Anima: is very long; I remove 10 cm usually.  It has a fake fly (wtf?) and the pockets are the usual fold over types which can bag out.  They are pretty high waisted and are otherwise loose around the bum and hips.  In the Anima I've been making the XXS though it took a few tries to settle on that and stick with it.  I have permanently removed a 1 cm wedge from the front waist which makes them slope down so the waist isn't quite so high, but I'd call the fit easy - they go pretty close to the natural waist.

The Hudson: has a modern, low waistband which is thicker than the Anima.  It sits low.  I would be tempted to add an inch of raise to the back to accommodate my amazingly muscular bum.  In fact I could add that inch all the way around.  The pockets are lovely and I like the addition of the bands on the pockets, which adds heft.  The pocket construction means they won't flap out.  The fit through the bum and hips is snug.  These are short.  I didn't modify the length at all, and I think I'd prefer another inch of raise...because they are so short that if I bend my knee I feel it pulling down the waistband.

I think the Anima pants are awesome loungepants.  But the Hudson pants actually if you made them in the right material, you could wear out of the house.  I guess that's why they've become so popular.  I like them despite my dedication to Papercut patterns. 

Saturday, 21 July 2018

Ida clutch binge

Around the time I discovered Kylie and the Machine and her lovely cheeky labels, I found her free Ida pattern and printed it out.  I needed something to push me to actually start making bags instead of clothes...and the Ogden-Ida swap was just the thing, so I signed up!

While I was in Seattle I picked up a pigskin at MacPherson's, the local leather dealer (sorry vegans!)  I wanted something lightweight and easy to work with and this colour just sang to me so I went with it.  It was about 30 dollars for the skin.

From it I got 3 Ida clutches, one oversized Ida yarn-bag, and one undersized Ida wallet-purse.
I have some scraps left over but I have no more desire to sew pigskin for awhile.
However I think I have mastered this pattern!!

The clutches went to: my Ida Ogden exchange partner, my sewing friend Tessa, and my friend Tina who was leaving on a trip to Switzerland. 


Learning curve pearls:
snaps are fine, but magnetic snaps are better.  A normal snap pulls at the fabric itself when you try to open it.  The magnetic snaps are easy to apply and don't pull as hard.  I had 2 magnetic snaps from Seattle and bought normal snaps locally to compare.

All the zips were from my stash, and the normal sized clutch zips were all Riri from Switzerland so they are really nice.  Pretty amazing that I had that many zips in the right size!  The big one for me was a plastic one, and the small one for me I actually bought in order to choose nice coordinating colours.

The scales-lining is Liberty tana lawn.  I forget the name.

This was really fun and such a great way to get comfortable making bags.  To make the yarn bag I basically did an FBA.  I cut the pattern in half both horizontally and vertically and increased each one and then smoothed out the curve of the top.    I added a little strap made of a single strip of pigskin.  I should have taken that more seriously and either quilted it or doubled it because it feels frail compared to the rest of the bag - but I've been using this for my knitting and adoring it so much that when pink hazel sold out of bags in 3 minutes at her last upload, I didn't cry.  Luckily knitting is not heavy so I think the strap will be fine.

When I made my little wallet purse I shrunk it with a similar technique to the knitting bag.  I decreased the height and I shrunk it across, but a few inches away from midline, and then redrew the curve back up to the same centre point.  And this time I braided a strap for it.
I also added a totally ridiculous piece of coral elastic to double around it.  It's totally for fashion but I like the additional tactile element.  


My wallet purse.  It fits a wallet, phone and keys


Monday, 16 July 2018

Jalie 3248 - Drop pocket Cardigan

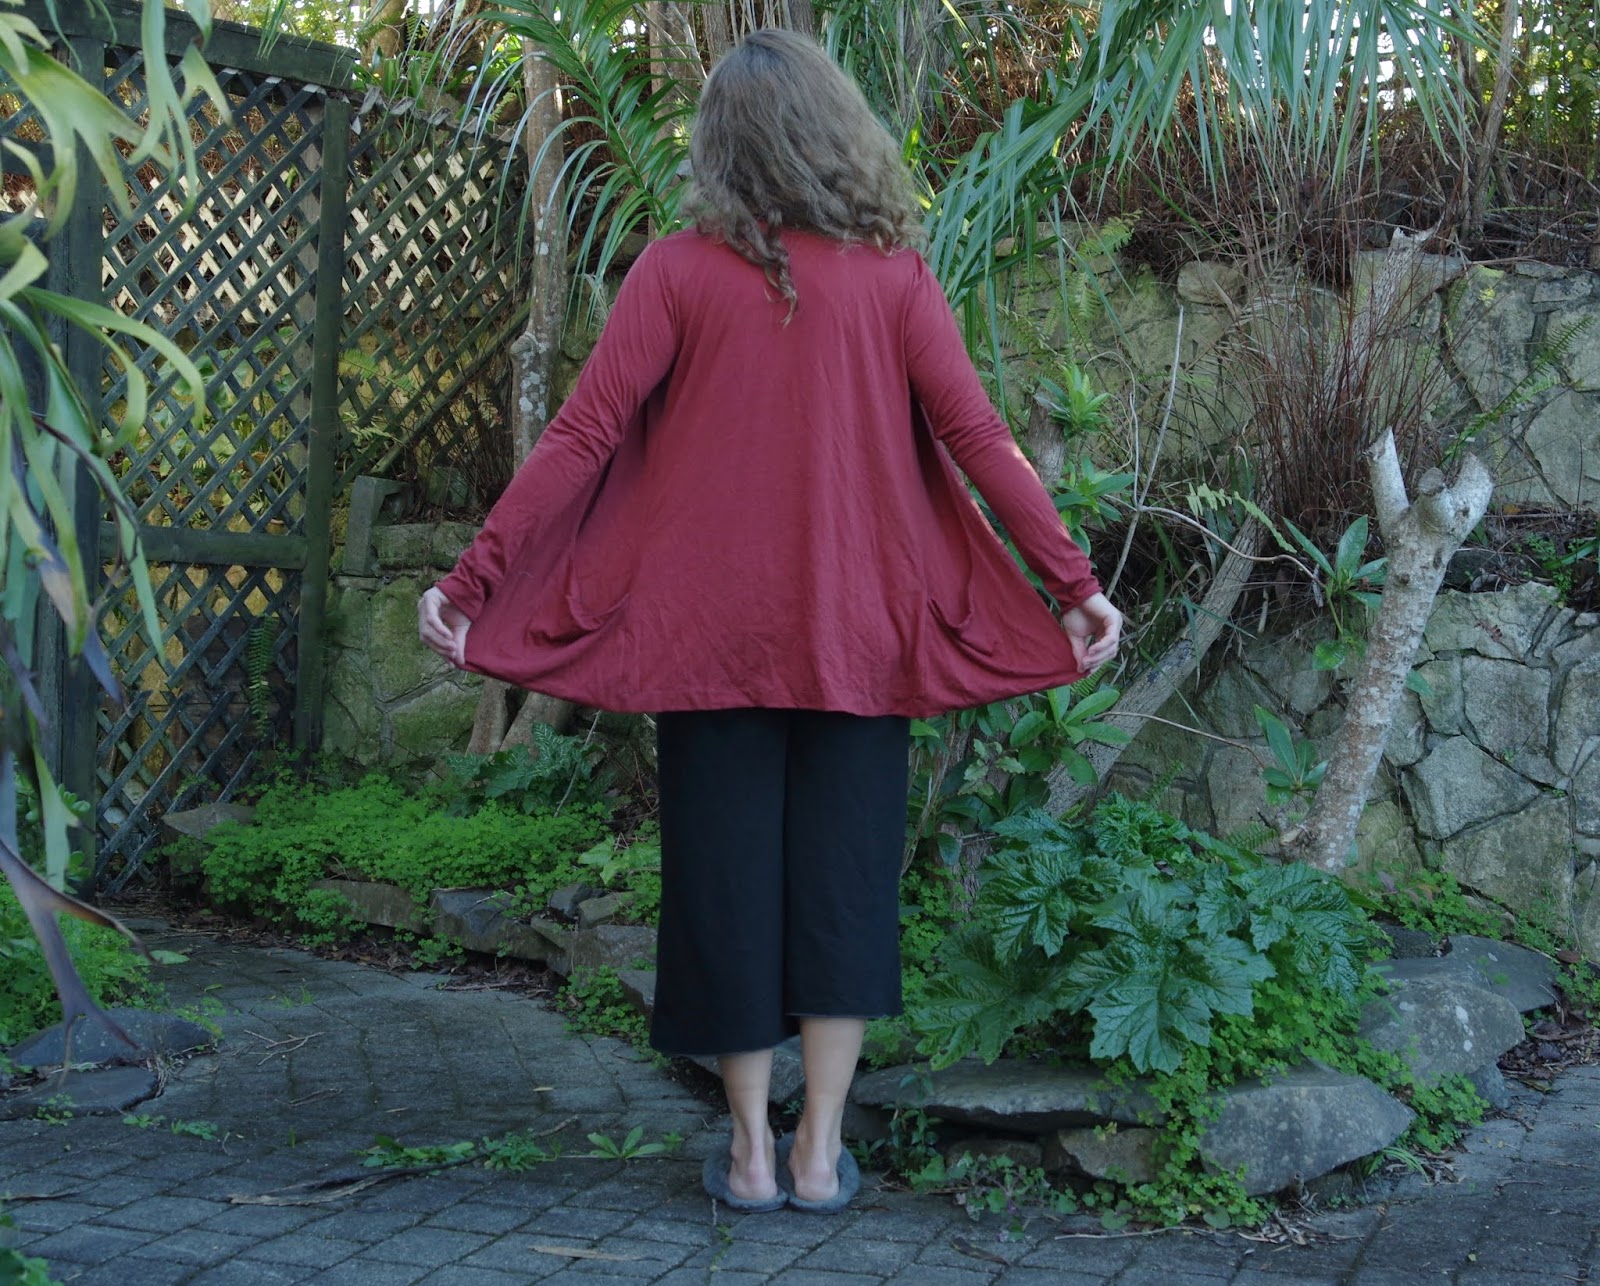
This pattern was totally a spontaneous make.  My sewing friend Tessa has just Discovered Jalie, as one does.  So I have Rediscovered Jalie!  I was browsing something and this pattern totally caught my eye because of the crazy pocket action.  I bought it pretty much that minute, printed it within the day at the print shop, and started sewing with a piece of fabric that I had been planning to use for a tshirt.

This was a much better idea than yet another merino tshirt!  The fabric is from Merino Heaven - my name for a cluster of shops in Otara in south Auckland.  Merino in this little cul-de-sac goes for about 8 dollars/meter, making it worth the helldrive to Auckland.

I cut a size R based on my measurements.  I am happy with this size. I am a bust 32 and waist 27, but with wide shoulders and a muscular back and upper arms.

I read through a few reviews, but there are a LOT of reviews, and most of them are the annoying type that just say they love the pattern and it's so cool and they want to make 5 more.  So I didn't read too many and I didn't think too far ahead and I didn't consider shortening the pattern.

The instructions are sufficient but not wordy.  Construction is ingenious.  I do not recommend sewing this on a normal machine, as I did.  I think too many of the seams need to stretch well, and of course I used a straight stitch.  I have indeed discovered the uses of a zig zag but I still don't always feel like it's as strong.  Since in the front you functionally have 4 layers of fabric, a lot of weight hangs on your stitching.

I lost the very first piece - the neck binding, and made another one from whatever was handy, and now I really like the contrast.

This took two separate sewing episodes, but mainly because on night shift I sometimes sew when I should be sleeping and I was smart enough to stop before I made any mistakes.  I wore it to work right after finishing it.

What people didn't bother to mention in those reviews: this cardigan covers your back very fully.  It does have slim fitted sleeves that will go well over a tank top but not a tshirt.  And the front goes to about the nipple line.  You could certainly pull the front more closely together, but that's not how it hangs - it's made to hang open and the pockets are quite far away from center.  My instinct is that it should be lots shorter so that I can easily access and put things in the pockets.  However I see that the line of the cardigan looks good long.  If I made it again I'd be tempted to shorten it.  As it is, I wouldn't put heavy things in the pockets because they seem far away, like the entire cardi half would then pull away from my body and things would fall out of the pockets.  But they are spacious.


Everyone else really likes it on me.  I have been on the fence about it.  But I do like the look and I think it will go with a lot of my wardrobe.