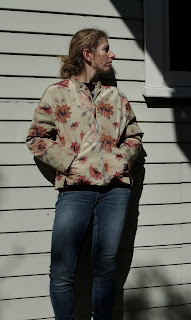
Haha you might have the idea already that this jacket wasn't a walk in the park.
So let's start with some pictures and you can judge afterwards if it was worth it for me, and if your experience might be better.
Disclosure: I bought this pattern the minute I saw it. I loved the lines of the jacket and the pockets and the little irregularity at the hem. It was my introduction to this pattern company, and though I found the description a bit bubbly, I LOVED this jacket and was keen to try it. Then I followed Made It patterns on Insta and they posted a sweatshirt in February - which I also LOVED - and said it was in testing...soon to come out...well, it's September now and not a hint of said pattern. In the intervening months I got really pissed off at this cheater advertising. I also had the pattern printed in March, after I bought the fabric, I read the instructions, and I was so put off by them that this project turned into something I wanted, but that felt like an onerous burden to sew.
***
Fabric: Outer is a heavy nylon rainproof from The Fabric Store, lining is a polyestery acetate from same. I bought these specifically for this pattern (rare event!!) which is why I was willing to go with the poly. The colour matched, and I realised I wouldn't hesitate to buy a sports jacket with a lining like that. I think the fabric requirements listed are good, because I didn't have much left over.
I made size 10 based on the size chart. I'm happy with the fit.
I had the A0s printed. It's quite a few sheets, and no attempt was made to save paper. There's a lot of empty space on those sheets. The pieces are labelled pretty clearly and it's nice to have the interfacing pattern pieces to cut out as they are funny shaped. However, in this relatively firm, tight woven fabric with zero stretch, I think the interfacing was not important.
It took me probably 10 hours to sew this jacket. Or two sewing days. It wasn't a super long process even though it was frustrating. Also, I made the version without a hood, and the hooded version might skip the drama of the collar.
So, the instructions. I hated them. I hated them more than I've ever hated sewing instructions, but I needed them, because there were a lot of quirks to this original pattern, and unfortunately, though the instructions reminded you to use a 3/8" SA with *every single step* and told you to fuckin take a dance after putting in a zip (I'll dance on my own time, bitch) they didn't actually provide much help when it came to places where you needed help. I think partly it's because there are photos instead of diagrams, so it was often unclear where you were sewing up to when turning a corner. There are a number of corners. I had trouble with the corners of the collar, and even more trouble with the corners at the hem. I came into additional difficulty (which was my fault) because my lining being acetate was shifty while cutting and so on one side it didn't match correctly.
In the end, my collar isn't perfect. The instructions have you sew the sides first, then the back. I had to ease in the back SO HARD it was almost too much for my fabric. I think it might work better to do the back collar first, and then the sides after. It also seems to depend on having a fabric that will stretch a little bit so you can ease it in.
The zip installation for the pockets is irritating, but the results are fine. The center zip is put in as usual so no surprises there, and there are good measurements telling you where the zip should start and stop. My fronts line up beautifully with minimal effort.
The hem instructions are so puzzling you have to read them three times, throw them away (but don't throw your computer across the room), and then look at what's in front of you and just figure it out that way. On the side where my lining wasn't stretched I got a good result in the end. On the side where my lining was cut slightly off, my result wasn't great and that side crumples up a tiny from pulling. I'm not entirely sure what I did to get there.
You are told to tack a bunch of spots down on the inside before you shut the bagged lining (also you only need to leave one sleeve open, not both) - I didn't do the tacks and it means the sleeves keep pulling out, as the lining is too long for them to stay put. Other than that this jacket looks pretty amazing as long as you aren't a sewist staring at my collar.
So your choice: ten hours of torture, for a really great wearable jacket! Also, in case it wasn't clear, I couldn't stand the chirpy instructions with their reminders to take breaks and endless cheerleading. However, it's a selling point and I'm sure some people would LOVE instructions like that. The drafting of the dropped sleeves is lazy (to get them to fit, you don't sew the top SA of the bodice, so that it can stretch open when you sew them on.) But the drafting overall and the attention to drafting detail is excellent. I think this is a good pattern with clever options and detailing, though I'll most likely keep a wide berth from this company in future.


No comments:
Post a Comment